I love this boho Christmas Tree ornament that I made and I’m sharing how you can make one for yourself!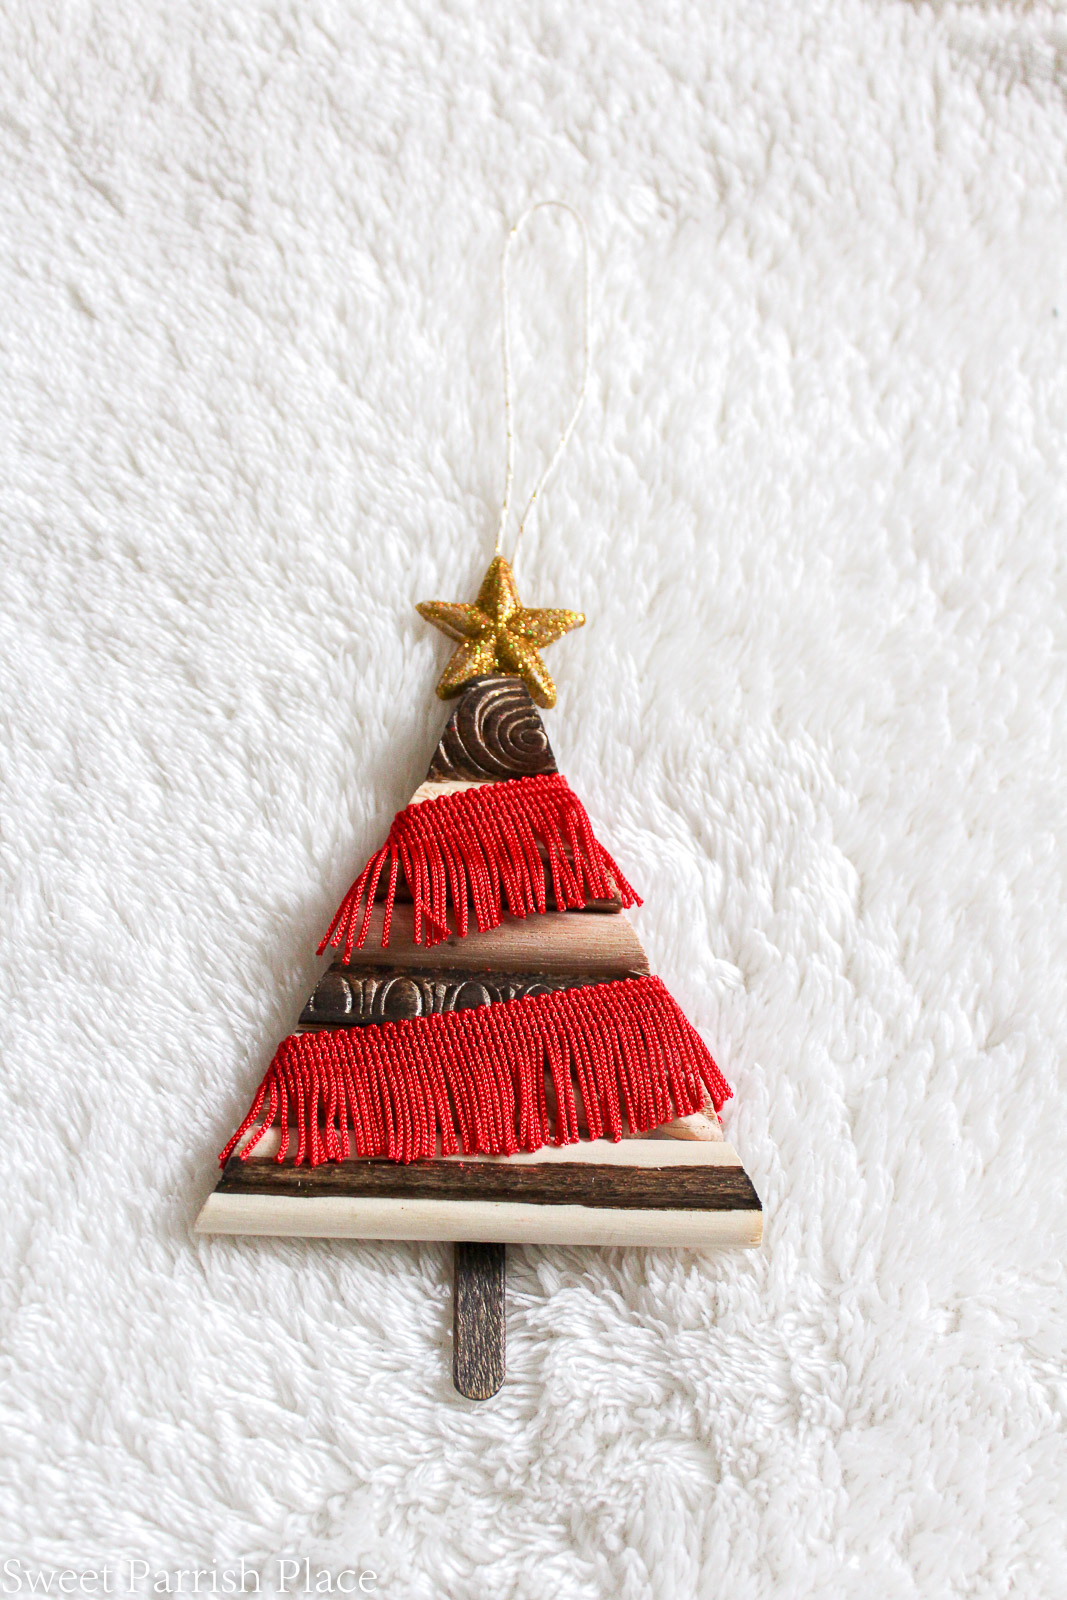
Welcome to the 2017 Ornament Exchange & Blog Hop! This year, there are 47 amazing bloggers participating in the exchange. The rules of the challenge were simple: be partnered with a fellow blogger, create a handmade ornament for $15 or under, create a tutorial, and ship the ornament off to a new home!

Meet the 2017 Ornament Exchange Hosts
Erlene ⋅ My Pinterventures Kim · Made In A Day Amanda · Domestically Creative
Shirley · Intelligent Domesticatons Michelle · Our Crafty Mom
Beverly · Across the Blvd. Christene · Key to Inspiration Pili ⋅ My Sweet Things
Nicki · Sweet Parrish Place Megan · C’mon Get Crafty
Hilary · Raising Fairies and Knights Emily · Two Purple Couches
Tina · One Crafty Mess Marie · The Inspiration Vault Debra · Shoppe No. 5
Trisha · Rosewood and Grace Jeanie · Create and Babble Katrin ⋅ Kreativ K
Terri · Christmas Tree Lane Maureen · Red Cottage Chronicles
Toni ⋅ Small Home Soul Ula ⋅ Lulu & Celeste Sue ⋅ A Purdy Little House
Pamela · Home On The Corner Lorelai ⋅ Life with Lorelai Cindy ⋅ DIY Beautify
Debbie ⋅ Tweak and Style Stephanie ⋅ Swoodson Says Chelc ⋅ Inside the Fox Den
Susan ⋅ Super Mom – No Cape! Molly ⋅ Just a Little Creativity
Roseann ⋅ This Autoimmune Life Angela ⋅ Simply Beautiful by Angela
Vicki and Jenn ⋅ 2 Bees in a Pod Joanne ⋅ Our Unschooling Journey
Tylynn ⋅ Bitterroot DIY Sam ⋅ Raggedy Bits Mary ⋅ The Boondocks Blog
Cyn ⋅ Creative Cynchronicity Dione ⋅ Clever Chameleon Quilting
Erica ⋅ Erica Ever After Chelsea ⋅ Love Paper Crafts Evija ⋅ From Evija with Love
Samantha ⋅ Little Bits of Home Hope ⋅ Hopes Crafty Niche Anne ⋅ Orange Bettie
Pam · P.S. I Love You Crafts
My partner for this ornament exchange was the sweet Susan from Super Mom No Cape. She and her husband have traveled extensively and lived in so many places, including Canada, where they currently live, Maui, Florida, Georgia, and Nebraska. She loves sewing and crafting, and uses traditional Christmas colors in her decor. Susan sent me the cutest Sawtooth Star with Applique Center Ornaments, and she went above and beyond by making three of them! Overachiever much, Susan? I kid, I kid. I love them, and I think I am going to incorporate them into a garland or something instead of to put on the tree. They deserve a spotlight! She also sent a sweet card and a nail file, and made me feel like an underachiever because I barely got her ornament into a box. Ha!
I do have a good excuse, Susan. I have been hard at work on the One Room Challenge, which was pushed back to a week later than it was supposed to b, which screwed up my editorial calendar, which is why this post is a day late, but hopefully not a dollar short. I just didn’t want to have two great posts going live in the same day. But Susan, seriously, I hope you know how thoughtful and sweet your gifts were, and much appreciated. And please know that mine was made with love, and much Aloha!
Since Susan is a wordly woman, I decided to shake up her Christmas tree a little bit with this boho Christmas tree ornament. I love the way it turned out, and I do hope she can appreciate the slightly non traditional Christmas touch in her decor this year. In fact, I love it so much that I am considering making a few more for my own tree! Now, let’s get on with this and let me share my boho Christmas tree ornament with you, and show you how I made it! I am so in love with this ornament!

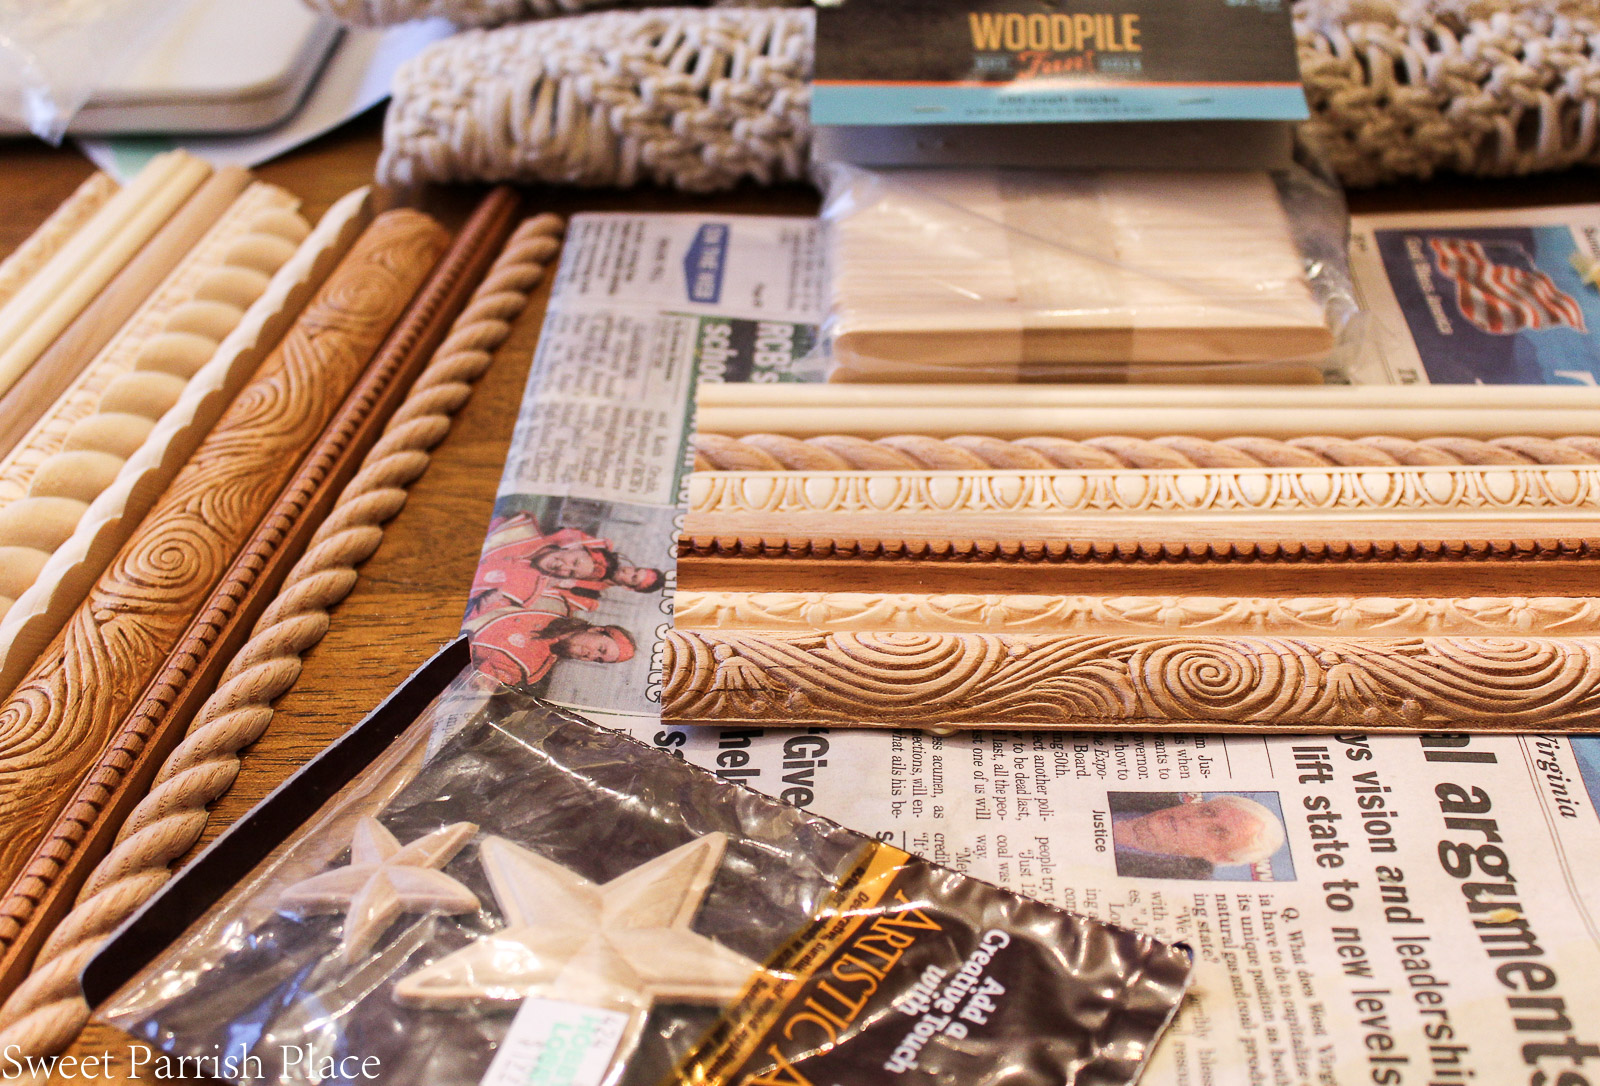
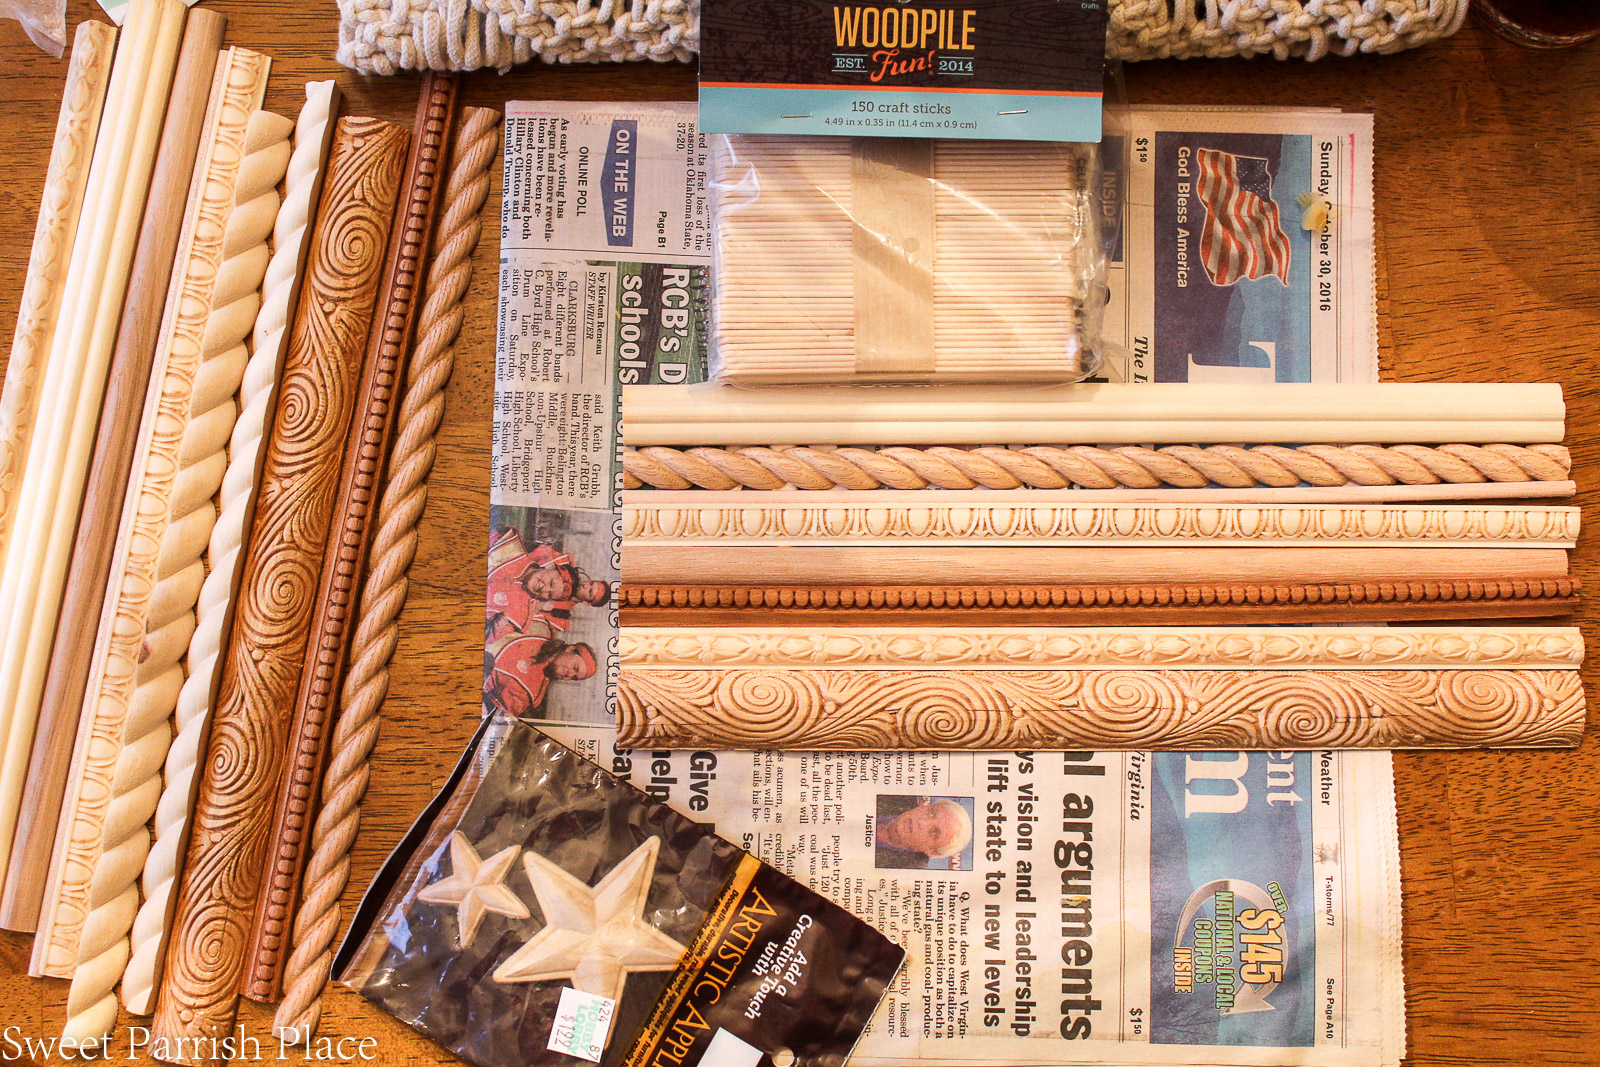
Please note: Some of the links in this post are affiliate links, which allows me to make a small commission from your purchase, but your purchase price stays the same. Supplies:
Miter saw ( You can probably use a hand saw, but I used my miter saw)
Scissors
Painters tape
How to Make a Boho Christmas Tree ornament
Start by determining how large you want the Christmas tree shape to be
Lay out one wooden craft stick and cover it with your wood glue
Choose the pieces of wood mouldings you want to use and lay them in a straight line on top of the craft stick you just glued. You can see in the photos above and below how I laid mine out. You will want to make sure you are allowing enough room on each side of the wood craft stick to make a triangle the size of the tree you want.
In these photos, the moulding is already glued to the craft stick that is behind it. I glued them over at the far edge of the mouldings because I wanted to have as much left over moulding as possible in case I wanted to make more of these ornaments.
Once all the mouldings are glued to the craft stick, allow time for them to dry thoroughly.
After the glue is thoroughly dry, you will be able to pick up the mouldings and the craft stick and turn them over so you are now looking at the back. Use painters tape to tape off the shape of the Christmas tree. You will use this tape as a guide when you are cutting the trim. Make sure it is even on both sides.

Use a saw to cut right along where you taped off. I used a miter saw because I could cut it all at once. That seemed much simpler to me. However, you can probably use a hand saw, it will just take you longer. It took me only a few seconds to cut this whole tree with my miter saw.
After the cuts are made, you will need to use your sanding pad to sand down the edges until they are smooth.
Next you will glue on two more craft sticks to the back, right on top of the existing craft stick. You will glue one at the bottom to make a little tree trunk, and you will glue one sticking up at the top so that you have something to glue your star onto.
Next, you will paint your star with mod podge, and then sprinkle your gold glitter all over it until it is covered nicely, and then allow that to dry for a few minutes. After it is dry, you can glue it onto the craft stick at the top of your tree.
The next thing I did was use my wood stain marker to color onto some of the mouldings to make them various colors. The mouldings are already varied in color, so I just chose a few pieces to paint. Do this according to your liking.

After everything is nice and dry, it is time to add your fringe to the tree. This is my favorite part! You will need to trim your fringe down to be short enough to fit onto your little tree. Just use scissors and trim it to your desired length.

Next, you will use your hot glue gun to glue the trim onto the tree. I wrapped my trim around to the back of the tree, and then just put a little dab of hot glue on each end and glued the trim onto the wood. You can see that I did mine in a diagonal. I love this little red fringe so much that I am planning to use the full size version on my own tree this year!
The last thing you will need to do is add something to hang the ornament with. I used gold glittered bakers twine and just hot glued it to the back of the star to make a little loop to hang it with.

You are now finished with your boho Christmas tree. Now go hang it up somewhere and admire your handy work! Just like I did! I just love this little boho Christmas tree so much. I am going to make as many more as I can to use on my own tree. I hope my partner Susan will enjoy this little ornament as much as I do!

I hope you enjoyed my boho Christmas Tree ornament and tutorial today. And don’t forget to check out all of the other handmade ornaments below. There are so many adorable ornaments, and they all are sharing tutorials for how to make them yourself. I think handmade ornaments add so much character to a home at Christmas time, don’t you?
If You Like it, Then You Wanna Put a Pin on it!

FIND ALL 47 HANDMADE ORNAMENT TUTORIALS BELOW AND SHARE YOURS TOO! Use Hashtag #2017OrnamentExchange so we can see your creations on social media.
Do you have champagne taste and a tiny budget too?
Love fashion, DIY, crafting, all things vintage and thrifty? Stick with me, I’ve got you covered!
Sign up to get my posts delivered to your inbox here
Follow me here:
Facebook / Twitter / Instagram / Pinterest / Bloglovin / Google + Stumbleupon
![]()
You may also like:
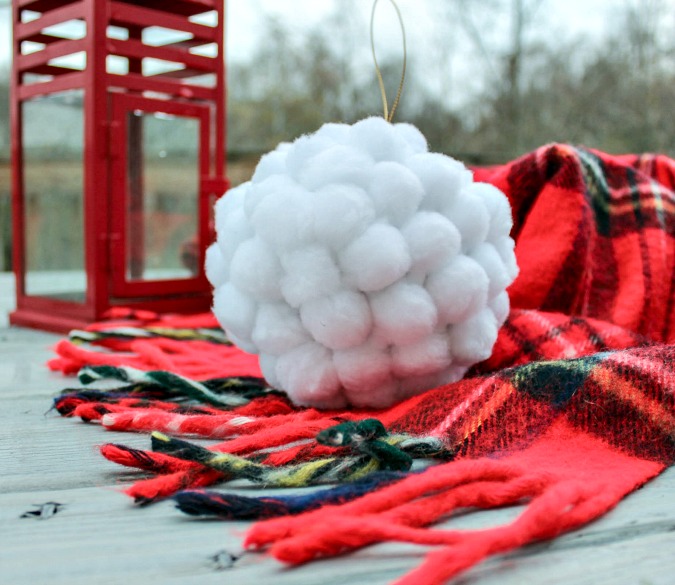
Pom pom snowball Christmas Ornament
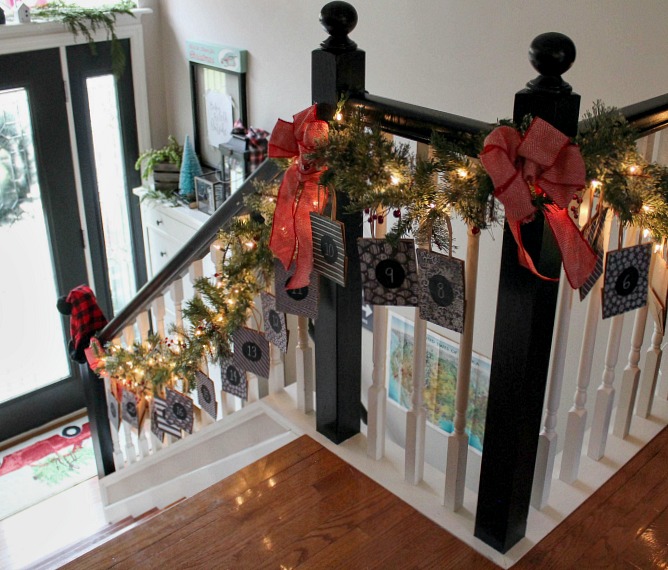
Christmas Advent Calendar Garland
Oh Nicki!!! You don’t know how perfect the ornament you made me is. One of my husband’s hobbies is wood working, so an ornament made of different pieces of molding will definitely have a place on our tree this year and in the years to come. Thank you so much… I can’t wait for it to arrive in the mail!
Sending you hugs!
Oh yay! I’m so glad to hear this! I was worried it might be a little too boho for your taste. Thanks so much for taking the time to comment! I hope you have a wonderful holiday season.
This is so nice. I love the detail of the different moldings.
Thanks Debra! It is a fun project!
I’m so in love with this! Did you glue the wood trimmings together first or just lay them on top of the craft stick with glue? I want to give this a try 🙂 Thanks so much for sharing your tutorial on the #2017OrnamentExchange.
Thanks so much Erlene! NO, I didn’t glue the trim together, I just glued the trim to the wood stick. It seemed stable enough! Thanks!
This is such a cute and fun ornament. I love the tassels as garland and the different wood trims that make up the ornaments. So adorable. visiting from the Ornament Hop 😀
Toni | Small Home Soul recently posted…Easy Ornament Updates – Make Plain Ornaments Gorgeous
Thanks Toni! I’m so glad you like it!
I love this! Very chic and a cute gift topper and/or ornament. Visiting from Share Your Style.
Thank you Victoria! I want to make some more of them but haven’t gotten around to it yet!
I love the mouldings that you’ve used to make this cute little tree. I’m inspired!
Thanks so much!
Nicki, I love your ornament! I’ve been seeing so many neat Christmas boho ideas this year! Already pinned 🙂 #2017OrnamentExchange
Thanks so much Emily! I had fun with it!
I am a huge fan of Christmas decor and you did such an excellent job with that pretty ornament. Also love the rest of your Christmas home tour. I shared my home decorated for Christmas just last week. I gotta check all the ladies that linked up too.
Welcome by Thursdays and join my linkup each week, come share your latest. Thanks and Have a great weekend!
http://eleganceandmommyhood.blogspot.com/2017/12/thursday-moda-93-mommymini-matching.html
Thanks so much Ada! I will have to check it out!