This shop has been compensated by Collective Bias, Inc. and its advertiser. All opinions are mine alone. #SpringCreations #CollectiveBias

Hey friends! I hope you have had a great week. I just finished up the 2016 work year yesterday, and now I am on a nice 2 month summer break! I have been a little absent from the blog this week because my evenings have been spent at swim meets and making these adorable and charming cottage chic journals to share with you guys! These little journals are just too darn sweet for words, and they would make such a thoughtful gift for lots of different occasions. Think favors for a party, bachelorette gifts, gifts for a women’s group (like the prayer group I attend), wedding shower prizes, the list is endless. And better yet, you can personalize them and decorate them however you want to. I am so in love with these that I don’t think I can part with them, so I might need to make several batches. These journals make a great gift if you want to give something homemade, from the heart, and don’t have a lot of money to spend. And today, I am going to show you how you can make some adorable journals of your own!

Supplies
You can see a picture of the supplies I used for this project in the picture below. Everything I needed for this project, I purchased at Walmart, because it’s pretty safe to say that store has everything, and that is why I love to shop there, it’s usually a one stop shop when they is something I need!
- I chose to use these simple and cheap little notebooks, they are about half the size as a regular notebook, and I think the perfect size for a journal, and something you can easily slide into your bag to take with you.
- I knew I wanted to cover them with pretty paper, and my heart skipped a beat when I found this feminine paper that screams cottage to me! I knew this would be the perfect paper for this project.
- I bought the labels because I love all things chalkboard and thought it would be fun to write different words on them, but the owner could change it to suit her.
- I used the Scotch® Brand Utility Knife, which worked like a dream to help me get precision cuts with the paper.
- Scotch® Brand Double Sided Tape, and Scotch® Brand Clear Glue.
- It is not pictured below, but I also used some burlap tape I found that I thought would look really cute as the binding on the notebooks.

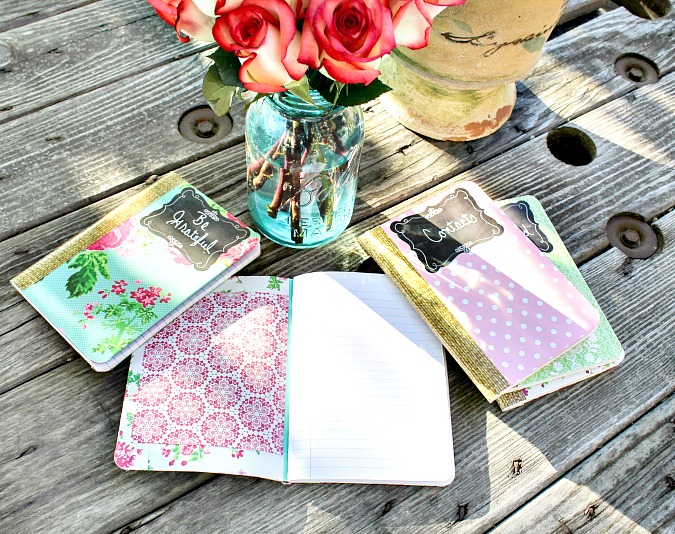
These journals look so sweet just sitting in a stack and they have been around my house all week waiting for this post to go live. But I decided to photograph them outside on my wooden spool patio table because I knew they would look great against the rustic looking wood. The one you see pictured below just happens to be my favorite!

How To Make Them:
I used an 8×10 notepad turned upside down to place underneath of the area where I would be using my utility knife, so as not to damage any surface with my cuts.
- Start by placing the notebook on the paper. Leave about a 1 inch length of paper overlap on each side of your notebook, because you will be folding it over each edge.
- Wrap the paper around the notebook while it is closed, not open. If you look at image one below, you will lie the notebook down on the paper as pictured, and then take the paper to the left of the notebook, and bring it up and over the front of the notebook, leaving a one in overlap on each side. I used a pencil to mark where I needed to make my cuts.
- After the paper is cut to the right size for your notebook, you will then make your cuts for the little details, like the rounded corners, and the binding in the center of the notebook. You can see in image two and three how I made those particular cuts.
- In image 4 , you can see how the paper looks after all of my cuts are made. This was time consuming when I first began the process, and a little bit of trial and error because I was making it up as I went along, but each notebook became easier and faster to cover as I went.
- After you paper is cut properly, you will start adhering it to the notebook. I used my Scotch® Brand Clear Glue and spread it all over the front of the notebook itself, and then precisely placed the paper onto the notebook, being careful to match it up with my cut edges.
- Adhere one side at a time. After the first side is adhered, you will wrap the edges of the paper around to the inside. I used my Scotch® Brand Double Sided Tape. I placed the tape on the paper’s edge and then wrapped it around and adhered it to the inside. Note: since I cut the corners out, once the paper is wrapped around to the inside of your notebook, there will be a small half moon shaped place on the inside corners that will not be covered, so I cut small pieces of paper and glued them in place on the inside corners, because I wanted my journals to be finished inside and out.
- After the first side is adhered and wrapped, repeat the same process on the inside.

The next several pictures will give you a look at what the inside of the notebooks looks like. The paper I purchased was double sided, and there was one design on one side, and a coordinating one on the other. So I just used the opposite side on the inside of my notebooks. I simply cut a piece of paper to fit on the inside of the front and back covers, and used my Scotch® Brand Clear Glue to adhere it. That gave my notebooks a finished look both inside and out.


After the paper was all wrapped and adhered to the notebook, I added a few finishing touches to the outside by placing some of the burlap look tape down the binding. I just cut a piece to size, and laid it down on the table. Next, I laid the binding of the notebook down right in the center of the strip of tape, and then carefully wrapped and pressed it around the front and back of the notebook. And then I added the chalkboard label last. I wrote something different on each one using a chalk marker, but they can easily be erased and changed out to say whatever you choose. And there you have it! The most adorable, charming, cottage chic journals that make such a sweet gift, straight from the heart! This just might be my favorite craft project ever, and I see lots of little journals being made as gifts in my future! My daughter who is in college loves to make hand made gifts for people, especially because she is poor, and she really loved these journals when I showed them to her. I have seen her eyeballing them!

What do you think of my handmade journals? Would you smile if someone made one for you? I know I would!

All of the Scotch® Brand products I used for this project can be found in the crafting aisles at your local Walmart. I love these products! No matter what your crafting needs are, they have a product to fit your project for sure! And although I didn’t use them for this particular project, Command™ Brand products are equally as great! They provide damage free hanging solutions, and I am constantly using them to hang decor on my walls. No nail holes is always a good thing!


I am heading to visit a sweet friend today and spend the night in her newly built home, which I haven’t seen yet. Do you think I should give her one of these journals as a little housewarming gift? Oh no! I don’t know how I am going to part with them! But I think she will really like them too, so I am going to have to take one for her, and I joke, but I am happy to give her a little something handmade!

I hope you have a great weekend friends! If there are any questions I can answer about how to make some of these journals, I am happy to do so in the comments. You can check out plenty more adorable spring crafts by clicking here! I have already checked them out, and my head is spinning with crafty ideas right now. You can also follow this DIY 3M Pinterest Board for some wonderful crafting inspiration!
Do you have champagne taste and a tiny budget like me? Love fashion, DIY, crafting, all things vintage and thrifty? Stick with me, I’ve got you covered!
Sign up to get my posts delivered to your inbox here
Follow me here:

This is where I party:
Monday:
Tuesday:
Wednesday:
Thursday:
Friday:
Saturday:
Sunday:
Monthly Parties:
What a lovely idea!! These would make such lovely gifts! Love all of the paper you chose!
Sam – Raggedy Bits recently posted…How to Paint Thrifted Wooden Trays Farmhouse Style
Thank you so much Sam!
I love these journals. They were my “favorites” pick for Waste Not Wednesday this week.
Ahhh Thanks sooo much! I haven’t been online in awhile!