It’s reveal day for the $100 Room Challenge, and I am loving the new look in this space, come along and see my Farmhouse Bathroom Makeover progress!

Hey friends! Have you been following along so far with my latest $100 Room Challenge makeover? I mentioned back in week 3 that I didn’t think I was going to complete this room in time for reveal day, and sadly, I was right. September turned out to be a busier month than I initially anticipated, so I had to accept that fact that I am not super human. I used my time to concentrate on the most important things I wanted to accomplish in this space, and although it’s not a complete reveal, I feel that I accomplished enough in this room to still give you somewhat of a reveal, so I am happy today to share with you my Farmhouse bathroom makeover progress.

Wanna Catch up with my progress on this challenge? Start from the beginning!
Week 1 | Week 2 | Week 3 | Week 4
Of course, I want to thank the lovely Erin over at Lemons, Lavender, and Laundry for being our lovely host. If you are new to the $100 Room Challenge you can read more about it here. But the basic premise for the challenge is this: you get one month, and $100, to completely makeover one space in your home. I know what you may be thinking… $100 is not a lot of money. Just wait. What you can do with $100 (and a little creativity) will absolutely blow your mind. And if you don’t believe me, just follow along, and click through and see what the other participants are doing for this challenge, and you will see so many great things happening with just a $100 budget.
Farmhouse Bathroom Makeover Progress

Let’s start with a before photo of the sink area in our master bathroom. Two super gawdy mirrors, and a worn looking chocolate brown painted vanity. I disliked the mirrors at first sight, and I had been jonesing to replace them since day one of moving into this house.

And BAM, the after! Ahhh it is just so satisfying to see this side of the bathroom looking completely different! This is just so much more my style. I had a little paint swatch in the color sea salt propped up on the little backsplash ledge in this room since I moved in. And I knew I wanted to use this color somewhere in the room. I debated back and forth for awhile…should I use this color on the walls or the cabinets?
Sea Salt Painted Cabinets

Here’s the same view from when we first moved into the house. So much better, right!?

I ultimately decided to use Sherwin Williams Sea Salt on the cabinets, because our paint color on the walls in the master bedroom, which is Benjamin Moore’s Grey Owl, and it leans the same color as the Sea Salt, Which is weird, because I used it on several walls in our old house and it didn’t lean blue there at all. So it must be something with the lighting in our bedroom.
I love love love the way the cabinets turned out! I also love the contrast of the light colored cabinets with the matte black cabinet handles that I scored from Amazon. In this photo below, you can see on the back wall the paint color that was on these walls from the get go. I plan to paint all four walls the same color that I painted on the sharpie shiplap wall, Bistro White by Behr. I also plan to paint the baseboards a nice bright white.
You can see in this photo that I went ahead and painted the half wall between the toilet and the sink in that color already. I wanted to finish this whole side of the bathroom so that I would have some decent reveal photos to share with you.

This room does not have adequate lighting, and I knew we weren’t going to correct that on a budget of $100. But having this entire wall white has brightened things up already. So I can’t wait to see the entire room white!
One other little thing I managed to check off my list in here is the little wooden rack hanging to the right of the toilet. I found that out thrifting years ago, and I took it down and gave it a fresh coat of linen white chalked spray paint. However, I ran out of paint before I got a good coat on it. But I liked the results the way they were, so I left it, and rehung it.

An check out the before of our little toilet nook. It’s a much more pleasant spot now than it was before, if you can call a toilet area pleasant, hehe!

Sharpie Shiplap Wall
A sharpie shiplap wall was such a budget-friendly way to make an impact in this space. Perfect for the $100 Room Challenge! I actually like it even more than I thought I would! Maybe one day I’ll make this a real shiplap wall, but for now I am quite smitten with these results.
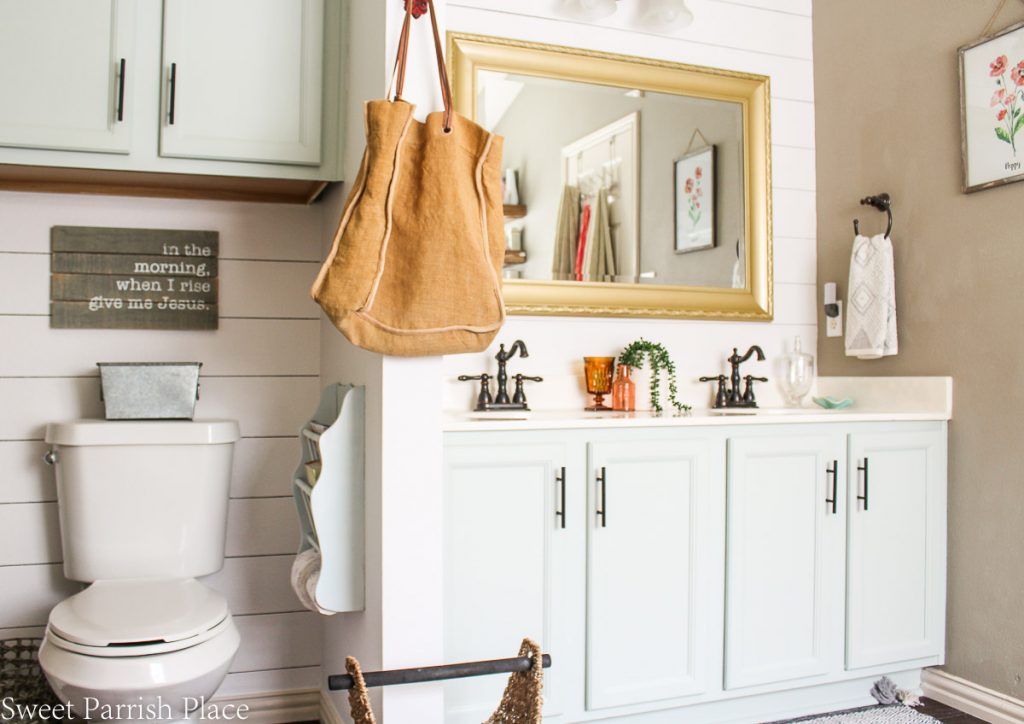
Mirror Makeover
We moved this mirror that we already had into this room for now, and sold the ornate mirrors on Facebook Marketplace. It’s a little small for the area, but It will work just find until I am ready to fork out the cash for a larger mirror. But I do enjoy having one large mirror rather than two, so I will keep just the one mirror, but replace this one with a larger one.

Below was my first attempt at giving this mirror a little makeover. I bought what I though was a gold spray paint, and it turned out to be champagne metallic color. So I repainted it with Rustoleum Pure Gold spray paint, and I am so much more happy with the look now!

Rustic Floating Shelves
I brought these shelves with me when we moved. You may remember these used to hang in our kitchen. I had some different shelves hanging here initially, but I decided to change them out with these, because they didn’t work out in the spot I initially planned to hang them. I am much happier with the look of these, and they will look even better when I paint this wall white. I think I will love the warm wood look against a white backdrop.
I styled the shelves completely with things I already had. A small collection of milk glass, white bath mats, and a few other pretties. The basket underneath the shelves is from Hobby Lobby, and we also have had it since before we moved. When we removed these shelves from our old house, we forgot to remove the hardware they were hung with (which came with the shelves), so we had a really hard time finding a way to hang these.
I finally decided to purchase these L brackets for only $8.21. You can see them only from underneath, but really only if you are really looking for them. I am willing to accept that in order to get these hung, because I love these shelves.

These were the first shelves I had hung here when we moved in. I think the new shelves I hung look much more expensive and finished.


I picked up two new hand towels from World Market that I really love, and they are a nice finishing touch hanging on either side of the sinks.

All of the accessories I used to style the sink are things I already owned and brought in from other spots in the house. I love to play musical chairs with my decor. It’s a great way to add a breathe of fresh air to your decor. Just change up where you place it and how you style it!

I didn’t have a lot of time to shop in September, and I did not end up finding a rug I wanted to use in this space, so I brought in this 4×6 rug that my daughter owns (she recently moved in with us), and I LOVE the way it looks here. But just so you know, had I purchased this for this challenge, it would have broken my budget. But it’s not against the rules to bring things in from other rooms. I must admit though, I love it in here, and I just might splurge and get one for myself, because she will be wanting this one back eventually! I love the colors, the pattern, the tassles, and the texture.

What do you think of this farmhouse bathroom makeover progress so far? I am very happy, and seeing how good it looks so far has given me the inspiration to get it finished up. My goal is to finish it by the end of October, and I will share the full reveal right here on the blog when I did complete this space, I promise!
The Budget
Rustoleum Spray paint in Pure Gold – $6.98
Cabinet Pulls – $9.84 (these pulls came in a pack of 10, and I will only use 1/2 for this project, so saving the rest for a future project)
Paint for vanity– $20.98
Sharpie Paint Marker– $2.98
L-Brackets for Shelves– $8.21
Hand Towels– $20.00
Total So Far – $68.99
For even more bathroom inspiration, check out my Bathroom Pinterest Board here.
Check out my previous $100 Room Challenge Reveals
Guest Bedroom Reveal | Modern Farmhouse Dining Room Reveal | Mudroom Makeover Reveal
Modern Farmhouse Dining Room/Office Reveal
Make sure you check out what the other participants are doing using the link up below.
Do you have champagne taste and a tiny budget too? Love fashion, DIY, crafting, all things vintage and thrifty? Stick with me, I’ve got you covered!
Sign up to get my posts delivered to your inbox here
Follow me here:
Facebook / Twitter / Instagram / Pinterest / Bloglovin / Google +
Shop My Amazon Storefront Here

I love your sharpie shiplap walls and the painted cabinets! Changing the mirror made a huge impact, love it!!
Leslea Ferguson recently posted…Budget Friendly Laundry Room Makeover Reveal – $100 Room Makeover
Nicki,
I love this entire transformation! Amazing details.
I know that you have more projects that you want to complete for this bathroom. But what you have accomplished is so beautiful! Isn’t amazing how small changes can make such a large difference. Well done Nicki!
Jackie @jackiecantblog recently posted…$100 Back Porch Makeover Reveal
You have worked hard on this and it shows, its truly a show piece of a bathroom,
Wow!! This came out amazing!! I am in deep love with the Sea Salt cabinet color. Amazing job girl!
Wow that cabinet color is just everything for me! It looks amazing you did such a great job this season!
I am absolutely LOVING this bathroom makeover (even if you’re not quite done yet). The cabinets look SO pretty, and the Sharpie shiplap walls brighten up the space. You have done an incredible job in here already! Thank you for joining another round of the challenge!
Erin- Lemons, Lavender, & Laundry recently posted…Farmhouse Entry Makeover for $80
I love everything you did even if you weren’t able to finish, but it looks pretty finished to me. Love the cabinet color!