Welcome to part 2 of my cozy and casual Christmas tour, where I’m sharing our kitchen, breakfast room, and living room. Hey friends! Happy Holidays! In typical me fashion, I am a little late bringing you part 2 of our cozy and casual Christmas tour! Why do I always procrastinate these things? Were you able […]
The post Cozy and Casual Christmas Tour | Part 2 appeared first on Sweet Parrish Place.
]]>Welcome to part 2 of my cozy and casual Christmas tour, where I’m sharing our kitchen, breakfast room, and living room.

Hey friends! Happy Holidays! In typical me fashion, I am a little late bringing you part 2 of our cozy and casual Christmas tour! Why do I always procrastinate these things? Were you able to catch the first part of my Christmas tour? If you missed it, you might want to start there. I share our front room and our dining room, and last year those areas in our home were practically empty. This year we have a fully furnished downstairs, and I was so excited to decorate everything and make our home festive for the season/
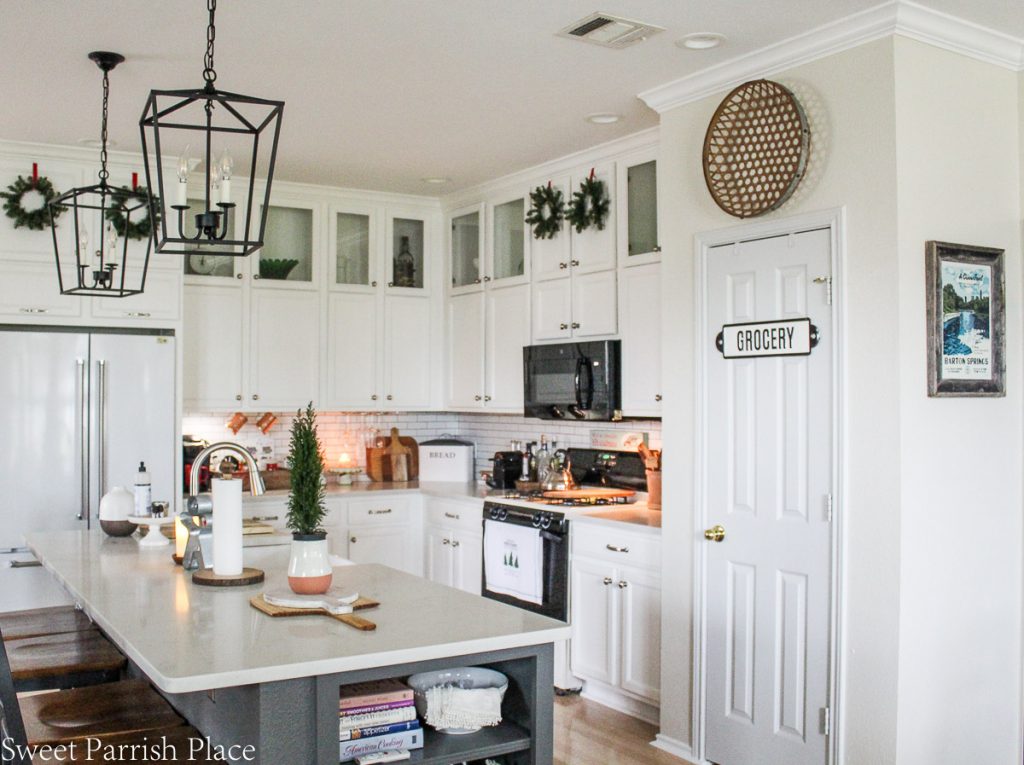
We are starting our tour today in our kitchen. We purchased this home in July of 2019, and the kitchen was our first big renovation. You can read all about our kitchen transformation here. We love our kitchen, it is definitely the main hub in our home. I just love the large island that’s big enough to seat 4 people, and I love how open our downstairs is. When we did this renovation, we only had enough in our budget to replace the refrigerator, but I have my eye on a new dishwasher in 2021!

Our Christmas decor in the kitchen is really so simple! I had originally planned to add small wreaths to all of the upper cabinetry, but I decided to hang them on only the solid wood uppers, and not the glass. I started feeling like all of the wreaths were going to be a little too busy.
I actually made these four simple wreaths using a couple of strands of garland I bought at Target. I literally just cut them to size, and wrapped them into a circle and, using a bit of floral wire, to hold them together. Then I used some simple red ribbon to attach them to the cabinets doors using painters tape on the inside of the door.
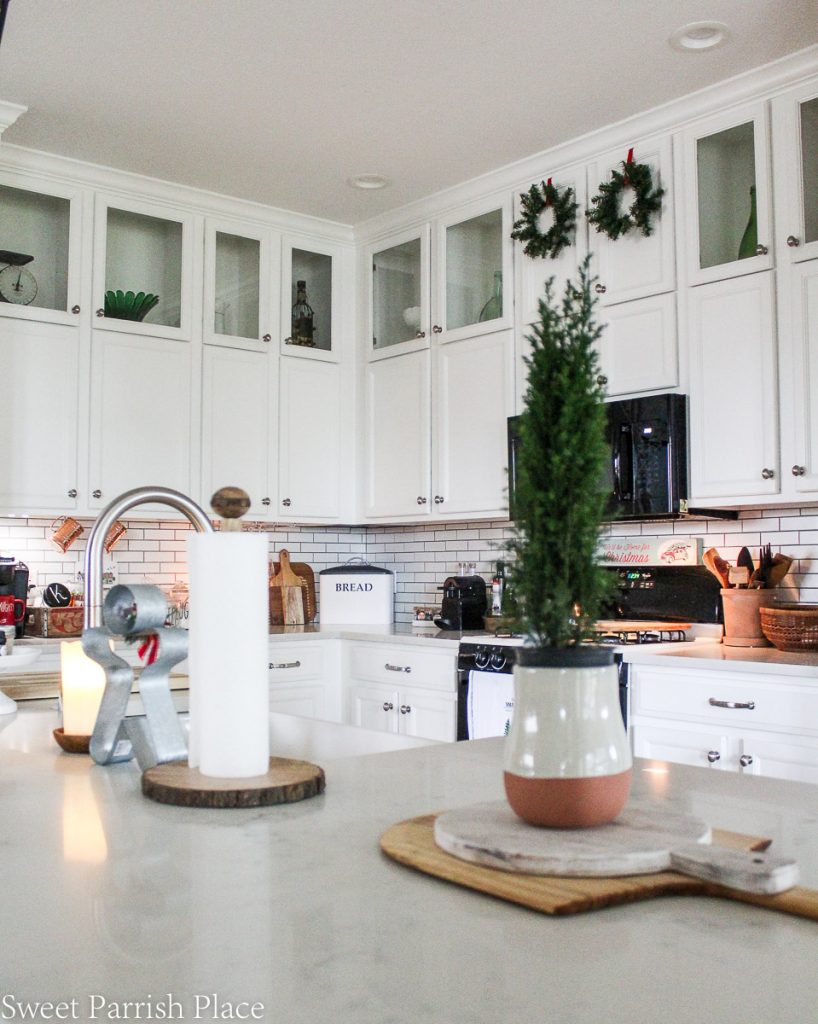
The tiny tree on our kitchen island is real, and I’m trying my best to keep it alive. And I found the most darling giant gingerbread man cookie cutter that fits in perfectly.

Our little breakfast room is right off the kitchen, and we furnished this room with furniture we brought with us from our old house back in WV. Our buffet and our round table fit perfectly in this space.ON the door, I hung a simple flocked wreath, and over the door, a sign made by my aunt and uncle that says God Jul, which is Swedish for Merry Christmas.
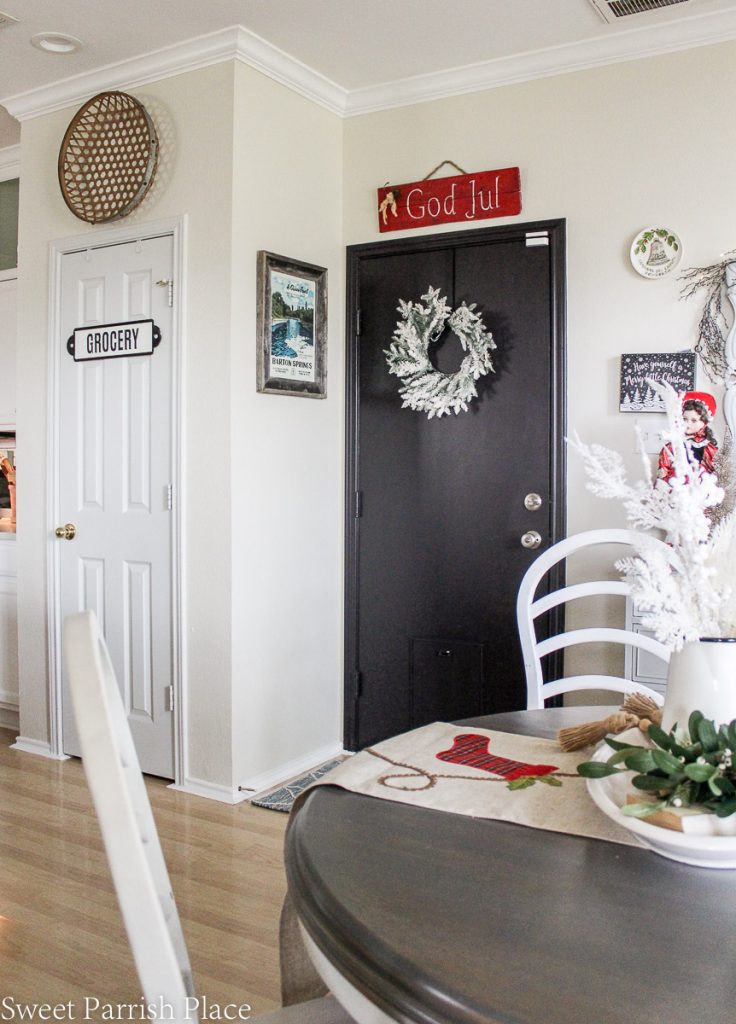
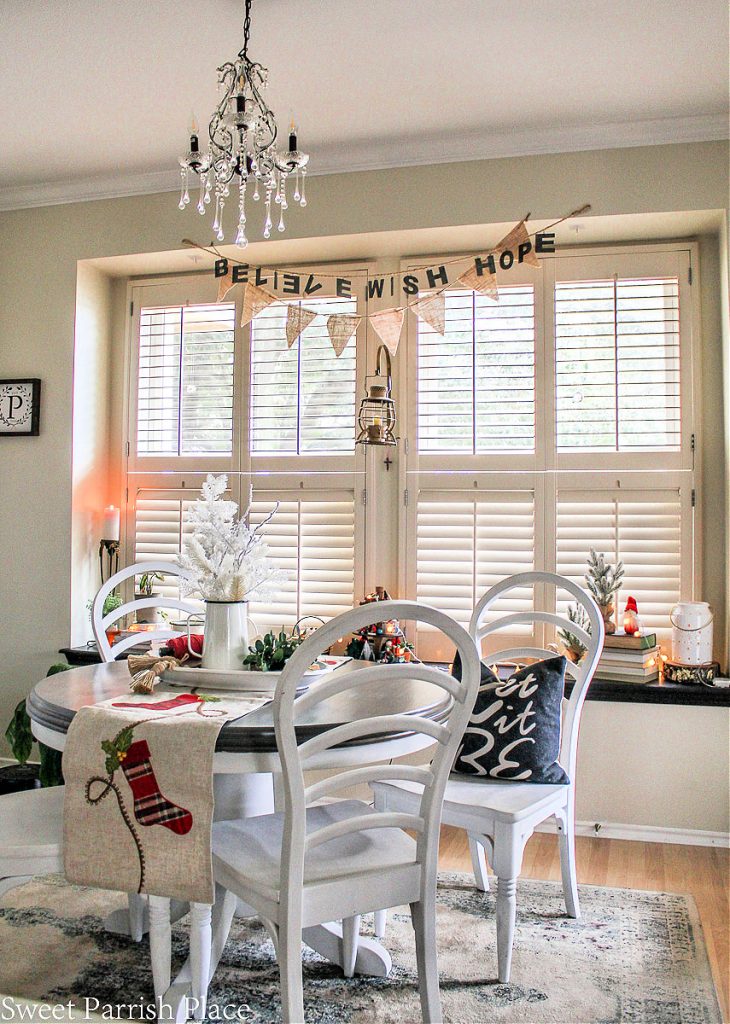
The table and chairs, and the buffet in this room have come a long way. You can read about how I made over the dining table here, and then you can read about the painted buffet here. I like this breakfast room becasue it has great natural light. I layered a couple of different garlands above the window in here
I draped some icy garland atop the antique mirror, and then I brought out this vintage Christmas Doll and she sits atop the buffet.
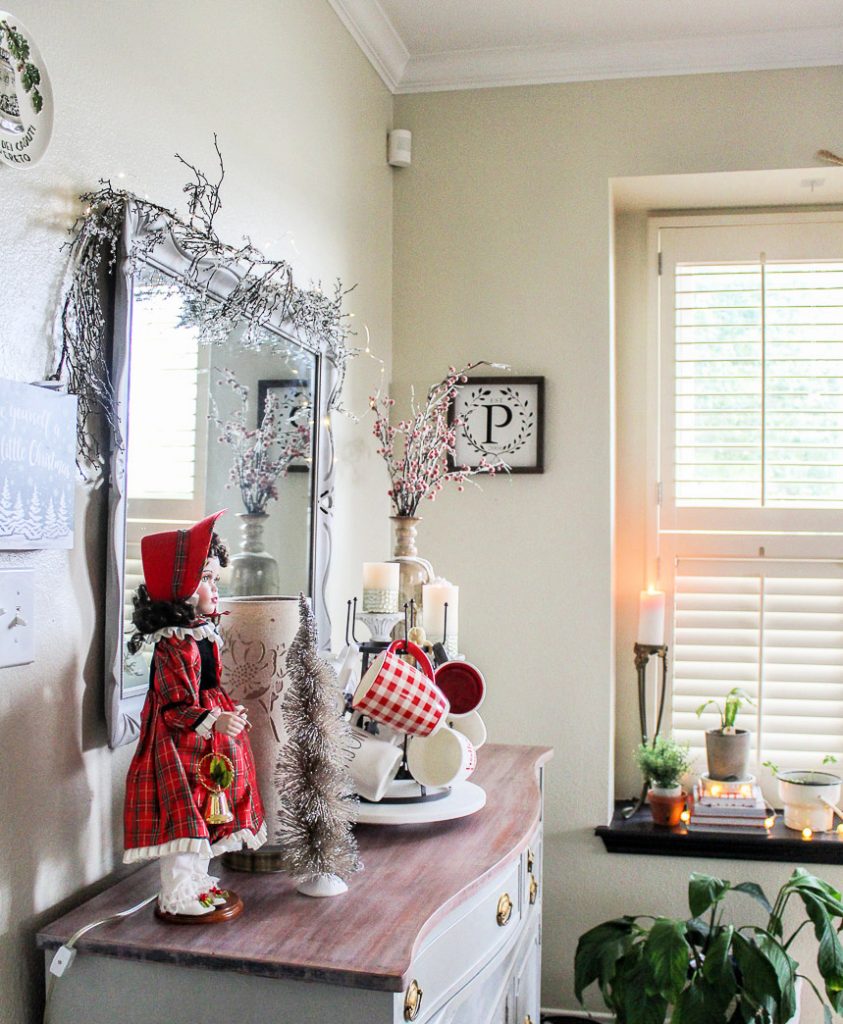
My mug collection used to be in our kitchen, but during Quarantine, our daughter moved in with us, and we needed to make room for her Nespresso. So my mug tree has been playing musical seats around the area. It was sitting in the middle of the table for months, but I wanted to create a pretty centerpiece for on the table for Christmas, so they moved over to the buffet for now.

Check out the details on this vintage doll! I still have the original box she came in! This was a gift to may daughter when she was a tiny girl. And one day when she has her own home, it will go with her. But for now, I enjoy having her around at Christmas!


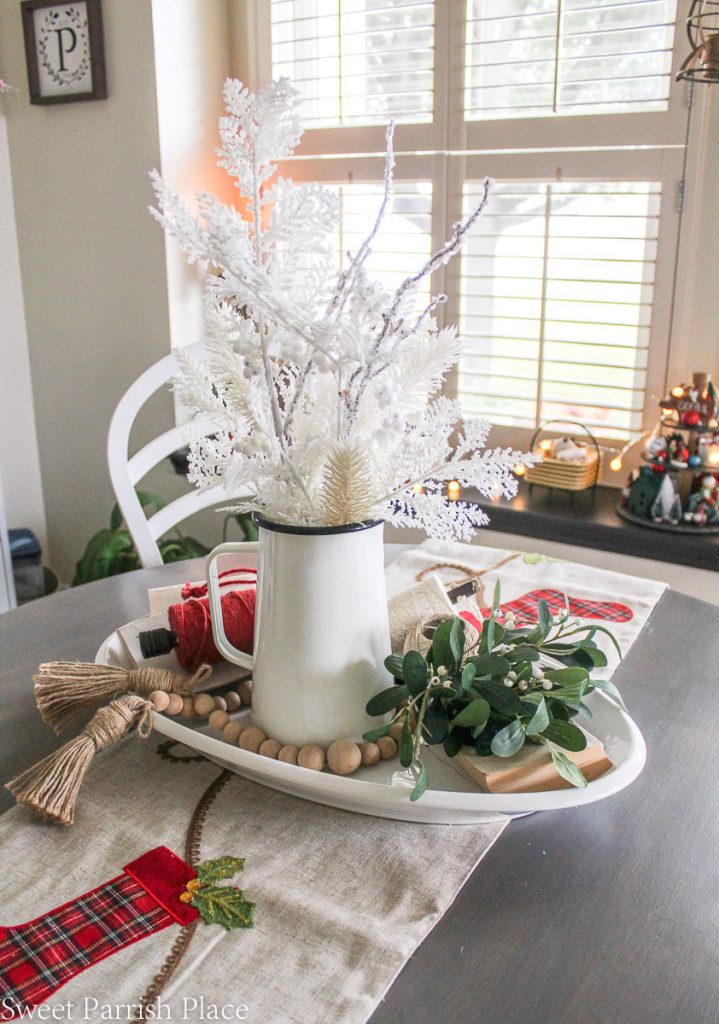
I threw this centerpiece together using things I had lying around, and I love the way it turned out! I have had the snowy branches for a couple of years. There are actually two different arrangements that I combined in my white enamel pitcher. The large white tray is what we use at Thanksgiving for our turkey. I tore the covers off some old paperback books, and added them into the tray with some wood beads, a variety of twine in festive colors, and a sprig of greenery I bought from Target- I believe it was from the Hearth and Hand line.
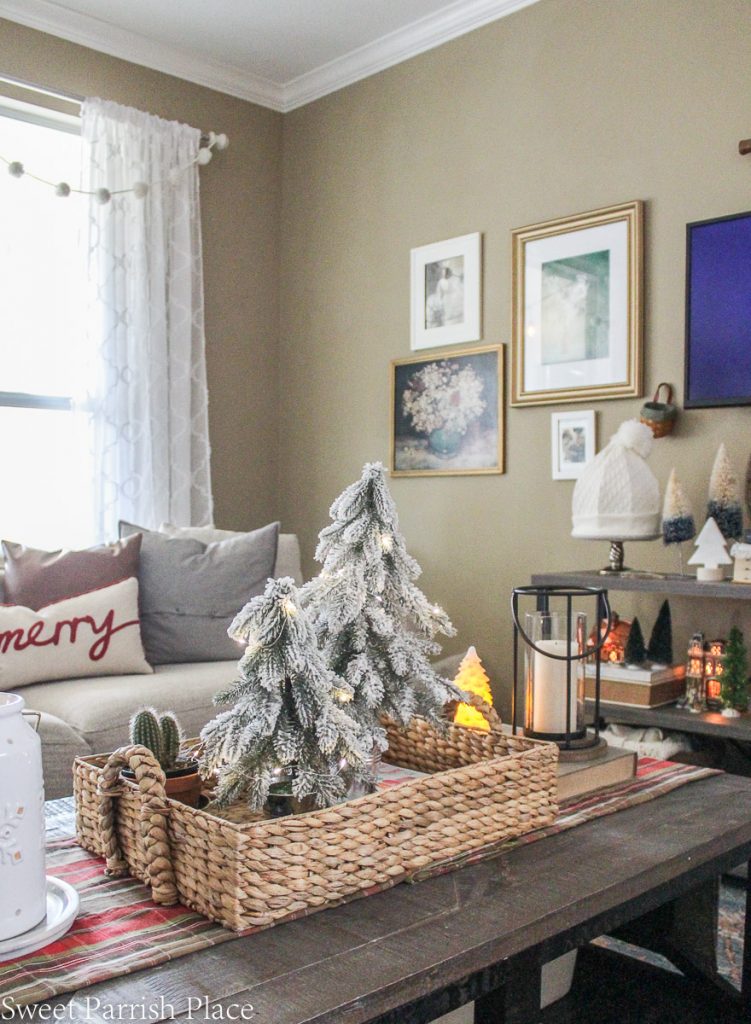
I bought two of these white snowflake lanterns from Kirkland’s last year after Christmas. I like the details on them and the flickering light peeking out from all the little house add a warm glow. I placed one of them here in the breakfast room, and you’ll spot the other a little further down in this post in our living room.
I bought the two mini trees you see above at Target this year. When we moved, I had to cut down on my Christmas decor by about half, and I left so many little trees behind. So I am working on building my collection back up. I love the string lights I placed in this windowsill. They have the perfect warm glow, and they are battery operated. I found them on Amazon, and I want to buy more. They look like little snowballs!

We have a small sunroom right off the breakfast room, and it is one of my favorite rooms in the house. I have always wanted a sunroom, and this one might be small, but I love every inch of it! You can read all about the quarantine makeover I did in our sunroom here.
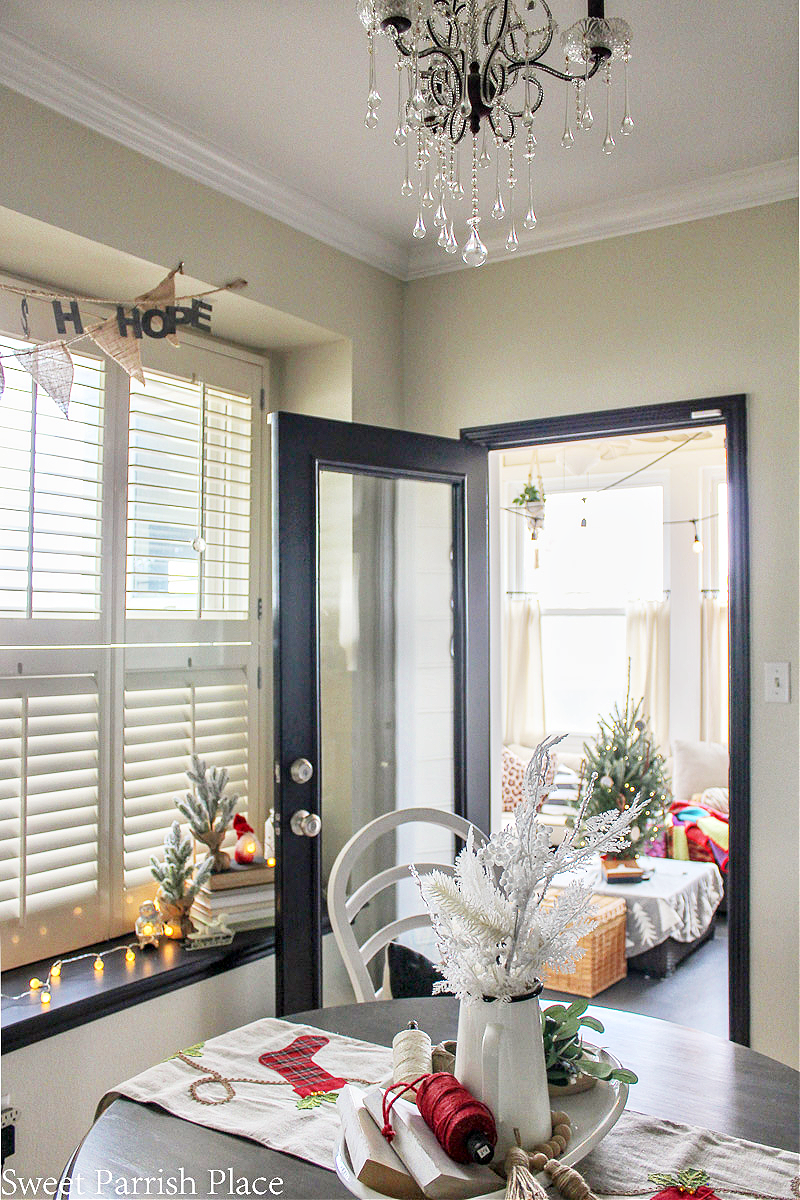
Not a lot has changed since I completed our quarantine sunroom makeover, but I did make some DIY cafe curtains for the windows. We close them in the evenings during the summer, and it helps keep the glare and the heat out. I decided to by a tiny real Christmas tree for our sunroom, and isn’t she the cutest!? I decorated her with twinkle lights, vintage inspired candy canes, and some handmade wooden ornaments that I made a few years ago. I still need to find an area rug for this space, but for now I’m ok with the charcoal painted floor. It’s definitely an upgrade from what it was when we moved in!
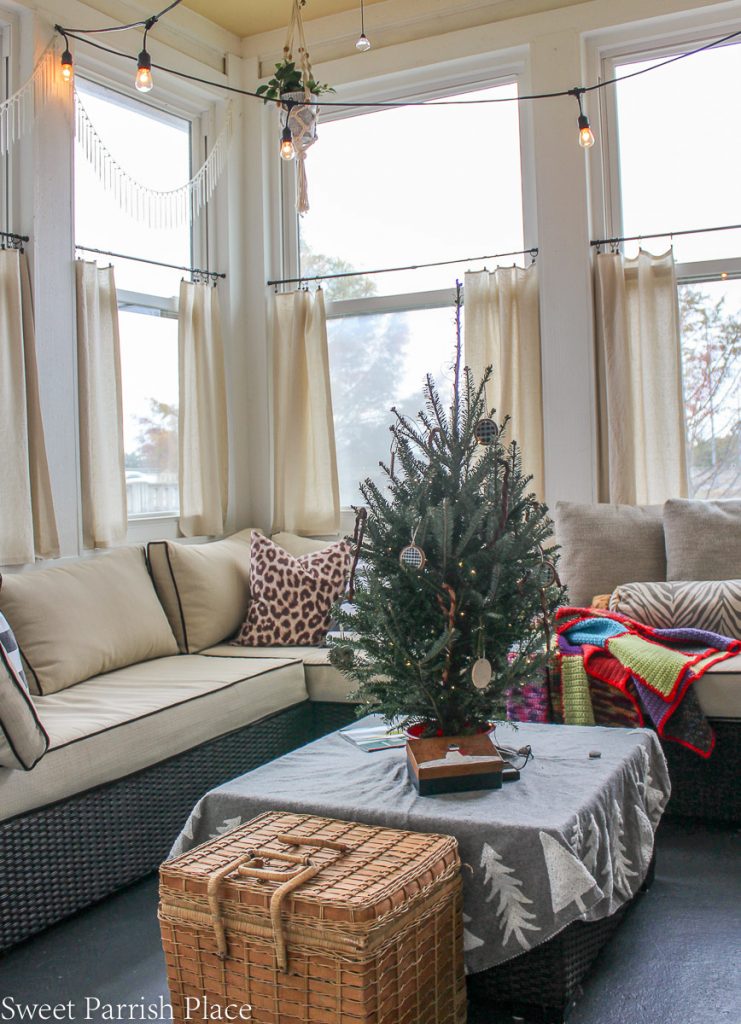
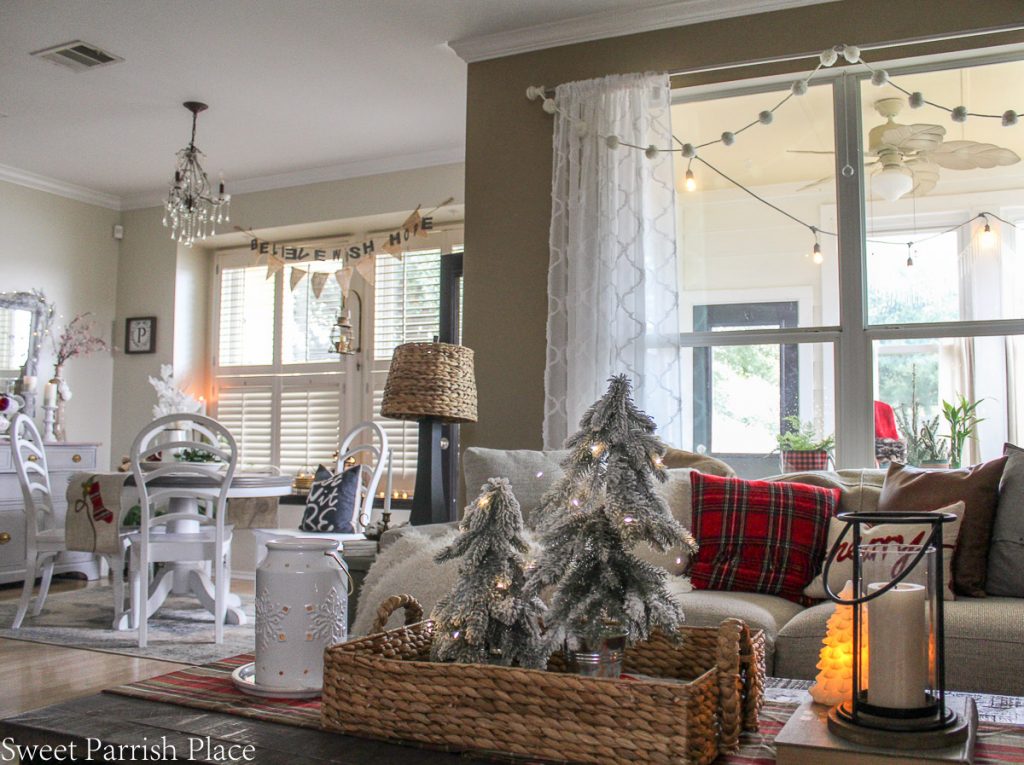
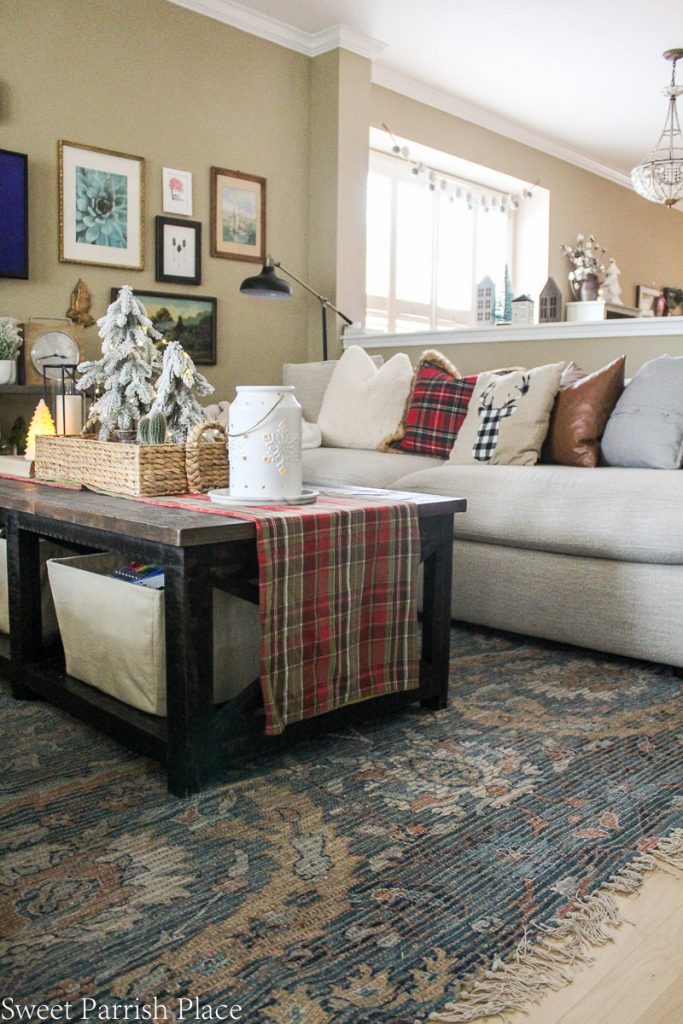
Last, but not least, welcome to our living room. This is where we hang as a family on the daily! I have plans for this space eventually, that may or may not include a shiplap feature wall. This room is not large, and it butts right up to the kitchen island. So I kept it simple with two matching sofas. This photo below give you a good idea of the layout of our downstairs. You can see our little dining room and front room in the background.
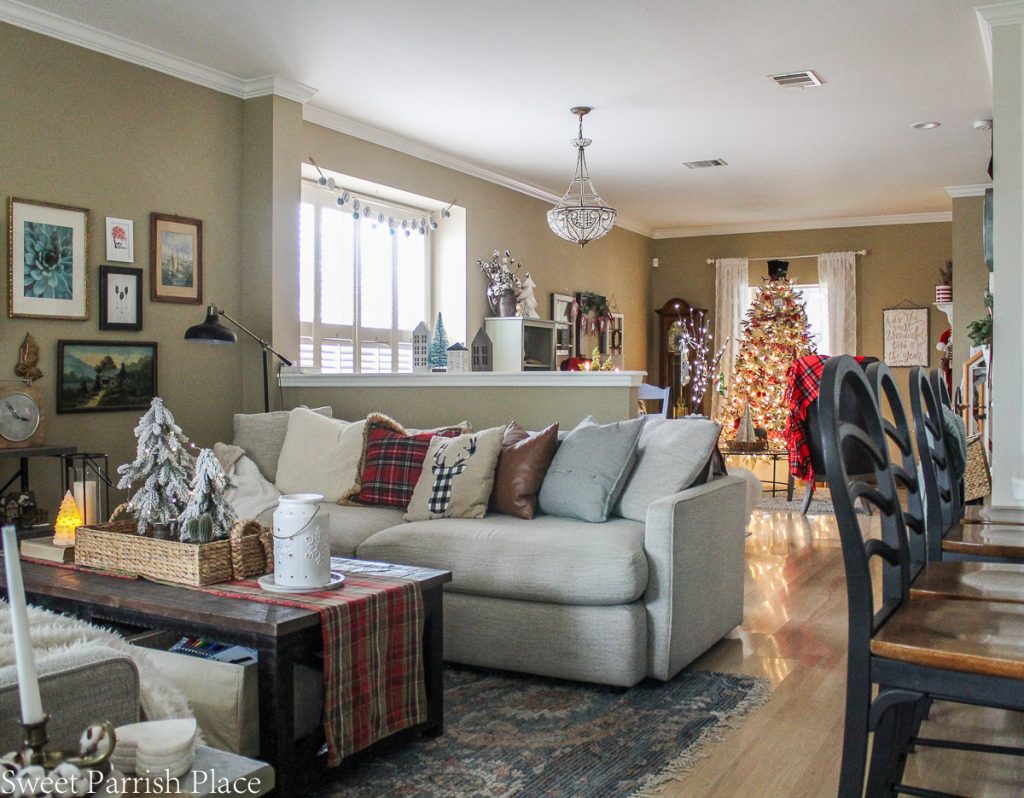
The little flocked trees on the coffee table are also two new additions, courtesy of Target. I was drawn to these trees because I felt like they have a little of a whimsical feel to them. The branches are shaped downward, towards the bottom of the tree, and I like that. I just draped some fairy light around both of them and called it a day.
You can see my other white lantern here on the coffee table. And I have my vintage Dickens Village displayed on our TV stand. My kids still want me to put the village up every year, and I oblige!
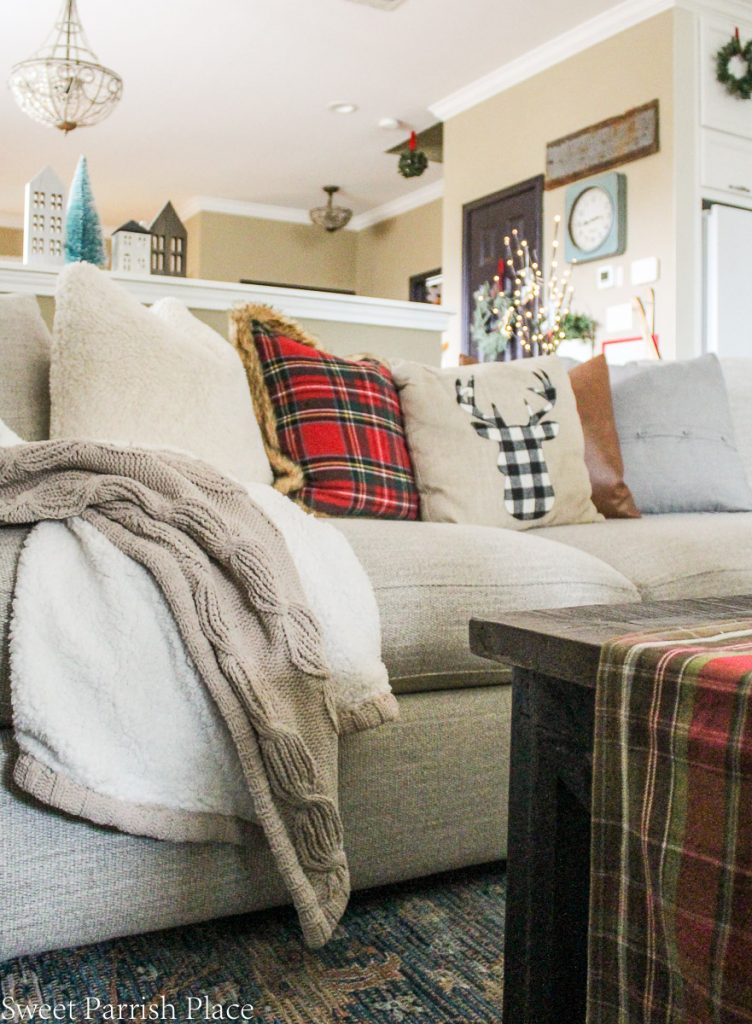
I added this cozy sweater blanket to my blanket supply for winter, because we only had one really cozy blanket in our living room, and people were always fighting over it. So, it was time to add a second one. And this one from Target is so soft, warm, and cozy!
This is a casual and cozy room that is well used and loved. So I try to keep it simple and cozy. I draped a white pom pom garland across this window. As you can see, I am into draping garlands across windows this year. I just like the festive touch they bring!

An of course, meet Tyson Chicken Nugget, our 4 year old Pug. He wanted to say hello! I swear he knows when I am doing a photo shoot, and he poses for me! I never considered myself a dog person until I fell in love with this sweet, snuggly little guy.

That back wall, where you see the TV and gallery wall is the spot where I am thinking of doing a shiplap feature wall. And of course, I want a frame TV for this wall as well. Future goals!

This toboggan was another Kirkland’s find after Christmas last year. I think it supposed to be a tree topper, which would be adorable, but I just sat it on our TV stand atop a cake stand, and I love it!

The area rug in our living room is new from Boutique Rugs. It’s called the Maldon Rug, and we originally bought it for our dining room area, but the size of the rug did not work in the space. So right before I began decorating for Christmas we did a rug swap between our living room and our dining room, and it works so much better in here! It goes perfectly with the gallery wall colors. If you like this rug, now is the time to grab it, because it is currently on sale for $186, down from $465, so it’s a steal!

And that is a wrap for our Christmas tour this year! I did a few little things upstairs, but nothing worth really doing a photo shoot for. Remember, I mentioned above that we paired down our Christmas decor when we moved, so I didn’t have much left for other areas in our home. I would like to add a skinny tree upstairs in our bonus room, and give it a festive feel, so maybe next year.
I hope you enjoyed seeing our cozy and casual Christmas tour this year! We really have done quite a bit during our first 18 months in our new home, but oh my, we still have lots to checkoff our list! So I do hope you will stick around and follow along on our journey! I have been daydreaming lately about what I want to accomplish in our home in 2021, and can’t wait to share. and before I go, I want to be sure to wish you and yours a Merry christmas, and a much better 2021! I love all of you, and thank you so much for visiting my little blog from time to time!
Do you have champagne taste and a tiny budget too? Love fashion, DIY, crafting, all things vintage and thrifty? Stick with me, I’ve got you covered!
Sign up to get my posts delivered to your inbox here
Follow me here:
Facebook / Twitter / Instagram / Pinterest / Bloglovin / Google +
Shop My Amazon Storefront Here

You Might Also Like:
Casual and Cozy Christmas Tour Part 1

The post Cozy and Casual Christmas Tour | Part 2 appeared first on Sweet Parrish Place.
]]>It’s a casual and cozy Christmas at the yellow prairie house this year, and I am so excited to invite you in! Hey friends! Welcome to part one of my casual and cozy Christmas tour. I am particularly excited to share this tour with you today, because it’s the first Christmas where we have a […]
The post Casual and Cozy Christmas Tour | Part I appeared first on Sweet Parrish Place.
]]>It’s a casual and cozy Christmas at the yellow prairie house this year, and I am so excited to invite you in!
Hey friends! Welcome to part one of my casual and cozy Christmas tour. I am particularly excited to share this tour with you today, because it’s the first Christmas where we have a fully furnished downstairs! Yay! You might remember that last year our front room and dining room were virtually empty. Well no more! The downstairs is finally filled, and we have so enjoyed having a fully furnished home for the past few months.
Casual and Cozy Christmas Tour
Today, I am sharing our newly furnished front room and dining room. Red just happens to be my favorite color, so you will always see lots of pops of it in my home at Christmas time. As I take you through our downstairs, keep in mind that there is still work to be done.
We painted the kitchen and breakfast room downstairs after we moved in, but decided to leave most of the walls the color they were when we moved in for a bit longer, while we focused on other more pressing things. So that is the state of our walls in the front room and dining room. I look forward to the day we will lighten things up in here, and maybe add some more character. I just haven’t decided how quite yet.

Please note: Some of the links in this post are affiliate links, which allow me to make a small commission from your purchase, but your purchase price stays the same.
Our flocked tree is from Lowe’s a few years back, and we still just love it! This year, I found this cute ribbon at Michael’s that is made of sweater material and looks like a cozy winter scarf , and that was my starting off point for the tree. I used mostly the same ornaments, and I always find a few new ones to add to the mix each year, lots of red and white ornaments along with lots of sprigs of red berries, and a collection of Lennox ornaments I have collected for years.


This year I found these cute vintage inspired red stockings with creamy little pom poms at Michael’s, and I had to have them. I found the cute little white reindeers on clearance at Kirkland’s last year after Christmas.


I wanted to throw in a shot of the tree without the lights just so you could see that too. But we leave the lights on whenever we are home. We love the glow of the tree lights!

I bought the tree collar at Michael’s. I found several cute things while I was shopping there this year. And I specifically went there to get the creamy white tree collar with the snowflakes. The mirror you see propped up under the shelf is usually hanging on the wall, but I changed it out for the Christmas sign temporarily. I love the way it looks with the reflection of the tree glowing in it!

I always enjoy using my Hunter boots for seasonal decor, but I wear them from time to time too! I just cut up a bouquet of white berries and used eucalyptus and elephant ear to make some cute arrangements in each boot.

I gave this bookcase below a makeover several months ago, painted it and added beadboard wallpaper to the back. It’s a fun place to decorate, but I really want to put some type of a cabinet with a glass door in this spot as soon as I find the perfect piece! I sprinkled some Christmas cheer throughout the shelves, do you spot the little yarn trees I scored at the Target dollar spot? I think they are the cutest!
The vintage plaid suitcase was a Goodwill find, and I bring it out every year for the holiday season.

This little side table is another piece I painted not long ago. It now fits in much better in our home, and I have high hopes that I will get up the nerve to paint my grandfather clock sometime in 2021! We would like to find a cute cushiony round ottoman to go in the front room to replace the glass coffee table one day.


The set of Wingback chairs might be my favorite furniture purchase so far in this house! I love the shape, the color and texture of the fabric, and the distressed looking wood trim! They are usually on the wall where the tree is currently residing. So I just flipped them to the opposite side to make room for the tree.

Seeing this view, compared to the view of a mostly empty room, now when I come down the stairs, makes me so happy! This is a nice little conversation area, and a great place to read a book by the glow of the tree.

Guess what? We made over a Facebook Marketplace dining table and chairs! And they turned out even better than I had hoped they would. I picked up this table and four chairs for $200. We painted the base of the table and the chairs black, and then we stripped the table top and white waxed it. We also reupholstered the chairs.
The bench doesn’t really go with the table, but we had it, so I thought I would try it out here and I love it! Unfortunately, the color of the stain doesn’t go with the table, and this bench belongs elsewhere. So I think I am going to have someone make me a matching bench for the table.

One of the things I love most about our home is the way the whole downstairs is so open. It feels nice and airy with high ceilings, and there is space for everyone to chill and do what needs to be done. There is also tons of natural light that pours in through the windows. Hopefully by this time next Christmas, we will have been able to tackle painting the walls down here a lighter color, and maybe adding a shiplap accent wall somewhere.
I keep debating what I would like to do to add some character, and I haven’t decided for sure yet, but I can see some shiplap in our future, I think. And maybe a fireplace a little further down the line? I really miss having a fireplace, and would love to add one in this home. But we’ll see, the fireplace may have to wait until our next house. I have been keeping my eye open for a vintage mantel or something that I might be able to use to create a faux fireplace.

I searched high and low for a dining table set to make over. I thought about buying something new, but my heart kept telling me to find something old and give it a new life. My daughter helped tremendously with this makeover. She actually did most of the work. And seeing the finished product all decorated for Christmas makes me so happy. We enjoyed a lovely Thanksgiving meal here this year, and it was so nice! The table also has an extension, but we didn’t include it in our little makeover, so I need to do it to match as well.

Here is a before shot of the table, in case your curiosity is picked. And I owe ya’ll a blog post all about this makeover!

I kept the table decor very casual, with a red jar of greenery, some bottle brush trees and other flocked trees, and some thrifted brass candlesticks. I also scattered some ornaments around.

I absolutely love the natural look of the wooden table top! It was so worth the work that was put into it. Since we completed this table, my husband has began working from here every day, and he really enjoys it. It’s right next to a great window that let’s in a ton of natural light, and he can still see the TV and be right there in the heart of the home, while the rest of us are at work and school.

I didn’t have the heart to pack away my collection of amber bottles, so I moved them over to this window sill, and they fit perfectly there! I have plans to paint the window sill black one day, like our other one in the breakfast room, but I have been lazy getting on it.

I really enjoyed decorating for Christmas this year, and I hope you enjoyed seeing this first glimpse inside our home. I’ll be back to share more of my casual and cozy Christmas tour with you. I’ll share our kitchen, breakfast room, living room and dining room with you.
I feel like we have the perfect amount of Christmas going on the home this year. And it felt good getting it mostly finished before Thanksgiving. The only thing I wish I had is some fresh greenery. I’m not sure where to find any here in Austin! I need to figure that out, don’t you think? We finished up the outside over this past weekend, and now we can sit back and enjoy the Christmas festivities. Enjoy your week friends! And let me know in the comments if you have any questions about anything you have seen in the tour today!
Do you have champagne taste and a tiny budget too? Love fashion, DIY, crafting, all things vintage and thrifty? Stick with me, I’ve got you covered!
Sign up to get my posts delivered to your inbox here
Follow me here:
Facebook / Twitter / Instagram / Pinterest / Bloglovin / Google +
Shop My Amazon Storefront Here
You Might Also Enjoy:
Prairie House Christmas Tree

Traditional Christmas Breakfast Room

The post Casual and Cozy Christmas Tour | Part I appeared first on Sweet Parrish Place.
]]>It’s reveal day for the $100 Room Challenge, and I am loving the new look in this space, come along and see my Farmhouse Bathroom Makeover progress! Hey friends! Have you been following along so far with my latest $100 Room Challenge makeover? I mentioned back in week 3 that I didn’t think I was […]
The post Farmhouse Bathroom Makeover Progress | $100 Room Challenge appeared first on Sweet Parrish Place.
]]>It’s reveal day for the $100 Room Challenge, and I am loving the new look in this space, come along and see my Farmhouse Bathroom Makeover progress!

Hey friends! Have you been following along so far with my latest $100 Room Challenge makeover? I mentioned back in week 3 that I didn’t think I was going to complete this room in time for reveal day, and sadly, I was right. September turned out to be a busier month than I initially anticipated, so I had to accept that fact that I am not super human. I used my time to concentrate on the most important things I wanted to accomplish in this space, and although it’s not a complete reveal, I feel that I accomplished enough in this room to still give you somewhat of a reveal, so I am happy today to share with you my Farmhouse bathroom makeover progress.

Wanna Catch up with my progress on this challenge? Start from the beginning!
Week 1 | Week 2 | Week 3 | Week 4
Of course, I want to thank the lovely Erin over at Lemons, Lavender, and Laundry for being our lovely host. If you are new to the $100 Room Challenge you can read more about it here. But the basic premise for the challenge is this: you get one month, and $100, to completely makeover one space in your home. I know what you may be thinking… $100 is not a lot of money. Just wait. What you can do with $100 (and a little creativity) will absolutely blow your mind. And if you don’t believe me, just follow along, and click through and see what the other participants are doing for this challenge, and you will see so many great things happening with just a $100 budget.
Farmhouse Bathroom Makeover Progress

Let’s start with a before photo of the sink area in our master bathroom. Two super gawdy mirrors, and a worn looking chocolate brown painted vanity. I disliked the mirrors at first sight, and I had been jonesing to replace them since day one of moving into this house.

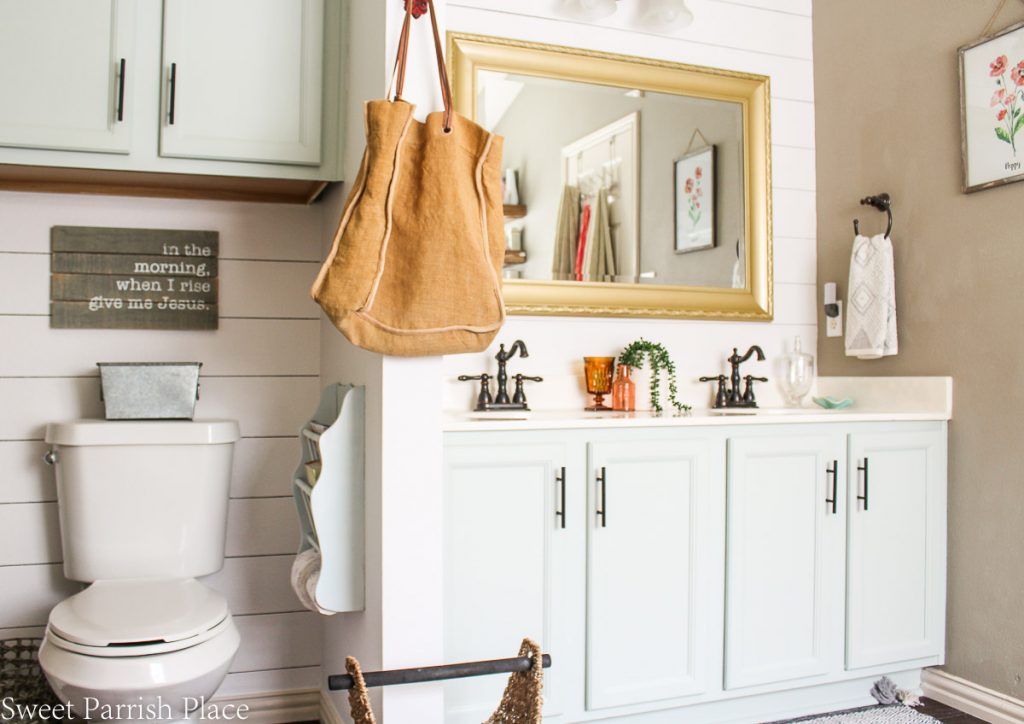
And BAM, the after! Ahhh it is just so satisfying to see this side of the bathroom looking completely different! This is just so much more my style. I had a little paint swatch in the color sea salt propped up on the little backsplash ledge in this room since I moved in. And I knew I wanted to use this color somewhere in the room. I debated back and forth for awhile…should I use this color on the walls or the cabinets?
Sea Salt Painted Cabinets

Here’s the same view from when we first moved into the house. So much better, right!?

I ultimately decided to use Sherwin Williams Sea Salt on the cabinets, because our paint color on the walls in the master bedroom, which is Benjamin Moore’s Grey Owl, and it leans the same color as the Sea Salt, Which is weird, because I used it on several walls in our old house and it didn’t lean blue there at all. So it must be something with the lighting in our bedroom.
I love love love the way the cabinets turned out! I also love the contrast of the light colored cabinets with the matte black cabinet handles that I scored from Amazon. In this photo below, you can see on the back wall the paint color that was on these walls from the get go. I plan to paint all four walls the same color that I painted on the sharpie shiplap wall, Bistro White by Behr. I also plan to paint the baseboards a nice bright white.
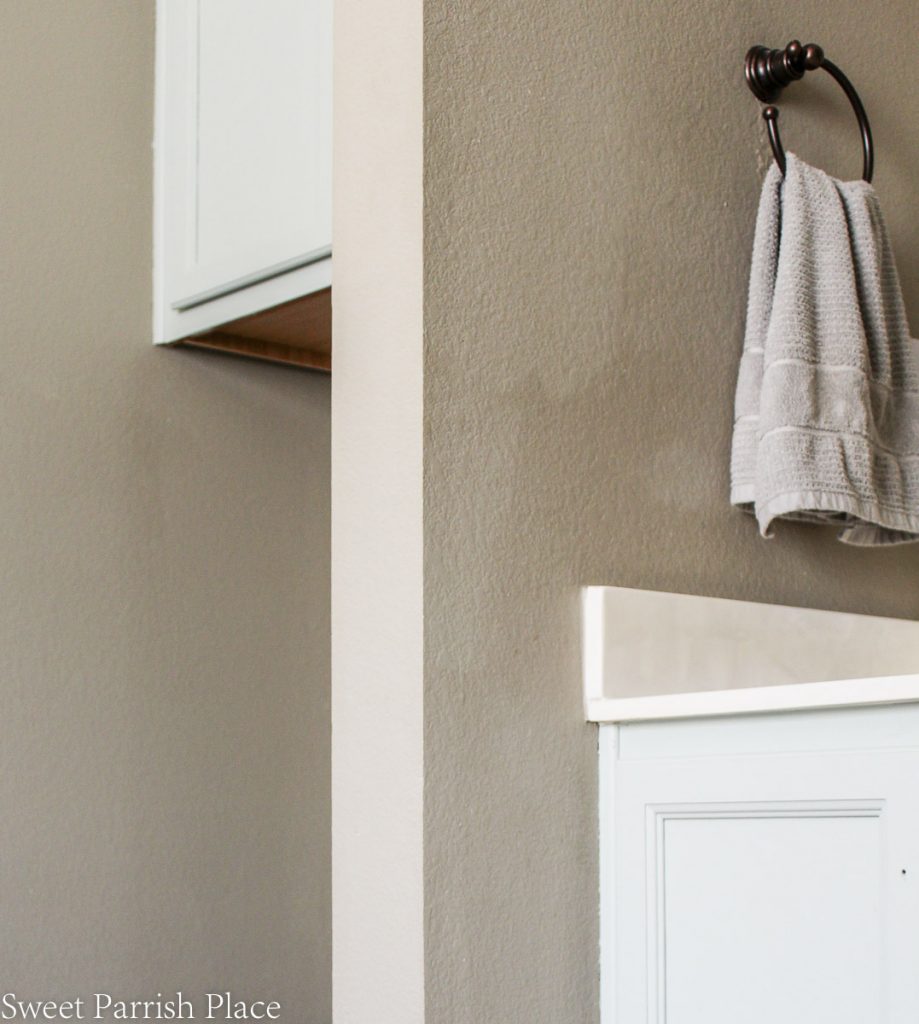
You can see in this photo that I went ahead and painted the half wall between the toilet and the sink in that color already. I wanted to finish this whole side of the bathroom so that I would have some decent reveal photos to share with you.

This room does not have adequate lighting, and I knew we weren’t going to correct that on a budget of $100. But having this entire wall white has brightened things up already. So I can’t wait to see the entire room white!
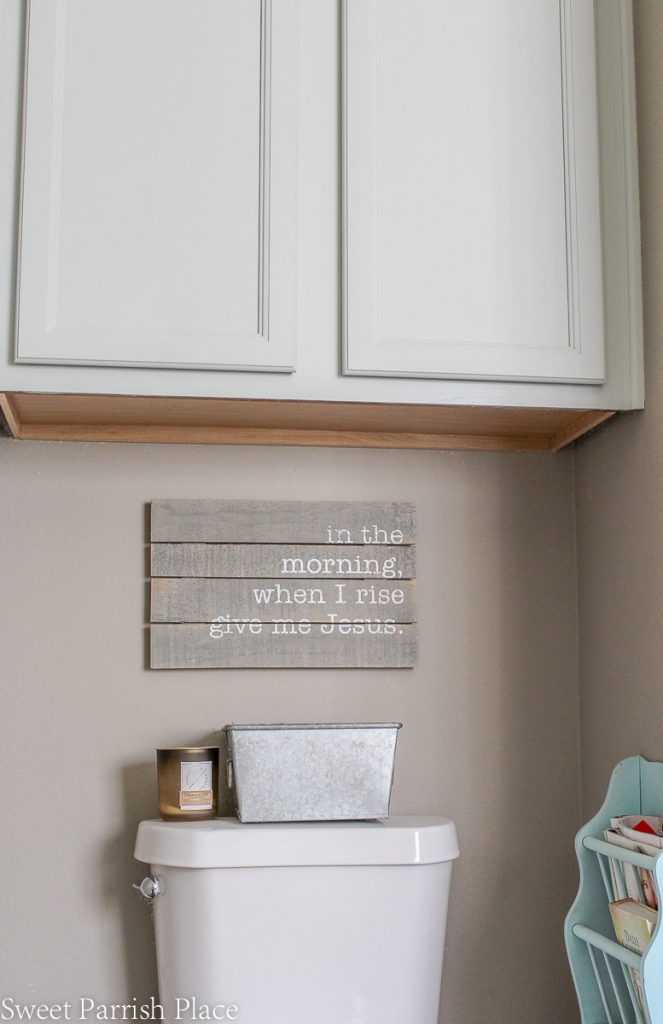
One other little thing I managed to check off my list in here is the little wooden rack hanging to the right of the toilet. I found that out thrifting years ago, and I took it down and gave it a fresh coat of linen white chalked spray paint. However, I ran out of paint before I got a good coat on it. But I liked the results the way they were, so I left it, and rehung it.

An check out the before of our little toilet nook. It’s a much more pleasant spot now than it was before, if you can call a toilet area pleasant, hehe!

Sharpie Shiplap Wall
A sharpie shiplap wall was such a budget-friendly way to make an impact in this space. Perfect for the $100 Room Challenge! I actually like it even more than I thought I would! Maybe one day I’ll make this a real shiplap wall, but for now I am quite smitten with these results.
Mirror Makeover
We moved this mirror that we already had into this room for now, and sold the ornate mirrors on Facebook Marketplace. It’s a little small for the area, but It will work just find until I am ready to fork out the cash for a larger mirror. But I do enjoy having one large mirror rather than two, so I will keep just the one mirror, but replace this one with a larger one.

Below was my first attempt at giving this mirror a little makeover. I bought what I though was a gold spray paint, and it turned out to be champagne metallic color. So I repainted it with Rustoleum Pure Gold spray paint, and I am so much more happy with the look now!

Rustic Floating Shelves
I brought these shelves with me when we moved. You may remember these used to hang in our kitchen. I had some different shelves hanging here initially, but I decided to change them out with these, because they didn’t work out in the spot I initially planned to hang them. I am much happier with the look of these, and they will look even better when I paint this wall white. I think I will love the warm wood look against a white backdrop.
I styled the shelves completely with things I already had. A small collection of milk glass, white bath mats, and a few other pretties. The basket underneath the shelves is from Hobby Lobby, and we also have had it since before we moved. When we removed these shelves from our old house, we forgot to remove the hardware they were hung with (which came with the shelves), so we had a really hard time finding a way to hang these.
I finally decided to purchase these L brackets for only $8.21. You can see them only from underneath, but really only if you are really looking for them. I am willing to accept that in order to get these hung, because I love these shelves.

These were the first shelves I had hung here when we moved in. I think the new shelves I hung look much more expensive and finished.


I picked up two new hand towels from World Market that I really love, and they are a nice finishing touch hanging on either side of the sinks.

All of the accessories I used to style the sink are things I already owned and brought in from other spots in the house. I love to play musical chairs with my decor. It’s a great way to add a breathe of fresh air to your decor. Just change up where you place it and how you style it!

I didn’t have a lot of time to shop in September, and I did not end up finding a rug I wanted to use in this space, so I brought in this 4×6 rug that my daughter owns (she recently moved in with us), and I LOVE the way it looks here. But just so you know, had I purchased this for this challenge, it would have broken my budget. But it’s not against the rules to bring things in from other rooms. I must admit though, I love it in here, and I just might splurge and get one for myself, because she will be wanting this one back eventually! I love the colors, the pattern, the tassles, and the texture.

What do you think of this farmhouse bathroom makeover progress so far? I am very happy, and seeing how good it looks so far has given me the inspiration to get it finished up. My goal is to finish it by the end of October, and I will share the full reveal right here on the blog when I did complete this space, I promise!
The Budget
Rustoleum Spray paint in Pure Gold – $6.98
Cabinet Pulls – $9.84 (these pulls came in a pack of 10, and I will only use 1/2 for this project, so saving the rest for a future project)
Paint for vanity– $20.98
Sharpie Paint Marker– $2.98
L-Brackets for Shelves– $8.21
Hand Towels– $20.00
Total So Far – $68.99
For even more bathroom inspiration, check out my Bathroom Pinterest Board here.
Check out my previous $100 Room Challenge Reveals
Guest Bedroom Reveal | Modern Farmhouse Dining Room Reveal | Mudroom Makeover Reveal
Modern Farmhouse Dining Room/Office Reveal
Make sure you check out what the other participants are doing using the link up below.
Do you have champagne taste and a tiny budget too? Love fashion, DIY, crafting, all things vintage and thrifty? Stick with me, I’ve got you covered!
Sign up to get my posts delivered to your inbox here
Follow me here:
Facebook / Twitter / Instagram / Pinterest / Bloglovin / Google +
Shop My Amazon Storefront Here
The post Farmhouse Bathroom Makeover Progress | $100 Room Challenge appeared first on Sweet Parrish Place.
]]>I wasn’t sure I’d be able to pull off Sharpie shiplap on textured walls, but I was able to get clean lines, and I’m sharing the details here! Hey friends! I feel like I made some great progress in my bathroom makeover this week, which marks week 4 of the $100 Room Challenge. I really […]
The post Sharpie Shiplap on Textured Walls | $100 Room Challenge appeared first on Sweet Parrish Place.
]]>I wasn’t sure I’d be able to pull off Sharpie shiplap on textured walls, but I was able to get clean lines, and I’m sharing the details here!

Hey friends! I feel like I made some great progress in my bathroom makeover this week, which marks week 4 of the $100 Room Challenge. I really wanted to attempt to do a Sharpie shiplap on textured walls, but I was really worried that it wasn’t possible. I searched Pinterest, to no avail; other than the fact that I read in several other tutorials not to try it on textured walls, hehe!
Well the spoiler alert is right up above, because obviously I was able to do my sharpie shiplap on textured walls, and I am so thrilled with how this little project turned out! I mean, check out the before of this same view below?! Big difference, right?
Wanna Catch up with my progress on this challenge? Start from the beginning!
Of course, I want to thank the lovely Erin over at Lemons, Lavender, and Laundry for being our lovely host. If you are new to the $100 Room Challenge you can read more about it here. But the basic premise for the challenge is this: you get one month, and $100, to completely makeover one space in your home. I know what you may be thinking… $100 is not a lot of money. Just wait. What you can do with $100 (and a little creativity) will absolutely blow your mind. And if you don’t believe me, just follow along, and click through and see what the other participants are doing for this challenge, and you will see so many great things happening with just a $100 budget.
Details About Sharpie Shiplap on Textured Walls
My walls are kind of like the exaggerated texture of an eggshell, if you can picture that. We moved to Texas a little over a year ago, and every single house we looked at, and that I have been in at all, have this same texture on the walls. So it’s definitely a thing here. And I have to say, as a person who lived with non textured walls for my entire life up until this point, I’m not a fan of the textured wall. I even went so far as to say to my husband if I had the money, I would hire someone to come in and smooth every last wall back out.
I was worried sharpie shiplap would be a failure on my textured walls, but I decided to try doing a short line in a hidden spot in my closet to test it out, and it worked! So I decided to take the plunge.
I think the most important tips to remember for getting nice clean lines are to use a brand new Sharpie Paint pen (not a used one), a nice straight edge to guide you, and always use a level. Also, I recommend a Sharpie paint marker, not a regular Sharpie marker. It is much easier to cover any small mistakes by painting right over them with the paint marker, as opposed to the regular Sharpie. Let me share with you how I was able to get clean lines on my textured walls.

Supplies You Will Need
- Sharpie Paint Marker (I used one with a fine tip)
- Measuring tape
- Level
- Pencil
- Yardstick
- Smaller straight edge for tight spaces
- Painters Tape
My Process
- Paint your wall in the color you would want your boards to be if you were painting real shiplap walls. I chose Bistro White by Behr, in an eggshell finish. I already had this paint on hand from painting our sunroom, so free!
- Decide how wide you want your “boards” to be. I decided to make my boards 6 inches wide. That means that I will be drawing my line every 6 inches on the wall.
- Decide where you want your starting point to be. Should it be at the bottom, or top? I decided to start at the bottom right above my sink cabinet because I knew I wanted a full 6 inch wide board across the bottom, but I didn’t really care if there was a full board near the ceiling.
- Starting at either the left or right side of the wall, I took my yardstick and made a small pencil mark at each 6 inch point going all the way from 6 inches above the sink to the ceiling.
- I used my yardstick as a straight edge to draw my lines. I started by finding my pencil mark and lining up my yardstick right beneath it, then used my level to make sure my line was straight across. I then taped my yardstick to the wall using painter’s tape.
- I found that it took me more than one pass with my paint marker to get the dark, sharp lines I was looking for. I am sure this has something to do with the texture on the walls. Because I notice I had similar issues when using a paint brush or roller on my textured walls as well.
- I found that by going back and forth on each line in several times in opposite directions with the paint marker helped to get into all of the dips and crevices in the textured walls. I had no problem doing this because I had the yardstick taped securely to the wall.
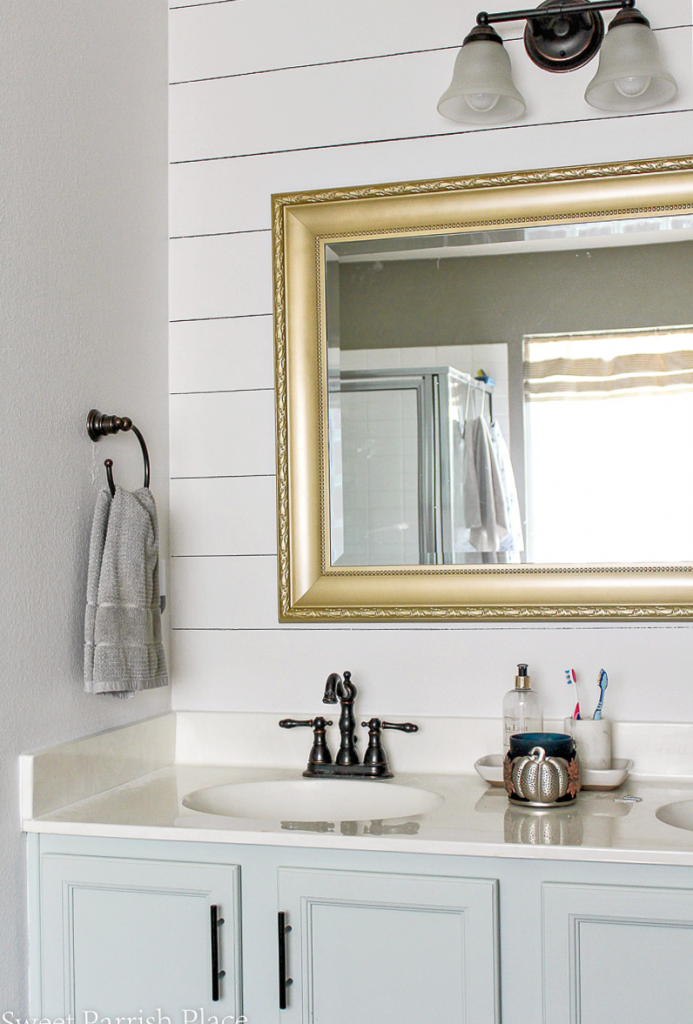
Just look at the clean, sharp lines I was able to accomplish on my textured walls! And look at that little before/after action above and below, yay! Did you notice I repainted the mirror and made it a more true gold color? I like it so much better now!
I never love painting around a toilet, but the only alternative is to remove the toilet, and that as not about to happen. So work around it was. I had to contort my body into some strange angle to get the sharpie shiplap in these tight spaces around the toilet, but I am very happy with the results!
I did make a couple of mistakes that I was able to touch up easily with a paint brush and some more of my wall color. I also painted the wall between the sink and the toilet bistro white. The goal is for all 4 walls to be this color – I am just not sure if that is going to happen in time for the big reveal (see my week 3 post to find out why). But seeing this side of the room all white is giving me all the feels, and I plan to have this room completely painted before Halloween.

Pssst, what do you think of my lovely new cabinet pulls? Love them! And I got them for a great price on Amazon for twice as many as I actually needed. So I will add them to my stash for a future project.

We have not great lighting in this bathroom, with the light over our sink being the only light in the room. One day we plan to hire an electrician to remedy this, but that is not for this challenge. I have to say, though, that having these lighter colors in the walls and the cabinets already goes a long way to making this room feel more light and airy.

If you caught my week 3 post, you might know that I admitted I may not complete this room because by the time of the big reveals next week, I will have lost two weekends of opportunities to work on this room. One weekend was my 50th birthday, and we celebrated by having a little kid free stay-cation in downtown Austin. And this coming weekend, my son is visiting from WV.
I didn’t really think this out before jumping into this challenge, but although the room won’t be 100% finished, I will have enough of the space finished to show where I am going with the whole thing, and 1/2 of the room will look great. It will just take me a weekend or two more to get the rest of the painting done.

The Budget…So Far
Rustoleum Spray paint in Pure Gold – $6.98
Cabinet Pulls – $9.84 (these pulls came in a pack of 10, and I will only use 1/2 for this project, so saving the rest for a future project)
Paint for vanity– $20.98
Sharpie Paint Marker– $2.98
Total So Far – $40.78
For even more bathroom inspiration, check out my Bathroom Pinterest Board here.
Check out my previous $100 Room Challenge Reveals
Guest Bedroom Reveal | Modern Farmhouse Dining Room Reveal | Mudroom Makeover Reveal
Modern Farmhouse Dining Room/Office Reveal
Make sure you check out what the other participants are doing using the link up below.
Do you have champagne taste and a tiny budget too? Love fashion, DIY, crafting, all things vintage and thrifty? Stick with me, I’ve got you covered!
Sign up to get my posts delivered to your inbox here
Follow me here:
Facebook / Twitter / Instagram / Pinterest / Bloglovin / Google +
Shop My Amazon Storefront Here
The post Sharpie Shiplap on Textured Walls | $100 Room Challenge appeared first on Sweet Parrish Place.
]]>This sea salt painted vanity is a huge transformation, and paint is always a budget-friendly way to change an outdated piece. Hey friends! I love the power of paint, don’t you? I just literally never get tired of how it can transform endless amounts of things. And my seal salt painted vanity is the perfect […]
The post Sea Salt Painted Vanity | $100 Room Challenge Week 3 appeared first on Sweet Parrish Place.
]]>This sea salt painted vanity is a huge transformation, and paint is always a budget-friendly way to change an outdated piece.

Hey friends! I love the power of paint, don’t you? I just literally never get tired of how it can transform endless amounts of things. And my seal salt painted vanity is the perfect example of a budget friendly transformation, using paint, that packs a giant punch.
I mean, just look at that tired chocolate brown painted vanity that was chipping and worn off?!?! I have been itching to change this cabinet up with some paint since day one of moving into this home! And when I decided to join the $100 Room Challenge this year, it really was all because I wanted some motivation to get this vanity painted for once and for all.

Wanna Catch up with my progress on this challenge? Start from the beginning!
Of course, I want to thank the lovely Erin over at Lemons, Lavender, and Laundry for being our lovely host. If you are new to the $100 Room Challenge you can read more about it here. But the basic premise for the challenge is this: you get one month, and $100, to completely makeover one space in your home. I know what you may be thinking… $100 is not a lot of money. Just wait. What you can do with $100 (and a little creativity) will absolutely blow your mind. And if you don’t believe me, just follow along, and click through and see what the other participants are doing for this challenge, and you will see so many great things happening with just a $100 budget.
Please note: Some of the links in this post are affiliate links, which allow me to make a small commission from your purchase, but your purchase price stays the same.
Sea Salt Painted Vanity Details
Since these cabinets were previously painted, I did not feel the need to prime or sand them. I just cleaned them really well to get any oily residues off of them. I did have to buy the paint for this, so it was the first time I have dipped into my $100 budget for this challenge.
I used Infinity paint from the HGTV Home Sherwin Williams line, in a flat finish, the color Sea Salt. I did spend a bit more on this paint than I typically would at Lowe’s, but I wanted to try it, and it is supposed to be really durable, which is good for cabinets.

I opted to use a paint sprayer to paint the cabinet doors. And then I used a brush for the bases. I have painted several cabinet doors in my life, but I usually hand paint them, and that takes forever and a day. So using my Homeright Paint Sprayer was a great choice and I was finished with the cabinet doors in a flash! After they were dry, I sealed them with Varathane Ultimate Water Based Polyurethane in crystal clear matte that I had left over from a previous project.
This room isn’t finished by a long shot, but it already has a more light and airy feeling with this drastically lighter paint color for the cabinets. This little alcove that houses the toilet and a large cabinet above, has always felt dark, and there is a lack of proper lighting in this room. So painting this particular cabinet a lighter color really helps brighten things up.
We plan to remedy the lighting problems we have in this room at some point, but certainly not on this tight budget! On down the line, it’s in the plans though.
We still need to add cabinet handles, and I actually already purchased them, but they didn’t arrive until after I took these photos. You can see the exact handles I ordered beneath this next photo.

I am super happy with my progress and how much it changed up the room so far! However, I have a bit of bad news. I think I may have bit off a tad more than I can chew this time around. I had some lofty dreams for this space, and I think I can accomplish all of them on my budget, but the problem is, I don’t think I have the time to get to all of them.
Last weekend was my birthday, so we were away for the weekend, and next weekend my son and his girlfriend are coming for a visit. So since I work a full time job during the week, I only have this upcoming weekend to finish all the things.

What is Left to Accomplish
My biggest goal for this weekend, is to repaint the bathroom mirror, and to paint the walls behind the sink and the wall behind the toilet and cabinets above. And then I am planning to do a sharpie ship lap on both of those walls. I also plan to shop for a new rug, fabric to make a quick DIY roman shade.
I also think I can squeeze in replacing the shelves near our bathtub with some shelves we already have. I also want to paint the rest of the walls, the baseboards, and the doors too, but I am quite certain that I am physically unable to do all of that painting in the time I have allotted.
So, I decided to focus on the side of the room that has all of the cabinets, and make that side of the room the way I envision it. Then at least I can get some good reveal photos, even if the other side is still yet to be finished. And then, I will obviously still complete the room and share with you.
I think I failed this time at planning ahead enough to realize that two of my five weekends were going to be shot because of prior plans. But the good news is that I think I can still make a significant impact in the room for this challenge, even if room isn’t completely finished on time. But you know what? Life happens, and I am choosing in this season of my life to focus on grace, not perfection. And I will take a weekend away with my husband and a visit with my son any day over a project that I can finish any time.
I’ll be back next week to share all about my sharpie shiplap accent wall, so stay tuned! I’m excited to give this project a try!
The Budget…So Far
Rustoleum Spray paint in Pure Gold – $6.98
Cabinet Pulls – $9.84 (these pulls came in a pack of 10, and I will only use 1/2 for this project, so saving the rest for a future project)
Paint for vanity– $20.98
Total So Far – $37.80
For even more bathroom inspiration, check out my Bathroom Pinterest Board here.
Check out my previous $100 Room Challenge Reveals
Guest Bedroom Reveal | Modern Farmhouse Dining Room Reveal | Mudroom Makeover Reveal
Modern Farmhouse Dining Room/Office Reveal
Make sure you check out what the other participants are doing using the link up below.
Do you have champagne taste and a tiny budget too? Love fashion, DIY, crafting, all things vintage and thrifty? Stick with me, I’ve got you covered!
Sign up to get my posts delivered to your inbox here
Follow me here:
Facebook / Twitter / Instagram / Pinterest / Bloglovin / Google +
Shop My Amazon Storefront Here
The post Sea Salt Painted Vanity | $100 Room Challenge Week 3 appeared first on Sweet Parrish Place.
]]>Welcome to a Hello Fall Home Tour featuring the homes of 7 talented home decor bloggers. Hey friends! Welcome to the Hello Fall Home Tour! I was honored to take part in this tour, featured 6 other very talented home bloggers, and I couldn’t be more honored to be included amongst so many uniquely talented […]
The post Hello Fall Home Tour appeared first on Sweet Parrish Place.
]]>Welcome to a Hello Fall Home Tour featuring the homes of 7 talented home decor bloggers.

Hey friends! Welcome to the Hello Fall Home Tour! I was honored to take part in this tour, featured 6 other very talented home bloggers, and I couldn’t be more honored to be included amongst so many uniquely talented women. If you are stopping by from First Day Of Home’s beautiful Fall Tour, welcome, I am so happy you are here!

For those of you who are new to my blog, let me tell you a little about myself. My family relocated from West Virginia to a suburb of Austin, Texas called Round Rock, in July of 2019. We bought a home in a cute little neighborhood, and we named it our yellow prairie house. We have been busy making updates to our new home as our budget has allowed, and trying to pay cash for pretty much everything. I love a gathered, collected over time look, and I am so excited to share my first Fall home tour in this house!
I have lots of photos to share with you today, so I hope you will enjoy taking a little tour of our open concept home today. As you enter our home we have a small little entry that opens directly into our front room. This is the view you see, with the stairs directly across from our front door. I have big plans to update these railings one day!

This is the view looking back towards the front door from the stairs. I have painted all of the doors except for one in our downstairs this same color black, called Plum Martini, by Benjamin Moore. I am in love with the look of black doors, and I don’t regret it for one second! We don’t have a large entry, so I added a shelf to the left of the front door that has hooks to hang jackets and bags. In the summertime you might find beach towels hanging here too. But of course, I styled them pretty for you today.
Please note: Some of the links in this post are affiliate links, which allow me to make a small commission from your purchase, but your purchase price stays the same.

These wingback chairs are a recent purchase that I saved up for for several months, because I just could not get them out of my head when I saw them at Kirkland’s. And they are exactly what I pictured for this space. I am super happy with these chairs and the fabric is perfectly casual and textured. This room is still a work in progress, but the main pieces that were chosen just for this space are the chairs and the rug. The rest will probably change as we find different pieces we like. I recently painted the bookshelf you see here in a color I love called Mossy Bank by Behr, which just so happens to great with Fall decor.

I added Fall touches to this space with some fall florals in golds, and blush colors, with lots of natural elements to bring in some texture, and of course, pumpkins! It’s also easy to cozy up any space by throwing a comfy throw over a chair or sofa. I love this one with the pom-poms, its like instant cozy vibes!

Here you can see some of the natural elements I added, with the hanging basket, the grapevine wreath, and the brooms hanging. You will find some of these same colors of gold , greens and blush in some of my other florals around the house.

I love this slate tiered tray that I styled for Fall. You can catch a glimpse in the background of some vintage window I hung on the wall, there’s one more to the left out of the shot. And I found this little vintage metal ladder out junking one day. I love the aged green patina on it.

Three of the items you see here on top of my bookshelf are thrifted finds. I love to find framed art at thrift stores that I can change out for the seasons. I picked this particular one up back in West Virginia and it was hand painted by an artist who signed it. I don’t now exactly who painted it, but the last name is a familiar name where I’m from.

I found a couple of little vintage brooms at an antique store in Austin and I had to get them! I think they are perfect for fall decor just sitting on a shelf or table. They add an element of natural and texture.

This next photo is a sneak peek into our most recent purchase. We picked up a dining table and chairs from Facebook Marketplace last week, and we have been busy stripping the top down to the natural wood and painting the base. I’m not sharing a full photo of it here just yet, but you can see some of the delicious natural wood peeking out below this collection of amber bottles. I picked up this cute plaid table runner at Hobby Lobby that ties in perfectly with my Fall theme, so I couldn’t help styling it just a bit for Fall!
Our dining area is right next to the front room. It is really kind of one large room. so you pass by this dining table as you enter the kitchen and living room. I have been loving amber bottles, especially for Fall, for the past few years now, and I still am loving the look of them!

This is the first time I have shared a tour of our living room. We do have plans to eventually make some changes in this room. Shiplap might be in order on that gallery wall one day. And I plan to paint all of the walls down here eventually as well. Below, you will see our kitchen and breakfast room, and those walls are already painted. I plan to do the same color throughout the downstairs, maybe with a couple of shiplap walls or something like that.

I didn’t change up much in this space for all except for adding a few pumpkins, a few new throw pillows, some cozy throws, and fall branches in a vase on the coffee table.

As you can probably tell, we did two matching sofas with a coffee table in the middle in the living room. It is not a huge space, and with the way it backs up to the kitchen island, this is the best furniture arrangement for the space, and gives us the most seating.

The gallery wall that surrounds the TV is made up of art that has been collected over time. Some are thrifted pieces, some are new. One of the reason I haven’t shared this room much is because I had never gotten my pillow game on point with these new sofas.
I finally feel like I have remedied that situation, and I am loving the combination of pillows I have on the sofa for fall. Actually some of them will stay all year around, and a few will get changed out for the seasons.
I think I was stumped by the fact that the sofas mirror each other, and I couldn’t decide if they should match exactly or not. I finally decided to match them exactly with the exception of one differing pillow on each sofa. I found the perfect faux leather pillow covers on Amazon. And then I found three different pillow covers at Ikea that I felt mixed and matched well with the colors in the gallery wall, but were yet mostly neutral.

The art you see hanging on the bottom left of my gallery wall is my favorite piece of art I have eve thrifted. It was found at my local Mission in WV and I paid $5 for it. I have had it for several years, and it still inspires me every time I look at it. They say to buy the things you love, and I definitely love everything about this piece. It is a Van Gogh print titled Bowl with Zinnias and other flowers.

Of course, our Pug, Tyson Chicken Nugget, had to get in on my photo shoot. You know he’s not going to allow me to photograph a space without him being in at least one shot! Ha!

This view from our living room into our breakfast room gives you a look at the lighter color I plan to paint all of our downstairs wall. It is called Sentimental Beige by Behr. It really lightens up the space, and I cant wait for the rest of our downstairs to feel this light and airy!


Our kitchen was our first big renovation, and really our only big renovation so far in this house. We have made other updates, and mostly been spending our budget to purchase furniture, but we sprang for a large renovation of our kitchen when we moved in, and it was worth it, because we enjoy this kitchen immensely! You can read all about our kitchen makeover here.
I love the simplicity of the wheat in this white metal vase on the kitchen island. The basket hanging over our pantry was a find from a trip we made to Magnolia Market over the winter. I love that we live near Waco! Other than a few small pumpkins, the wheat is the only thing I added in the kitchen for Fall.


Lanterns over Island | Farmhouse Sink
Our breakfast room is one of my favorite spaces. I like to decorate this room for the different seasons. And the black door in this room is just my absolute fave! I made the little wreath I have hanging on the door.

I found these pretty branches at Hobby Lobby, and they are so much prettier in person than I was able to catch on camera. They are more of a gold in person, and they look so realistic. I love the way they look on my buffet for Fall.


I decided to use a few of the extra Fall pillows I had not used in my Fall decor in the house in my sun room. Just a few pillows, a colorful afghan, and our sunroom is feeling pretty for Fall too.


More black doors that I adore out here in the sunroom, and I added another wreath that I made a couple of years ago to the back door. It really did take me just a few minutes to give this space a Fall vibe.


If you are craving some more Fall inspiration, and you would like to follow along with the other tours that are a part of this hop, it’t time to hop on over and join Jennifer over at An Inspiring Home, she has a lovely tour to share with you, so be sure to check her out! She is the organizer behind this Hello Fall tour of homes, and I also can’t wait to check out all of the beautiful tours myself! Here’s a little preview for you of her lovely home tour!

And of course, don’t forget the other stops in our Hello Fall Tour, you don’t want to miss them!
An Inspiring Home | The Aspiring Home | Our Perfecting Manor

Savvy Apron | Home on Poplar Creek | First Day of Home | Sweet Parrish Place

Do you have champagne taste and a tiny budget too? Love fashion, DIY, crafting, all things vintage and thrifty? Stick with me, I’ve got you covered!
Sign up to get my posts delivered to your inbox here
Follow me here:
Facebook / Twitter / Instagram / Pinterest / Bloglovin / Google +
Shop My Amazon Storefront Here
The post Hello Fall Home Tour appeared first on Sweet Parrish Place.
]]>For week 2 of the $100 Challenge, I am sharing how to remove scratches from a mirror using a simple household staple. Hey friends! It’s week 2 of the $100 Room Challenge, and I am kicking it off by sharing the mirror we used to replace the super ornate ones we used to have hanging […]
The post How to Remove Scratches from a Mirror | $100 Room Challenge Week 2 appeared first on Sweet Parrish Place.
]]>For week 2 of the $100 Challenge, I am sharing how to remove scratches from a mirror using a simple household staple.

Hey friends! It’s week 2 of the $100 Room Challenge, and I am kicking it off by sharing the mirror we used to replace the super ornate ones we used to have hanging here. This is a mirror that was pretty badly scratched, and we happened to have it lying around after removing it from our second bathroom. I thought it might not be salvageable, but alas, I saved it, and today I am sharing a great tips for how to remove scratches from a mirror.
Let me start by thanking Erin over at Lemons, Lavender, and Laundry for being our lovely host. If you are new to the $100 Room Challenge you can read more about it here. But the basic premise for the challenge is this: you get one month, and $100, to completely makeover one space in your home. I know what you may be thinking… $100 is not a lot of money. Just wait. What you can do with $100 (and a little creativity) will absolutely blow your mind. And if you don’t believe me, just follow along, and click through and see what the other participants are doing for this challenge, and you will see so many great things happening with just a $100 budget.
Please note: Some of the links in this post are affiliate links, which allow me to make a small commission from your purchase, but your purchase price stays the same.

You can see the gaudy mirrors that were here when we moved in above, and then you can see the mirror we decided to replace them with below. We had removed it from another bathroom a couple of months ago, and it was just sitting around taking up space, so although it is a tad small for the space, I decided to paint it and make it work for this bathroom, at least until it is one day in the budget to replace it.

I knew I could paint this mirror and give it a more modern, updated look. and this might be an unpopular opinion, but I prefer one large mirror in my bathroom. I just feel like it allows for more visual space when I am standing in front of it getting ready. I also feel like the larger single mirror reflects more like from the window on the opposite wall, which is good because this room doesn’t have a ton of good lighting.
I purchased some metallic spray paint, and gave it a few coats, and this is how it turned out. Better, right?! I must admit, I am not happy with the color of spray paint I chose, but I hung it up anyway because I was dying to see it in the space. I plan to take it back down and paint it again with a different Gold metallic spray paint.

This is the best inspiration I could find to give you an idea of the color frame I am going for with this mirror.

I picked up a can of Rustoleum spray paint in the color Pure Gold. I haven’t had a chance to repaint it yet, but I will be sure to share how it turns out in a future post.

How to Remove Scratches from a Mirror
As you can see in the photo below, this mirror unfortunately got some scratches on it. At first, I worried that it was ruined, but upon further investigation, I discovered that the scratches were to the glass front of the mirror, but the actual mirror part (which is on the back, really) was not damaged.

I decided to try to remove the scratches, using toothpaste, of all things! I did some preliminary research, and read that you could try using a plain white tooth paste and rub it on the scratches. I was skeptical, but it was worth a try, right?
You Will Need:
- plain white toothpaste
- clean lint free rag
- wet rag or sponge
- glass cleaner
- clean dry rag
I found a sample of the plain white toothpaste in my bathroom cabinet, and decided to go for it. Using a clean lint free rag, I got some of the paste on the rag, and proceeded to rub all over the scratches in a circular motion.

I worked in small sections at a time, and rinsed the paste off of the mirror with a clean wet rag frequently so that I could check my progress and see if the scratches were coming off. It is hard to see once there is toothpaste all over the mirror.

I repeated this over and over until all of the scratches were completely gone! I was literally amazed at how well the scratches came out. They are 100% gone! And I repaired this mirror for zero dollars! A mirror this large and with a nice frame like this would sell for hundreds of dollars in a store, and I almost thought I was going to have to throw this mirror away. So happy to be able to salvage it and use it in this bathroom makeover!

Please be sure to come back next week to see my week 3 progress. Next week I will be sharing the finished cabinets. I am currently working on painting them. They are all painted and dry, but now I need to seal them, add the new handles, and then re install the doors.
In case you missed my week one post, below is an inspiration photo that shows the color I painted my cabinets. This is the color Sea Salt by Benjamin Moore. I still haven’t chosen the handles, and am currently debating a matte black or the same color gold I plan to paint my mirror. Any opinions on what color handles I should use? Did you know how to remove scratches from a mirror before now?

Farmhouseish | Black Cabinet Pulls
If you like it, then you wanna put a pin on it!

For even more bathroom inspiration, check out my Bathroom Pinterest Board here.
Check out my previous $100 Room Challenge Reveals
Guest Bedroom Reveal | Modern Farmhouse Dining Room Reveal | Mudroom Makeover Reveal
Modern Farmhouse Dining Room/Office Reveal
Make sure you check out what the other participates are doing using the link up below.
Do you have champagne taste and a tiny budget too?
Love fashion, DIY, crafting, all things vintage and thrifty? Stick with me, I’ve got you covered!
Sign up to get my posts delivered to your inbox here
Follow me here:
Facebook / Twitter / Instagram / Pinterest / Bloglovin / Google +
Shop My Amazon Storefront Here
The post How to Remove Scratches from a Mirror | $100 Room Challenge Week 2 appeared first on Sweet Parrish Place.
]]>Today marks day one of the $100 Room Challenge, and I’m sharing the before photos, and my budget-friendly bathroom makeover ideas that will give this space a whole new look. Hey friends! Today begins day one of the $100 Room Challenge, AND Erin, our lovely host, is celebrating the 5 year anniversary of the $100 […]
The post Budget-Friendly Bathroom Makeover Ideas | $100 Room Challenge appeared first on Sweet Parrish Place.
]]>Today marks day one of the $100 Room Challenge, and I’m sharing the before photos, and my budget-friendly bathroom makeover ideas that will give this space a whole new look.

Hey friends! Today begins day one of the $100 Room Challenge, AND Erin, our lovely host, is celebrating the 5 year anniversary of the $100 Room Challenge. I am so happy to be joining this challenge for the 5th time with a budget-friendly Master Bathroom Makeover ideas. I plan to focus heavily on the power of paint to transform this space. One the of the most budget-friendly things we can do to transform spaces and objects is to paint them, and I will be doing quite a bit of painting this time around.
I love joining the $100 room challenge for lots of reasons. The biggest reason is because I love a budget-friendly makeover, and I love the idea of sharing with others how we can transform spaces and improve them without breaking the bank. And I like the idea of doing a makeover in phases. I often like to start by making some key changes that don’t cost a lot, and then later on, when it is in the budget, I can add to what we have already done, and make some more expensive updates. Taking the time and spending a small amount to make a room more pleasing temporarily, while you are saving for a bigger renovation, is something I love to do.
I also love the idea of participating in a challenge with like minded people. We all have one month and $100 to make over our own spaces. There are usually one or two dozen other bloggers who participate in each challenge, and it is fun to follow along with their projects and to meet other talented bloggers who have at times turned into friends. You can find links to all of the other participants at the bottom of each weekly post.
Before we get started looking at the before photos and talking about plans, did you catch part 1 and part 2 of the home tour I shared recently to celebrate our one year anniversary of living in our Yellow Prairie House? If not, hop over when you get a chance and check out all the deets!

Budget Friendly Bathroom Makeover Ideas
Now, let’s talk about my master bathroom, shall we? I will be sharing lots of before photos with you throughout this post, along with my goals for this space.
Goal 1: Replace outdated mirrors
As you can see, we had a pair of really ornate mirrors over the sink, which were much too fancy for my taste. Actually, if I am being honest, I got a jump start on replacing the mirrors, because I already have sold them on Facebook Marketplace- $30 for both mirrors.

I plan to replace these two outdated mirrors with one mirror that I already have. I will be painting the mirror to make it fit more with my vision for the space. I have shared a mirror I found at Overstock.com that has a frame is a similar color that I plan to paint my mirror that I already own. This mirror costs more than my entire budget for this room, ha! Just saying!
Goal 2: Sharpie Shiplap and Fresh Painted Walls
I want to make a feature wall behind the sink and the mirror. This will extend all the way to the ceiling. And it won’t cost me anything but the cost of a few fresh sharpie markers. I already have the paint I need to do this part. Here’s an inspiration I found for the type of look I am going for with the wall. She also gives a tutorial for how she created her wall! I will also be painting the other walls in this space, but the sharpie shiplap will be an accent over the sink and possibly the toilet nook wall.

Goal 3: Paint Cabinets
We have cabinets over our toilet, which is back in a little sort of nook. And we also have the sink cabinets. All of them are currently painted a chocolate brown, and they are in rough shape. I think this is the paint that was originally on these cabinets, if I am guessing correctly. Needless to say, I plan to give the cabinets in this space all a fresh coat of paint, and add some fun hardware.
I really love the color Sea Salt by Sherwin Williams. And I have actually had a little paint chip of this color propped up on this sink since the day we moved in. So when I saw Lauren’s Sea Salt painted cabinets that she just recently DIY’d over at Farmhouseish, it sealed the deal for me, and I knew I wanted to use it on my cabinets.
Goal 4: Tone Down Glass Block Window with a cornice board or a window treatment
Although I like the fact that the glass block window offers plenty of privacy while allowing in plenty of natural light, I think it’s an eyesore. So I want to soften it up somehow with some type of a window treatment, and this idea is still formulating in my mind.

I do like the way this roman shade looks on this glass block window, so I am wondering if I might be able to IY something. Or I was thinking of a reclaimed wood type of cornice board that only exists in my head right now. So we’ll see what we come up with.

Goal 5: Add Decorative Accents
I am not sure how eery detail is going to turn out in the end. That will probably depend on some possible thrift store shopping finds, and maybe a DIY bathtub tray. Maybe some fresh hand towels. You get the idea! Things that will make the space look pulled together and pretty.

We will see how much I can fit into this tight budget with my time allotment! I do have an extra day off this coming weekend for Labor Day, so I plan to get to painting! I have quite a large birthday coming up during this challenge, and my husband and I will be spending a weekend away, so I won’t have as much time to work on this room. That makes me a little nervous, but I am going to give it a go anyway!
Check out my other $100 Room Challenge Reveals:
Make sure you catch up on what the other participants are planning for their spaces using the link up below.
Do you have champagne taste and a tiny budget too?
Love fashion, DIY, crafting, all things vintage and thrifty? Stick with me, I’ve got you covered!
Sign up to get my posts delivered to your inbox here
Follow me here:
Facebook / Twitter / Instagram / Pinterest / Bloglovin /
Shop My Amazon Storefront Here
The post Budget-Friendly Bathroom Makeover Ideas | $100 Room Challenge appeared first on Sweet Parrish Place.
]]>We are back, celebrating one year in our Texas House with lots of before, after, and progress photos of our upstairs living areas. Hey Friends! We can’t believe it’s been one year since we moved into our new home in Austin, TX, and we want to celebrate by sharing lots of before and now photos […]
The post One Year In Our Texas House | Part 2 appeared first on Sweet Parrish Place.
]]>We are back, celebrating one year in our Texas House with lots of before, after, and progress photos of our upstairs living areas.

Hey Friends! We can’t believe it’s been one year since we moved into our new home in Austin, TX, and we want to celebrate by sharing lots of before and now photos with you. We are happy with everything we have accomplished in our new home in our first year. We want to welcome you to part two of a home tour after One Year In our Texas house!
If you didn’t catch part 1 of our one year home tour, where I shared a tour of our downstairs, you can go read that first. Well, today I want to bring you upstairs. So many times over this past year, I have hesitated to share the upstairs of our new home, because truth be told, it is not where I want it to be. But in the spirit of keeping things real, I am going to share where our upstairs is after one year of living here. I love getting a glimpse into how people really live, and our upstairs is our current reality. So I’m hoping you will give me some grace, try to picture the possibilities, and enjoy this glimpse into our reality!
Stairwell Before|Progress

I thought I would start with this view up our stairs from when we first bought the house. If you scroll back up to the photo above, you can see what that same glimpse up our stairs looks like today. There is so much I want to share about our stairs. Starting with the stair rails, which I would like to completely replace with something more traditional.
You will notice the two paint colors on the landing wall. The bottom half is the same brown as the downstairs walls, and then the top half of the wall is a creamy color. I despise the two paint colors, and it is on my agenda to give this whole stairwell situation a makeover some day. But for now I just added some artwork. The lighting in almost our entire upstairs needs addressed as well, which you will soon see. Take note of the ceilings in the before and after of this space, and see what a big difference painting the ceiling white made!
Bonus Room Before|Progress

The first thing I knew I liked about the upstairs in this house when we walked through it for the first time was the floors. They still probably aren’t the floors I would have chosen, but they are very pretty and great quality hardwood floors. And they are far superior to the floors downstairs. We have a light colored dog who sheds constantly, so it shows up a lot on the floors. If it weren’t for that, I would love them a lot more than I do.
A bonus room space at the top of the stairs was one thing on our list when house shopping, and I love the space we have here! We have two young adult children who come to visit, and when we moved, we downsized from a 4 bedroom to a 3 bedroom home. So for the time being, we decided to add a daybed that has a trundle to pull out instead of a sofa in this space. That way we can sleep 2 guests here. And we made the right choice, because it has been used several times so far! We found this daybed at Wayfair, and we added memory foam mattresses we ordered on Amazon.

We haven’t painted the walls in most of the upstairs since moving in. Luckily, they are a creamy neutral paint color, so I am fairly happy with them. You can see a glass coffee table in these progress photos that has since been moved downstairs to our front room. I didn’t like it up here anyway. I added this vintage trunk that I painted in a spot right at the top of the stairs. It holds extra blankets for guests. I hung the curtains that used to hang in our old living room here. I still need to find an area rug, and a few other odds and ends for this space, but it functions great for our family.

Please allow me to pause for a brief interruption, and share a before photo of our guest room. Pay special attention to the built in cabinetry in this space, because we had it relocated to two different spots in our bonus room. Read more about that below.

I love that this bonus room is L-shaped, because it has this cute little area over to the left of the stairs. It’s open to the downstairs, which makes it feel bigger than it actually is. When we decided to relocate the cabinetry from our guest room to our bonus room, I knew this little nook would be a perfect spot for an arts and crafts station. Here it is before we moved in.

And here is that same little nook today! I just love this transformation, even though it’s not quite perfect just yet. The upper shelves just so happened to fit perfectly against this wall. Literally they felt like they were made for this space. We did have to have the desk side of the bottom half cut down a little bit, but there is still plenty of room to slide a sizable chair underneath.
Our 12 year old sits here for hours upon hours, creating and doing art. And we just let the mess pile up until I can’t stand it for one more second, then I clean it, and we repeat. But it’s been wonderful to have a designated space that is sort of tucked away from guests. So no one else really sees the mess. The cabinet you see to the left of the window also came from our guest bedroom, which was previously being used as a home office.

This area has three of the gaudiest light fixtures I have ever seen, haha! Two in the bonus room, and one in the stairwell, which is kind of the same area. It’s not in the budget right now, but I simply do not like the lights at all. Here is a good shot of them.

One day I was cleaning this room, and I got a wild hair, and just started taking crystals off of the two lights that I could reach. In the end, this is what I was left with. Still not the lights I picture in this space, but much more pleasing to my aesthetic. What do you think?

This is where the remainder of the built-ins from the guest room landed, on the other side of the room. We have another little desk area on this side where we have a PC and a place to do school work or pay bills. I plan to change all of these built-ins up with paint or stain one of these days. But I am far from the planning stages on this room. The entire bottom shelf is currently filled with a collection of my husband’s I have to say they don’t make me happy, but they do make him happy, so sometimes as a wife, I need to compromise.
I have to say, I struggle tremendously with styling these shelves, which is a huge reason why I have never shared them before on the blog. I always seem to feel like they are too busy looking, yet I like everything I have up on them (minus the entire bottom shelf) individually. But all on display on these shelves, it feels busy to me. I envision painting this whole area one day, and styling these shelves in a much more cohesive way. We have a small television hanging here, which is mostly used to play Wii. I need to find a small console table to place beneath it, but for now it’s a stack of vintage luggage. Honestly, this entire room is somewhat of a mish mash, and one day I will really focus some attention of making this space look the way I want it to. I just need to figure out exactly what my vision is. For now though, we find this room to be ever so useful for our family!

Master Bedroom Before|Progress

To the right of our stairwell, you will find our bedroom, and a hallway the leads to the laundry room and two other bedrooms. It was a bright blue on all four walls when we took ownership. And this was the only room in the house that I painted before we moved in. I painted it the color Gray Owl by Benjamin Moore, and it really improved the room so much! I really haven’t done much else in this room other than move everything here that we had in our old bedroom. But just removing the old curtains and painting the walls made a huge difference.
We actually just finally hung curtains in this room in July. And it made the room feel so much more cozy and soft. I bought the curtains from Ikea, and I ordered the curtain rods and ring clips from Amazon

If you notice the ceiling fan in the before photo below, and then scroll back up to the progress photo above, you will see that we added a light to the existing ceiling fan. I just bought a kit from Lowe’s, and my husband and brother-in-law attached it.
This bedroom is the largest master bedroom my husband and I have ever had, and we are so enjoying all of the space we have. Our last bedroom was tiny. We plan to buy a cozy chair to put over in the corner between the two windows you see here. I have been on the hunt for a second hand chair, but haven’t found the perfect thing quite yet.

Isn’t it amazing how changing just the paint and curtains in a room can change the look and feel of a room!? I have lots of other plans for this room, but for now, I am happy with the in between. We used the rug from our old living room in this room, and I;m happy with it. I may layer something else over it one of these days. And I am currently debating what color I want to paint this bed.


This room has a little nook on the other side, right next to the master bathroom. I decided to use a small desk we brought with us from WV, and make a little spot to sit and do my hair and makeup when I get ready.

It works out just fine, and it makes it easier that my husband and I aren’t constantly fighting for space in the bathroom. I like to sit when I get ready, so this works for me. One day, I plan to change this desk for a more proper makeup vanity, but for now, it works. And we still have room to spread out in our bedroom, even with me having this makeup table in here.

Master Bath Before|Progress
This master bathroom checked all of the boxes for me. It had two sinks, a separate bathtub and shower, and a large master closet inside of the bathroom. It could use some updates, but it has good bones and it is a fairly large bathroom.
I am actually getting ready to take on the $100 Room Challenge, and this bathroom is going to be getting a little makeover during the month of September, so you are actually getting a little sneaky peak below, because the mirror is a part of the new makeover. But I am still not quite finished with this mirror, so I’m really not spoiling much.
As you can guess, the mirrors in the before photo were not my style at all. I find them to be way too fancy and ornate. And it’s hard to believe I lived with them for a whole year before I finally sold them on Facebook Marketplace. I’m not going to go into any details about this room, because I will be sharing my plans for this bathroom in a separate post that will be coming in the next day or two. But I have a pretty good plan to transform this space for a phase one makeover on a budget of just $100.

The glass block window in this room is my least favorite thing about the room. I want to rip it out one day and replace it with a regular window. I do like the privacy it offers, because it is directly across from our next door neighbors bathroom window. But I simply hate it. Every house in our neighborhood has these windows in the master bathroom.

When you exit our master bedroom, this is the view you see of our upstairs. to the right is the bonus room, to the left is a bathroom, the laundry room, and two bedrooms.

And this is the same view right now. You might remember this old vintage dresser that I stripped some of the paint off of. I just couldn’t part with this. The bathroom right around the corner is sadly lacking in storage, so we used this dresser to store things that belong in a linen closet or medicine cabinet. It has come in very useful and it is in a convenient location right outside of the bathroom door.

Second Bathroom Before|Progress

This is the bathroom that our kids and guests use. And we have recently made some changes to this bathroom to make room for our oldest daughter. And, I guess now is as good a time as any to let you know that our 24 year old daughter has returned to the nest. Long story, but she decided to leave Miami, where she had been residing for two years, and relocate to Austin to be near us, so she has moved in with us temporarily until she can secure a job and an apartment.
I started working on this bathroom back in March, right after quarantine hit. I never liked the vanity and sink in this bathroom, but it is currently not in the budget to replace, so I gave it a little makeover with some paint in the color Mossy Banks by Behr Paint. I also added some crates above the toilet that are used to store hand towels, wash cloths, and tissues. You can read all about this sink makeover here.

Since I wrote the post about our sink makeover, I have made a couple more changes. You might recognize the mirror in the before photo below is now hanging in our master bathroom. I painted it and hung it in there. Let’s take just a brief moment before moving on, to acknowledge the ugly light fixture that is off center over the sink. It will be replaced one of these days.

I needed to add a little storage for my oder daughter to have a place to put some things that she needs easy access to, and I happened to find some shelves at Goodwill. And they just so happened to be a perfect fit for the wall to the right of this sink. They were also perfect to house bathroom types of items. So, I decided to paint them the same color as the walls.
I happened to find a can of paint in our garage that had been used to paint this room. I plan to paint these walls for now, but I love the way these shelves look the same exact color as the wall, because they kind of just blend in. But they are extremely useful for my daughter, and bonus, they have some pegs to hang a hand towel and a washcloth on.
I had to remove the larger mirror because the shelves wouldn’t fit. So I added this mirror that I already had. It is a temporary fix, and too small, but it works until I find something to replace it. I also plan to replace the entire vanity and sink someday.


Laundry Room Before|Progress

Not much has changed in our laundry room, but I thought you might be curious, so here it is! It is a small room, but I am big time happy it is upstairs, and right outside of our bedroom. Makes it so much easier to do laundry! We did purchase a brand new washer and dryer right after we moved in. They are a champagne color and I really like them.
I also added the drying rack you see hanging on the left wall. It folds out to hang laundry to dry, and then folds neatly down to the wall if you are not using it. One of these days, I plan to give this room a makeover and make it something much more special, but for now, I am just thankful to have it at all.

Guest Bedroom Before|Progress

I actually gave this room a makeover last winter for the $100 Room Challenge. Obviously, the biggest change here is the removal of all of the built-ins that were here when we moved in. We also had to have some flooring replaced to match the existing flooring. You can read all about the transformation here.


This room has changed again, because, like I said, my daughter is living with us, so it is no longer our guest room. It is now her bedroom. So I let her change the decor in here, and I need to photograph it and share it because it looks super cute, even better than my little $100 makeover. Although, I do think I made quite a significant impact with a $100 budget!
Third Bedroom Before|Progress

This bedroom is the room that belongs to our 12 year old, and I thought it best to share at least the before photos, so that you could get an idea of the house as a whole. But my 12 year old child has asked me not to share her bedroom on the blog, and I have no problem with that. Besides, lets face it, the room is a disaster the majority of the time. I share a lot here on the blog, but if my child asks me not to share, I have no problem obliging that. They are only tweens and teens for so long, and they deserve to have a space free from prying eyes if they want it.
We have painted this space and bought new furniture as well, and the walls are now a very pale pink with posters and other things plastered over most of the walls. There is a shaggy grey carpet on the floor, and lots of room to hang out with friends. One of these days if I ever get permission, and the energy, to do a deep clean and photograph this space during the two seconds it stays clean, I might share it, hehe.

Well, now I have finally shared the entirety of our home on the ole’ blog! I can’t believe how fast our first year living in Texas has flown by! I have so many big plans to update this house slowly over the next few years and also on a budget. Some things we will take on ourselves, and some larger things we will hire out, but one thing is for sure, there will be lots of change to come in our yellow prairie house.
I plan to bring you along for the entire ride! I am currently working on my first post for the $100 Room Challenge, where I will be doing a phase one makeover of our master bathroom. The project has already begun, so be looking for the first post of this month long challenge in the next couple of days! thanks for taking the tour of our upstairs, and please please, come back soon for a visit!
Do you have champagne taste and a tiny budget too? Love fashion, DIY, crafting, all things vintage and thrifty? Stick with me, I’ve got you covered!
Sign up to get my posts delivered to your inbox here
Follow me here:
Facebook / Twitter / Instagram / Pinterest /
Shop My Amazon Storefront Here
The post One Year In Our Texas House | Part 2 appeared first on Sweet Parrish Place.
]]>We are celebrating one year in our Texas House with lots of before, after, and progress photos of our downstairs main living area. Hi Friends! We can’t believe it’s been one year since we moved into our new home in Austin, TX, and we want to celebrate by sharing lots of before and now photos […]
The post One Year In Our Texas House | Part 1 appeared first on Sweet Parrish Place.
]]>We are celebrating one year in our Texas House with lots of before, after, and progress photos of our downstairs main living area.

Hi Friends! We can’t believe it’s been one year since we moved into our new home in Austin, TX, and we want to celebrate by sharing lots of before and now photos with you. We are happy with everything we have accomplished in our new home in our first year. We want to welcome you to part one of a home tour after One Year In our Texas house!
The photos you see here are photos that were taken at random times and during random seasons. But it gives you a great idea of how we are progressing with making this house our home.
This photo was taken on the same day we took ownership of our house! I nicknamed it my Yellow Prairie House for blog and Instagram purposes. I am excited to share where we are with our downstairs with you today. Some spaces are finished, some are partially finished, and some aren’t finished at all.
Front Porch Before|Progress
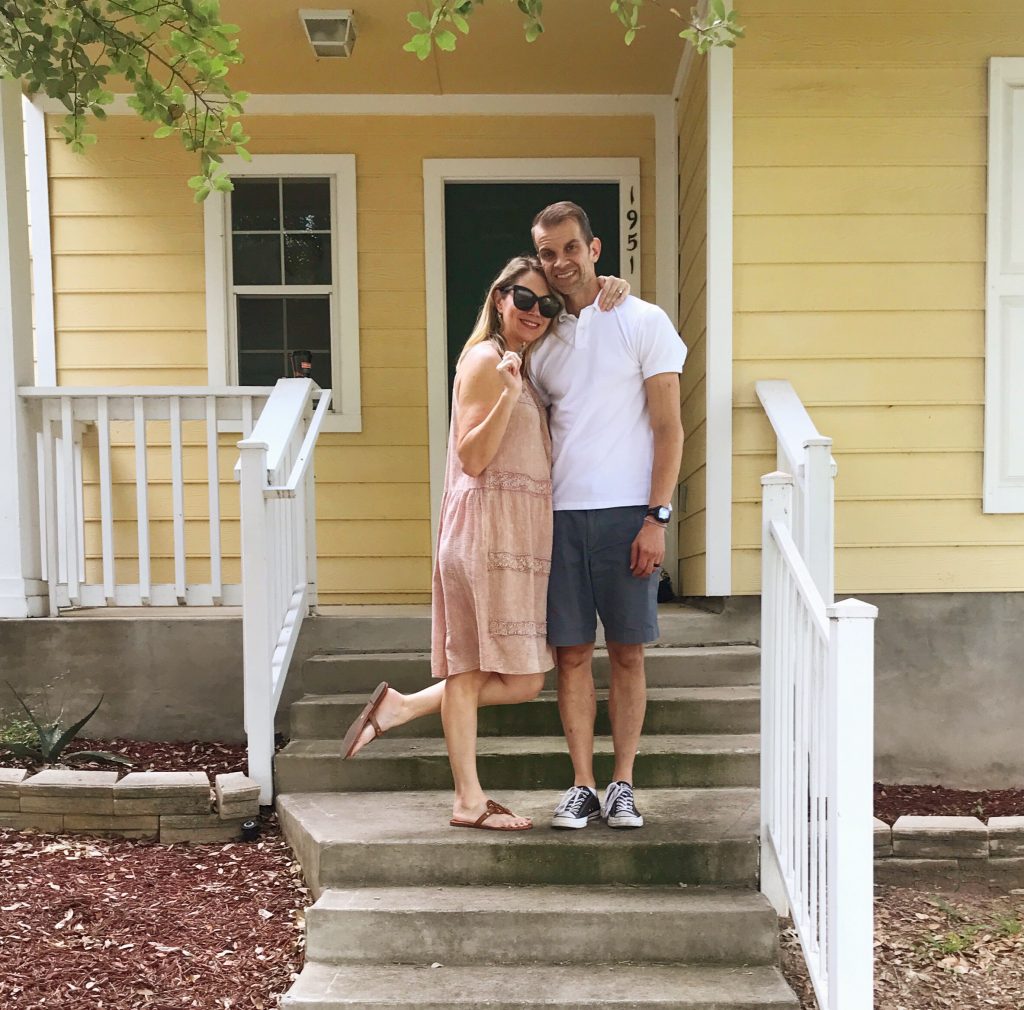
One of my first DIY projects in our house was to paint the front door. I mean, is the house really yours if you don’t paint the front door?! I used front door and shutter paint by Deco Art called Americana Decor Curb Appeal, in the color Nantucket Grey.
We added a comfy wicker chair, a small side table, and the bench that used to be in our old dining room out on our small front porch, and I just think it feels cozy! We also added a custom made planter to our front porch rail. This was made by my talented father-in-law. He also made us a front window box, but we haven’t been able to install it yet.
Lastly, we changed out the ceiling light on the front porch. If you look closely, you will see that we need to touch up the ceiling from the old light being removed.


Back Patio Before|Progress
This patio spans the entire length of the back of our house, which we love. The things we don’t love are the rust stained concrete and the stairs that strangely lead to a doggy door in the side of the house. In the future, we also would love to add a large pergola, some lush greenery back here, and a grilling area .

As you can see, I painted the back door in the same Nantucket Grey paint as the front. Back in the Spring, my son visited, and he power washed as much of the stain off of the patio as possible. And we have lived with it like this ever since. Honestly, we both agreed we like it before, although it’s quite rough and need attention. We are currently awaiting a phonecall to get started with having this patio painted.
We pulled out those steps to that doggy door and placed our cooler in front of that, since it is not something we will ever want to use. We purchased a little conversation set and an area rug. This center area is where we would like to have a pergola built in the future. We bought a large storage box which you can see to the left to hold all of our outdoor cushions for when it rains. But with the weather in Austin, that isn’t very often.

We also want to add a cute grilling area and a dining table out here, and we have plans to slowly landscape the back yard and give us a little more privacy and shade. We started this year with planting about 6 crepe myrtle bushes going up our fence line. They really aren’t big enough yet to get a good photo of them, but most of them did bloom this summer, which is a sign that they are healthy.

Front Room Before|Progress
This is a very bad before photo taken with my iPhone and poor lighting. One thing I noticed immediately about this house that I wanted to change was the color of the ceilings. You can see in the below photo that they were the same brown color of the walls. It felt like a cave to me, and it was something that we quickly changed.

We had all of the ceilings and crown moulding downstairs (except the sunroom) painted in a fresh white. I think it cost us about $300 dollars to hire this job out, and it was well worth it. This job was done while we were both at work during the day, and we were amazed upon returning home after it was finished to see how much the white painted lightened and brightened the entire downstairs. It truly made me love the house even more!
We do plan to change the wall color at some point, but once the ceilings were white, I decided I could live with this for a bit while we focused on other things, one being to furnish the downstairs. You see, we left most of our furniture behind in West Virginia before we headed to Texas.
You will see that we painted all but one door in our downstairs black, and I love the look of black doors. The paint color we used is called Plum Martini by Benjamin Moore. The floors were here when we moved in, and I can’t wait for the day we can replace them with a higher quality of flooring. These are a cheap laminate, and they actually look better in photos than in person.
We have a small entry area, so I added a little mail drop spot behind the front door. And I found the white shelf you see to the left of the door at a local Goodwill. I am on the hunt for a small bench or something to add beneath it where we can store shoes

This is a first peek at the furniture we finally have in our front room! I first saw these chairs from Kirkland’s while watching someone’s Instagram stories. She happened to be doing a tour of her local Kirkland’s, and she skimmed across these chairs. She didn’t really even mention them, but my eyes lit up, and I was instantly in love! I waited for nine long months before my husband finally gave me the green light to buy them. They were a little higher priced than we wanted to pay, but we got a Memorial Day sale and we took the plunge and bought them. Stay tuned for a post coming that will share more details and photos of this front room.
We added the glass coffee table that had been living in our bonus room upstairs. We actually brought it with us when we moved, but it wasn’t jiving in the bonus room. I eventually want to add a large round ottoman here instead. But this is a decent place holder.
The area rug was a Christmas gift for me last year, in preparation for these chairs, lol! I just recently painted the little side table you see in between the chairs using a chalked spray paint in the color Linen White. I am still debating on what I want to do with my grandfather clock you see behind the chair. Ultimately, I want to move it to a better spot, but unfortunately, I haven’t found one yet.

Powder Room Before|Progress
We have a little powder room right off of the front entry. It was pretty plain and simple when we moved in. And it pretty much stayed just like you see it below, until I decided to liven things up in here during the quarantine.

I gave this powder room a little makeover using some bold wallpaper. You can read all of the details about this powder room here. I love the bold pattern of this wallpaper, and the fact that it is still neutral colors makes it easy to change up the rest of the decor whenever I tire of it.

I still need to address the flooring and the sink in this room, but for now, it is a whole lot more pleasant of a space. And it’s the bathroom that guests use when they come to visit, so it was nice to partially check this off of the list.

Kitchen Before|After
The kitchen is the main room that we focused on doing a major update on when we first moved in. When we bought the house, it looked just the way you see it in the photo below. Oak cabinetry, formica counters, outdated lighting, not enough lighting, a small sink, and a sad kitchen island.


Renovating this kitchen completely changed the downstairs in our home. We are still just thrilled with the results! You can read all about this kitchen update because we shared all of the details back in the Fall as part of the One Room Challenge.
As you can see, we painted the existing cabinetry white, and then we had some custom cabinetry built to go above the existing ones. These cabinets have glass doors, and they are the start of the show in this space! We also changed up the kitchen island significantly, added a beautiful farmhouse sink, changed out the lighting over the island, bought a new refrigerator, and had recessed lighting added throughout the kitchen. The new Kitchen Aid white refrigerator we bought is exactly what I had pictured for this room. We hope to eventually replace the rest of the appliances to match the refrigerator.

I had initially planned to add a pop of color on the pantry door, but in the end I settled on Gray Owl by Benjamin Moore. I still may go for a bright pop of color here one day though.

Breakfast Room Before|After
We tackled this breakfast room at the same time as the kitchen for the One Room Challenge. Here you can see what it looked like before we moved in, with the brown ceilings and all. I do love the plantation shutters on the windows, and the chandelier stayed, because I felt I could make it work in this room.

You can obviously see that these photos were taken last Fall. You can read all of the details about this space here. The ceilings are now white, and we painted the walls a color called Sentimental Beige by Behr. I also painted the two doors and window ledge in this space in the Plum Martini color, by Benjamin Moore. The furniture and the rug we brought with us from our previous home.


Living Room Before|Progress
This living room is a room I don’t believe I have shared before on the blog. I just never have really felt like it was photo worthy yet, but here is the before with the matching brown walls and ceilings.

The room to the right of that little half wall will house a dining table one day, but in the meantime, I added a bookcase and some decor, and this is what the little corner looked like last Christmas.

And here are a few shots I took of our living room from last Christmas, that I never ended up sharing on the blog. But this will give you an idea of how our living room looks. I do have plans to paint the walls, and maybe add some shiplap on the wall where we have our TV hanging, one day down the road. Don’t laugh at our small TV. We have never been the type to spend an exorbitant amount of money for a giant obnoxious TV. But I do dream of getting a Frame TV in here eventually.

These matching sofas we our first furniture purchase for our new home. We bought them at a local store called Home Zone, but honestly, we are not happy with them. Both of them have broken, and we had to send both of them back for repair. The frames broke.
So during quarantine, when we were stuck at home, we had to send both of them back in for repairs, and being stuck at home with no sofas was not a fun experience. Since they were repaired, they have been holding up just fine, and I do like the look of them. Luckily, we had purchased a warranty on the sofas that covered the repairs
We purchased the coffee table from Home Zone as well, and I must say I am very happy with it. We ordered the TV table from Amazon last year, it was actually my birthday gift. You can see I added a gallery wall surrounding the TV, which is something I did in the living room of our previous home as well. We used a couple of pieces that are from our old living room gallery wall in here, but several things were added. I plan to add a couple of things to the wall as I find them.

The small side table you see next to the sofa is a piece we brought with us that I got for free. In this photo, you can see it was in need of a makeover, and I painted it over quarantine too. I also used this same paint color, called Mossy Bank by Behr, on a bathroom vanity upstairs and a bookshelf you will see a little further down in this post. I found the small wine box you see on the bottom shelf of the table at a thrift store.


Sunroom Before|Progress
The sunroom in this house is one of my most favorite features of the home, and one of the reasons we bought the house. I have always dreamed of having a sunroom. And although this one is small, I had big dreams for it. You can see that when we moved in the walls, ceilings, and ceiling fan were yellow, the same color as the exterior of the house. And the floor was the same rust colored stain as the outside patio, and it had a worn out stencil on it.

I decided to tackle this room during our quarantine. You can read all of the details of this renovation here. I started by painting the walls the same color I used in our guest room, Bistro White by Valspar. The walls are the same siding as the exterior, so I wanted it to sort of look like ship lap. I also painted the floor in the color cracked black pepper, using garage and floor paint.
I love the outdoor sectional we added here, and it brings me great joy now to see someone constantly sitting in our sunroom and enjoying the fruits of our labor. I do still need to purchase an area rug for this room, and I still need to address the ceiling and the ceiling fan.

Since I shared our sunroom makeover on the blog, we have actually made some more progress in our sunroom. I made some DIY cafe curtains using a drop cloth, and I need to share a tutorial with the details on them. But I wanted to share how they turned out. I just love them!


The details of the curtains along with the black door added the perfect touches that this room needed.

Dining Room Before|No Progress
We do have one room downstairs that we have made pretty much no progress on. This room is pretty much one big area with the front room you saw above. One day we will have a dining table with a bench and chairs in this spot next to the windows. The only thing that has changed here in this spot is that the ceilings are now white. We also plan to replace the light fixture here, but I want to wait until we buy a table before I choose a light.

I don’t have a new photo from the exact same angle, but you can see, the empty area in the forefront of this photo below is where the future dining table will go. We definitely plan to get a dining table in the next 6 months to a year. I really want to find something second hand, but just haven’t found the perfect table at the right size yet.

This bookshelf sits right between the front room and the future dining room. I gave it an update over the quarantine as well, using the same Mossy Bank paint color that I used on the bathroom vanity upstairs and the small side table in the living room. I like to sprinkle an accent color around in more than one room in our home. So I would consider this Mossy Banks color part of our whole house color scheme, and I plan to add touches of it in other rooms as well. I also added some bead board wallpaper to the back of this bookshelf. I have owned this shelf for years, but it no longer matched our style, so I was super happy to change this up and make it fit with our decor.

Here is a before photo of our bookshelf, just so you can see what it looked like. I had added the bead board wallpaper before we moved. I just hadn’t painted it yet.

I hope you enjoyed seeing the progression of our home after year one living here! We still plan to paint more of the walls downstairs, and possibly add some moulding or shiplap, or something to add some more character here. I also want to change out the stair railing at some point. But that is for the future. The flooring in the entire downstairs will eventually be replaced, but that will be an expensive endeavor, and we have other things we want to spend on before we get to that.
I will be back next week to share part two of our one year in Texas post. I will be taking you upstairs to the bedrooms and bathrooms, and the bonus room. So stay tuned for that! Thanks for stopping by sweetie pie!
Do you have champagne taste and a tiny budget too? Love fashion, DIY, crafting, all things vintage and thrifty? Stick with me, I’ve got you covered!
Sign up to get my posts delivered to your inbox here
Follow me here:
Facebook / Twitter / Instagram / Pinterest / Google +
Shop My Amazon Storefront Here
The post One Year In Our Texas House | Part 1 appeared first on Sweet Parrish Place.
]]>