Sweet Parrish Place

I'm the girl with champagne taste and a tight budget

  • Home
  • About
    • About Nicki
    • Shop My Amazon
    • Contact Us
    • Blog Love
    • Link Parties
    • Advertise | Disclosure | Privacy Policy
  • Home Tour
    • Yellow Prairie House Tour
    • West Virginia Home Tour
    • Seasonal
  • Projects
    • Trashtastic Treasures
    • Holiday
    • Decorating
    • DIY
    • Crafting
    • Paint Projects
    • Cleaning/Organization
  • Style
    • Fall/Winter
    • Spring/Summer
    • Sweet Parrish Place Style
    • Tips/Tricks
    • Shop My Looks
    • Shop My Amazon
  • Travel
  • Lifestyle
    • Family
    • Decor
    • My Favorites
    • I’m Loving It
    • Personal
    • Shop My Amazon
  • Yellow Prairie House Tour

How We Added Legs To Our Kitchen Island

January 26, 2016 By Nicki 4 Comments

This post will explain how to install legs on a kitchen island.   This post will explain how to install legs on a kitchen island.

Hey friends!  We are still recovering from winter storm Jonas, how about you?  Today, I wanted to show you some progress we have made in our kitchen.  We installed new island legs on our island!  If you follow me on Instagram, you may have seen some progress pictures.  We completed this project during the week between Christmas and New Years.  Today I will show you how we installed them.  We are no furniture DIY pros, let me just tell you that up front.  This is how we got it done, and although it might not be perfect, it is very sturdy, and it looks great!  I can’t wait for the next step of this makeover, which will be adding a slightly larger rustic wood top.  Let me start by showing you the before of the kitchen island.  Well, this was actually after phase one of this makeover.  I had painted it white.   You can read all about how we painted it here.

DIY Kitchen Island Leg Installation

And this is what the island looked like before we ever touched it.  It’s certainly come a long way, am I right?


How to install island legs to an existing kitchen island


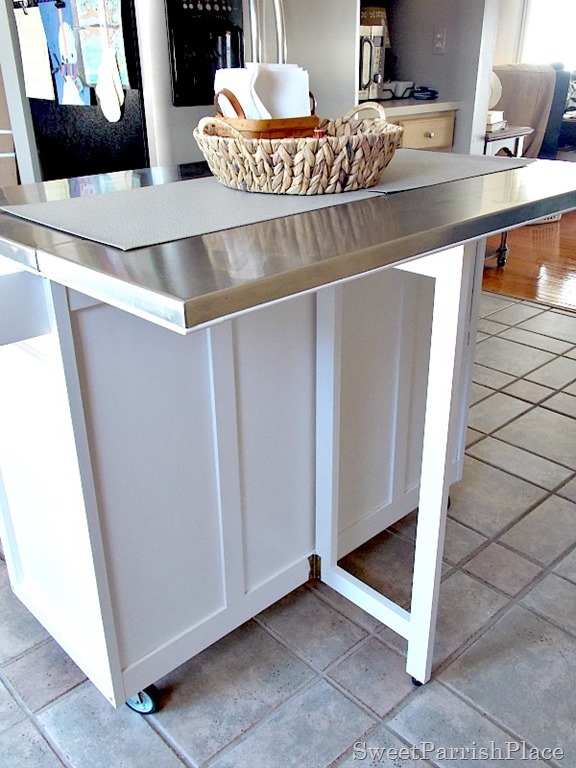
And now it looks completely different with these gorgeous new island legs from Osborne Wood Products!  The legs we chose are the Concord Kitchen Island legs in soft maple.  They have the most beautiful selection of legs. We used a paint sprayer to paint these legs, and I will be sharing a full tutorial on that part soon.  Right now the legs, I think, are just slightly too large for the island.  But that will be remedied after the new top is installed.  It will be a rustic wood top that is a tad wider and a little longer than the current stainless steel top. You can read about how I made over the barstools by clicking here.
island-legs-1
Things We Used:
Two Island Legs
1 1/2 inch wide pre-primed MDF board for the apron- and then we cut the pieces to fit.
Long piece of square trim that is 3/4 inch- and then we cut it to size.
Wood filler
Loctite Wood Adhesive
Shims
Caulk
White paint
Bottle Opener
10 Corner brackets
Sand paper
HomeRight paint sprayer
How we Did It:

We started by removing the old leg, which was a pull out contraption in the middle. We then filled in the holes left from the removed leg with wood filler, and let that dry.  Next, we filled in some other screw holes around the island as well.  Then we sanded and painted all of those spots when they were dry.
Now it was time to begin attaching the legs to the top.   We spread a strong wood glue on the top of the island legs.  This glue takes time to set up, so you have wiggle room in placing the legs.  Next we placed the island legs under the island where we wanted them, and moved them around until we liked where they were.  Then we started checking to make sure the legs were level on all four sides.  We used wood shims at the top of the legs, to shim up between the tops of the legs, and the bottom of the island top.  After we had them properly leveled and placed, we squeezed some wood filler neatly into the nooks and crannies at the top, and we let them dry overnight.  The next day, they were stuck like cement, but they didn’t look finished at the top, so I knew I needed to add some trim around the two outsides of the legs at the top.   And I also decided to add an apron around the three sides to give it a more finished look.  So I was off to Home Depot to buy two different kinds of trim for my island.  This is the island all finished except for paint touch ups.
island-legs-in-progress-1

So we did add some corner brackets between the island top and the table legs to make sure that they were completely stable.   You can see in the next two pictures how we added shims between the legs and the top of the bar to level it out.

How to install kitchen island legs


How to install kitchen island legs
After they were nice and solid, we added the apron right under the top.  We used small corner brackets to add those as well.  If you look at the picture above, you can see the metal brackets in the front.  We did cover those with white paint, and by the time the table top is installed, you will never be able to see the legs from this angle unless you get down on the floor, so no one but us will know they exist.  After the apron was attached, I caulked and painted it.  Below, you see a close up of the apron and the side trim at the top.  We started adding that trim by putting a piece on the outside that was exactly as wide as the table leg.  We attached it using our new Ryobi Airstrike nail gun we got for Christmas- love it!  We then cut a piece to go across the front that was the width of the leg and the trim we added to the outside.  Then we filled in the nail holes, sanded them down, and caulked and painted them.


island-legs-2You can see in the picture below how we used the corner brackets to attach the apron.

How to install kitchen island legs


Nail-gun-ryobi
Once everything is caulked and painted, it is finished!  The caulk works beautifully at hiding any imperfections or small gaps, and once the paint is dry it looks pretty darn good!  Perfect?  Heck no!  But very pleasing to the eye compared to what it was before.  It looks so much more sturdy and permanent.
island-legs-3
We also added a cute silver bottle opener to the side next to the paper towel holder.  The paper towel holder will be partially covered by the new rustic wood top, but that’s OK with me, I actually think it will be an improvement.  And it will be fun to have the bottle opener available if we have guests or get togethers.
island-legs-4
island-legs-5
I just think these legs give this island such a better presence.  It is starting to feel more like a piece of furniture, which is what I want it to feel like.  That rustic wood top is calling my name too!  But I don’t exactly think that my husband is dying to get started on it, ha!  He will complain his way through it at moments, but when it is finally all done, he will love and enjoy it so much, and then he will realize how much he appreciates it.
island-legs-6
If you look at the picture below, this is another before picture.  You can see that there is no apron, a cheapo center fold out leg, and screw holes showing in the island sides.

DIY Kitchen Island Leg Installation

And now, with no visible screw holes, sturdy and gorgeous farmhouse legs, and and apron on all three sides.
island-legs-7
So much better is what I think every time I look at these island legs.  And then I started feeling that excitement of looking forward to having a new top that will make this island a finished project!

island-legs-9island-legs-10

island-legs-11

My husband bought me the RC Cola crate as a little surprise Christmas gift, and it was a perfect gift!  All I did was to stick this thing in the sink and give it a scrubbing with some Dawn and a scrubby sponge.  It was super dirty.  It looked and felt so much better after a good bath.  I should probably rub it down with something to give it a conditioning treatment.  Maybe with some coconut oil I am thinking.
island-legs-12

wooden-crate-4

And that, my friends, is how we installed legs to our island!  We had some hours of frustration trying to get the legs level on all four sides.  That was the hardest part for some reason.  It took hours for that.  and this was our first time ever attempting a project of this sort.  Someone who has carpentry skills may not have done it this way.  But this is the way we found that worked for us at our level of skills.  And the island feels very solid and sturdy, so I am calling it a win.  Are there any questions that I have not answered?  If there is anything you want to know, just ask away in the comments.  I promise to answer every one.  We are hoping to get the top on this island before the year is out, but for right now, we have moved back into the master bathroom to work.  But I will be sure to share when we start working on the island again.  So stay tuned!  Have a great Tuesday!
Do you have champagne taste and a tiny budget like me?  Love fashion, DIY, crafting, all things vintage and thrifty?  Stick with me, I’ve got you covered!
Sign up to get my posts delivered to your inbox here
Follow me here:
 Facebook / Twitter / Instagram / Pinterest / Bloglovin / Google + / Stumbleupon

Filed Under: DIY, how to add legs to your kitchen island, installing legs to a kitchen island, kitchen island, kitchen island makeover, kitchen island makeover tutorial, Uncategorized

Comments

  1. Marla says

    August 8, 2019 at 6:33 pm

    Hi, where did you find the table legs? Thanks!!

    Reply
    • Nicki says

      September 2, 2019 at 10:40 am

      Hi! There is a link to the exact table legs we used in the post.

      Reply

Leave a Reply Cancel reply

Your email address will not be published. Required fields are marked *

CommentLuv badgeShow more posts

This site uses Akismet to reduce spam. Learn how your comment data is processed.

Hi, I'm Nicki I'M THE GIRL WITH CHAMPAGNE TASTE AND A TIGHT BUDGET. I'M SO GLAD YOU'RE HERE!
  • Bloglovin
  • Facebook
  • Google+
  • Instagram
  • Pinterest
  • Twitter

VIP Real Estate

NO PLACE LIKE HOME

No Place Like Home

ORC Bathroom Makeover

Kids/Guest Bathroom Makeover

One Room Challenge Week 6 Kids-Guest Bathroom Reveal

It's week 6 of the One Room Challenge and this is … [Read More...]

ARCHIVE

ORC

Shop My Faves!

Spring Trends
PicMonkey Photo editing made of win
Get Sponsored by Big Brands

SheKnows

Linquia Influencer

FYI

Find Your Influence

INSTAGRAM

Recent Posts

  • Cozy and Casual Christmas Tour | Part 2
  • Casual and Cozy Christmas Tour | Part I
  • Farmhouse Bathroom Makeover Progress | $100 Room Challenge

Archives

Find It Here

Copyright © 2022 · Sweet Parrish Place