It’s Week 5 of the One Room Challenge and I am sharing our kitchen island makeover with a rustic wood top. 
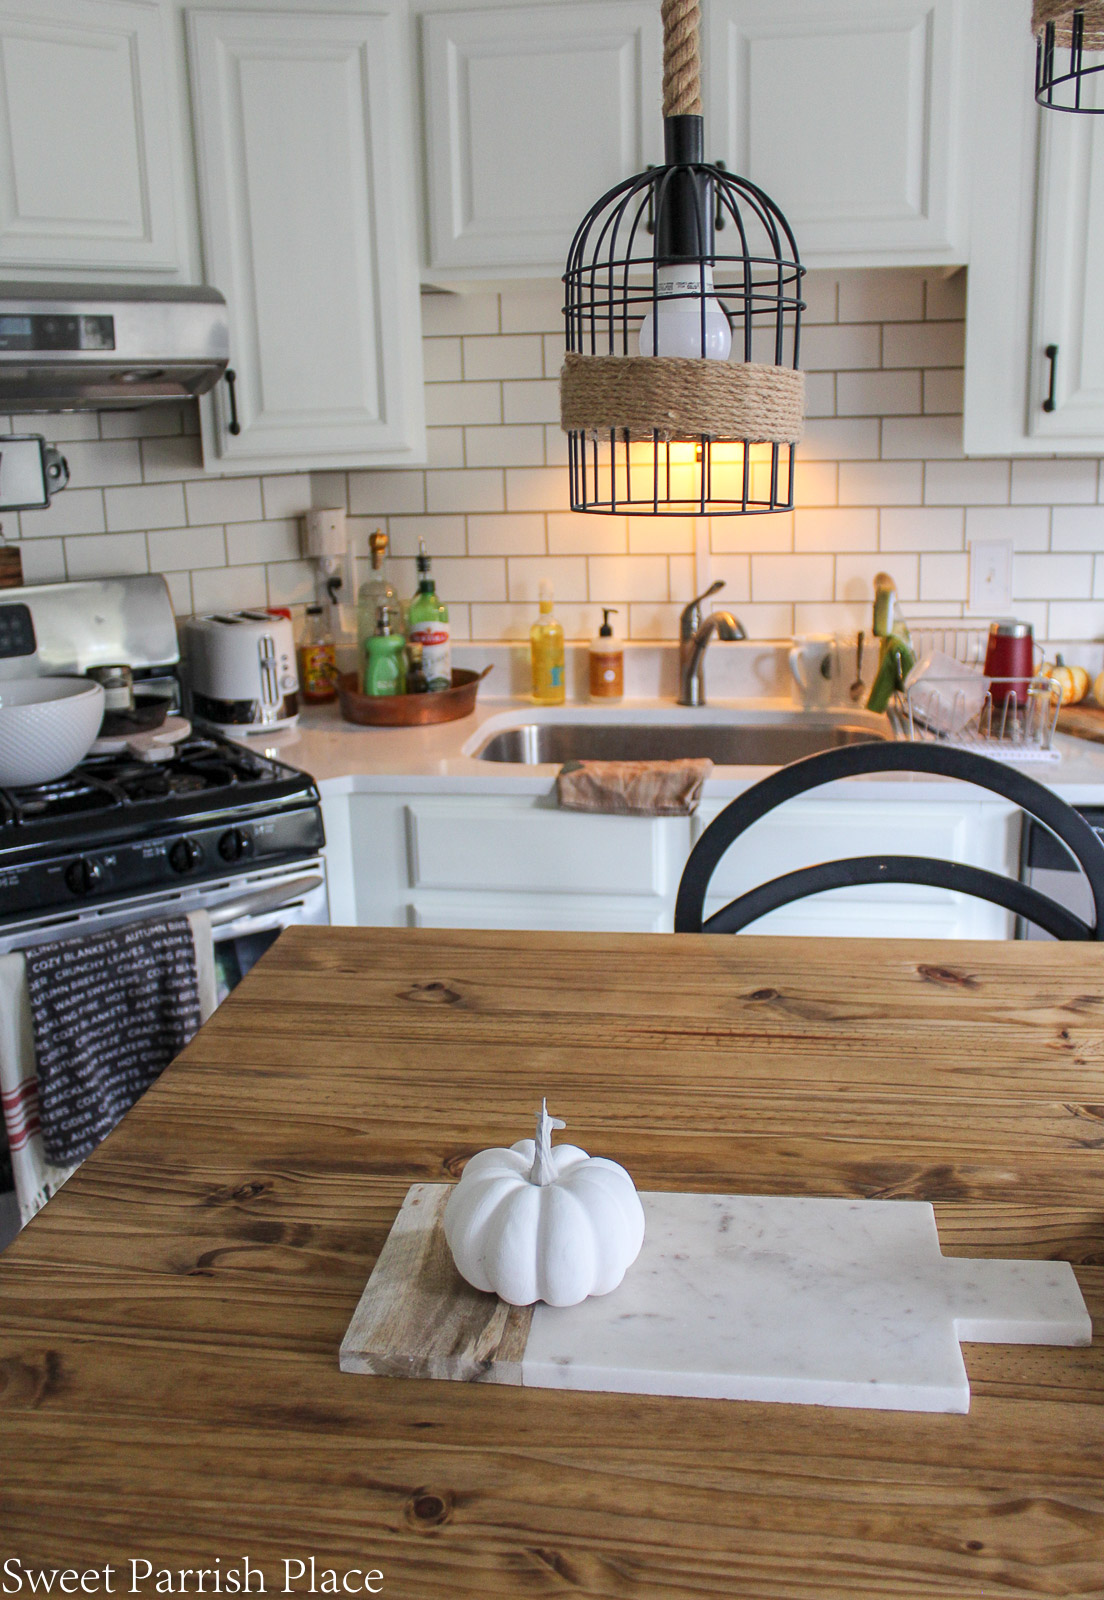
Hey friends! It’s week 5 of the fall One Room Challenge, and I’m sharing our progress on the kitchen makeover we are working on. We made over our kitchen island and added a rustic wood top! If this is your first time checking in on our kitchen makeover, you may want to start here: Week 1, Week 2, and Week 3. The first week, I shared our plans for this space, then week 2 is all about the lighting in our kitchen. For week 3 I shared our white painted upper cabinets, and week 4 I shared the cabinets that are all completely finished. We also have freshly painted walls and ceiling, and we have finished our wooden top on our kitchen island. I’m only sharing a few photos today because I don’t want to give away too much before the big reveal. And remember, these photos are unstyled progress photos and some of the decor from the before kitchen is still pictured.

You may or may not have seen my previous three ORC makeovers, and if not, you can click through to see my guest/kids bathroom makeover that I completed, my downstairs bathroom makeover that I completed, and my boys bedroom makeover.
If you have not heard of the One Room Challenge (also called ORC), currently in its 14th season, is a widely anticipated biannual event every April and October. Each round, twenty design bloggers take the challenge and transform a space. It is hosted by Linda from Calling It Home and Better Homes and Gardens. Wednesdays is the day for the design bloggers to go live with their progress, and Thursdays is the day for all the guest participants to go live. You guys will be amazed at these reveals, they are just beyond words good!
If you found me through the ORC Link up, welcome! I am so happy you are here! My name is Nicki and I am the blogger behind Sweet Parrish Place. I love to share our DIY and home decor shenanigans, along with some organization, fashion, travel and other lifestyle types of topics. Thanks for reading!
I am so excited about the wooden top we installed on this kitchen island! I have been scheming adding wood to the top of our island for soooo long, and if it weren’t for this ORC Challenge it still probably wouldn’t be done. This challenge was just the inspiration I needed to get this space finished. And it was way less difficult than my husband and I imagined it would be. It was actually an idea I dreamed up in my head, and he seriously questioned whether it would work. But it did, and I am so thankful for that. Because the stainless steel top on this kitchen island has driven me insane for years. Let me show you a before photo of what this island looked like when we first bought this house.

Please note: Some of the links in this post are affiliate links, which allows me to make a small commission from your purchase, but your price stays the same.

This is actually the third makeover I have given this island. The first time, I painted it white and removed two of the cabinet doors to make some open shelving. Next, we added some farmhouse legs to the island. And now, we finally have added a rustic wooden top to the island, and I believe we are finally finished with it! I was planning to add the same drawer and cabinet pulls to the island, and I realized that the pulls are not the same size, so in order to do that, I have to fill the holes and repaint the cabinets and drawers. We are going out of town this weekend, so this is not going to happen before the big reveal, so my temporary plan is to spray paint the current pulls a matte black, and I may end up changing them at a later date or finding some different pulls that will fit. Because I am so over painting cabinets you guys!
Cutting board |Marble lazy susan
So let me tell you about our wooden island top. For so long I have hated the stainless steel top on this island. I have known for years that I wanted to add wood to this. I wanted it to mimic a butcher block top, but I didn’t want to pay the price for a butcher block top. I also did not want to remove the stainless steel top that was already there. My husband and I are far from builders, and that just seemed too complicated for us. So I devised a plan to add the wood right on top of the stainless steel and then to make a frame of sorts that would cover the sides.

Cutting board | Marble lazy susan
I plan to write a full tutorial about how we installed this top on our island after the big reveal of this room. The wood I chose for the top is from Lowes. It is called utility shelving, and it is made from solid pine. What I liked about this particular board is that it was actually 12 inches wide and 8 feet long. And by some miracle it was the perfect fit. We had them cut this wood down for us at the store. We were very lucky that by placing the two cut pieces side by side, it was exactly wide enough for the top of the island. But my favorite part about this particular wood is that it is actually 2 inch strips of wood that are glued together. So because of that it reminded me of butcher block, and it was a very affordable price at only $14. We also purchased two pieces of 10 ft. unfinished outside corner wall panel moulding to use to cover the stainless steel sides.
When you look at the photo below, you can see the 2 inch strips of wood, and that is exactly what I was wanting. I actually found this wood over the summer, and I knew it was going to be perfect for my island top. And both my husband and I really love the way it turned out. It is so much more warm and cozy feeling in here with a wooden island top instead of a cold stainless steel. We really are amazed at how much the wood warmed up this room.

In the photo below, you can see what the wood looked like before we treated it. To adhere this wood top to the island we placed the two sheets of wood side by side, and glued them to the island with liquid nails. Then we placed C clamps all around the edges to hold it tight, and we drilled from underneath of the stainless steel up into the wood in various places. So this top is not going anywhere. We kept the clamps tight for about 24 hours before removing them.

You can see in this photo below what the top looked like without the trim to cover the sides of the stainless steel.

And here is what the sides look like now, with the trim attached. We attached the trim using my Ryobi brad nailer. As you can see, the trim sticks out a little further than the top of the island. At first when we brought the trim home we questioned as to whether we should use it and would it work. But we both decided that we actually liked the way it looks like this. It makes for an interesting detail. So we went with it. I added a photo of the trim piece we used right below this one so that you could have an image in your head as to what it looks like.


I did quite a bit of research when trying to decide whether to stain the wood or treat it with something else. Since we do a lot of food prep on this island, I wanted to use something that was food safe. That was very important to me. I found a blog post through Pinterest from a blog called The Red Feed Sack that completely convinced me to use Tung Oil. I had already been considering it as an option, because that is how we treated our rustic barn beam mantle. But reading her post was the final push I needed, and it made me certain that this was the way to go for me. By using this method I used, there is no stain, no varnish, no unsafe products, and I am fairly certain that this is also going to be very low maintenance.
I decided to order the exact same products as this blogger used on her butcher block counters. These products are from The Real Milk Paint Co. I used a 1 to 1 ratio of Pure Dark Tung Oil and Citrus Solvent. I painted it on with a brush and then let it soak in for 24 hours, and you are supposed to keep doing this until the oil stops sinking in. Mine took 4 coats. The fourth coat didn’t sink in completely, and after 40 minutes, I wiped off the remaining oil.
I sanded the wood down to a buttery smooth finish before applying the oil. I also used wood filler down the middle seam on top and all round the trim we nailed to the sides. Then I sanded it all down really well.

I simply love the way it deepened the color of the wood and brought out the beautiful wood grain. It feels so soft and smooth to the touch! And better yet, it is totally food safe. It is also supposed to be very forgiving. If it gets any scratches or marks, you can sand it down and re-oil. You can re-oil actually whenever you feel it needs it. I’m amazed at how this wood top cozied up our kitchen!

I’m having all the rustic and rich wood feels right now!
Here are the products I used for our rustic wood kitchen island makeover:
Outside corner wall panel molding

This is the perfect place to sit down for a hot cup of coffee or tea and eat breakfast or a quick snack, and it’s also frequently used for homework and blogging and making slime!

To Do List For Kitchen Makeover
paint cabinets whitereplace cabinet and drawer pullsreplace lighting over islandreplace over sink lightingadd new top to existing kitchen islandpaint back dooradd open shelvingturn two kitchen cabinets into open shelvingpaint ceilingpaint wallsreplace curtains- add new accessories and decor
add Wallpaper to sides of refrigeratorpaint trimSpray paint pulls on kitchen island
I am spending my Thursday cleaning up and styling this space and will hopefully have time to photograph it. I can’t wait to share the final reveal next week! I hope you will stop back by at this same time next week and see all of the before and afters and the finished space. See you then!
Before I go, I wanted to mention that I am an Amazon Influencer, and I now have a storefront that is up and running! You can click here to go to my page. You will find this smart lock there, along with loads of other things that myself and my family have ordered and love. I have all sorts of different things linked there, including things that I have already ordered myself and things that are currently on my wish list.

Do you have champagne taste and a tiny budget too?
Love fashion, DIY, crafting, all things vintage and thrifty? Stick with me, I’ve got you covered!
Sign up to get my posts delivered to your inbox here
Follow me here:
Facebook / Twitter / Instagram / Pinterest / Bloglovin / Google + Stumbleupon
Shop my Amazon Influencer Page here
![]()
Nicki,
Love the beautiful wood grain on the island. I’d love to know how well it holds up. I’m thinking butcher block for countertops.
Hi Libbie! I am anxious to see how it holds up as well. I can only attest to what I read in the blog that I linked to, and she wrote a review after two years. She said hers had held up wonderfully, and that is what sold me on using the method I used. The product is food safe and all natural, and it provides a tough, flexible, and highly water resistant coating. It does need re-treated from time to time. It is supposed to sink into the wood and harden it from the inside out. I plan to write a review in a year or so about how mine holds up!
Love that island! It’s looking so good Nicki! Looking forward to the reveal!
Denise recently posted…How to Set a Pretty Thanksgiving Table on a Budget
Thank you Denise! So glad it is finally finished and we can enjoy it now!
The island is soooo pretty Nicki! The whole space is coming together and looks stunning!
Thank you soo much! I am so happy to finally be able to enjoy this finished space!
WOW! it looks amazing! I love the finish you gave it!!!
Umar Sajjad recently posted…Kroger Feedback Customer Satisfaction Survey
Thank you so much!
Your island looks awesome for its farmhouse legs and color. I appreciate your ideas, dedication and gained experiences.