It’s the big day, it’s time for phase two of my modern farmhouse dining room reveal that I completed for the $100 Room Challenge.
Hey friends! When I left off last week, I wasn’t sure if I was going to pull off this modern farmhouse dining room reveal (phase 2) on time. But I am happy to report that I made it! There are a couple of minor little touch ups that need to be completed, and I will point those out to you along the way today. But they aren’t things that will really be noticeable unless I point them out. This dining room also serves as our home office, so it does dual duty, and it is one of the most used rooms in our home. There is always someone in this space!
Some of you may already know, I also made over this room last year for the $100 Room Challenge. You can find my reveal on this space from last year in this post. But with the tight budget and the time allotment, there were a few things I was unable to complete. So I decided this year, I would give it another go around and make over our dining table and our desk. I’m so happy with how everything turned out, and I think it really changed up the look of the space just by making over these two key pieces of furniture.
Week 1 , week 2, week 3, and week 4 of this challenge! Phase One of My Dining Room Makeover. That way you will be up to speed! I have also been sharing a lot about this room refresh in real time on my Instagram stories. You can find this dining table makeover in my Instagram story highlights under dining table. You can also see all of the details of my Ikea desk hack in my story highlights under Ikea desk hack.
![]()
If you are new to the $100 Room Challenge you can read more about it here. But the basic premise for the challenge is this: you get one month, and $100, to completely makeover one space in your home. I know what you may be thinking… $100 is not a lot of money. Just wait. What you can do with $100 (and a little creativity) will absolutely blow your mind. And if you don’t believe me, just follow along, and click through and see what the other participants are doing for this challenge, and you will see so many great things happening with just a $100 budget. You can see the mudroom I made over for my first time participating in the $100 Room Challenge here. I have lots of photos to share with you today, because I just love them all so I had a hard time narrowing them down. So I hope you have time to sit down and stay while and see my new dining room/office space! Welcome!
Please note: Some of the links in this post are affiliate links, which allow me to make a small commission from your purchase, but your purchase price stays the same.
I have linked some items below photos, but you can also find a complete source list with links to all of the items I was able to link to.

Faux fur sheepskin rug | Area rug | Cotton stems | Similar aqua glass vase | Similar wood beads with tassels | Curtains
Let’s begin this reveal tour with the star of the show, my dining table. This table had seen better days. It had good bones, but the top was badly scratched and stained. I had been wanting to give it a makeover for years, but the task was daunting to me. But I’m so so happy that I finally took the plunge and gave it a try! I feel like we have a brand new table, and even my husband loves the way it turned out. I even caught him sharing photos of it with his own friends, hehe. You can see a before shot of this table, from last years room reveal, below. The bench was something I had made for $50 for last years $100 challenge. This table now has a whole new life, and I will probably keep it for years to come. It does have a leaf that comes out, so I can make it into a round table as well. I will be writing an entire post about this table and chairs makeover soon, so if you want to know exactly what I did, stay tuned for that!

Curtains | Area Rug ( I love this rug but it got stained)
If you found me through the $100 Room Challenge Link up, welcome! I am so happy you are here! My name is Nicki and I am the blogger behind Sweet Parrish Place. I love to share our DIY and home decor shenanigans, along with some organization, fashion, travel and other lifestyle types of topics. Thanks for reading!
There was one other key change made to this space, and it was totally a last minute decision. It was not planned at all, and it is the addition of this little table that we brought into the space from my daughter’s old bedroom, which is now a guest bedroom. We had two old file cabinets that I made over and added a rustic wood top to in this corner of the room. But it was always an issue with the area rug, because in order for it to be centered under the table, it had to go under one of the cabinets, which was making them lopsided. We replaced the rug, which I will talk more about further down in this post, and as we were trying to get the rug in place, the file cabinets were again becoming an issue. And all of a sudden it hit me that I had this little table in the other room that really wasn’t being used anymore. So we decided to swap the file cabinets with this table. And now the cabinets are in the guest room. I am so happy that we made this change! It was totally free, the table was already white so it goes perfectly, and it looks so much better than the file cabinets.
The vintage milk can you see below the table was in my parents house all through my childhood, and my parents gave it to me. My mom painted it this color herself. I keep meaning to give it a little makeover, but never have quite got around to it yet. I think it looks cute tucked beneath this table, and I don’t mind the color here for now. but I probably will change it up at some point.

Cordless phone | Blue stackable desk organizers |Area Rug |Leaf art
Here is a photo from last years reveal of these file cabinets in this corner. We are still using these cabinets for storage, just in a different room. And I gave these file cabinets a makeover and added the rustic wood, which you can read all about in this post. I still like the cabinets, and we need them for storage, but they work out much better NOT in my dining room, so yay!

I also changed out some of the decor on the wall in this little corner. You can see what it was last year above. I had made that DIY bookpage wreath a few years ago, and I wasn’t feeling it in this space anymore, so I parted ways with it, but it was a fun little project that I did really cheaply, and I loved it for a few years. I decided to hang these two prints you see below here instead. Both of these, I already owned. I had actually bought the top print about a year ago, and was planning on using it in a gallery wall refresh I have been scheming in my head. So rather than have it lying around, I decided I could use it in here. And the print below of the Golden Gate Bridge is from Minted. It was already here in this room, but I had it hanging over next to the desk area until this past weekend.

When I was editing photos of this space, I was telling my husband that it is so nice that I have a pretty kitchen in the background when the camera is pointing in this direction. We recently made over our kitchen for the Fall One Room Challenge, and before that, I always avoided showing shots where you could see into my kitchen. Although I do have stuff up on the side of my fridge, sue me for being a real person.


We completely stripped the finish off of this table top, and stained it in a weathered gray stain by Varathane. I then sealed it with 5 coats of Minwax Polycrylic in a clear matte. At first I was afraid the weathered gray stain was too dark, but once I had the table base and chairs all painted white, I love the way the weathered gray looks. You can see a good depiction of the table top in the photo below. You can still see the wood grain of the table with the stain. This table top feels as smooth as butter now that it is all finished. Everything you see decorating the top of my table are all things that I previously owned.

Cotton stems | Similar aqua glass vase |Similar wood beads with tassels | Macrame table runner
I found the little vintage inspired wooden skis hanging in this gallery wall at the Target Dollar Spot for $3, and I just think they are the cutest! I also found the little pink and blue succulents for $3 each at the same place. This little corner feels bright, airy and colorful, and it makes me smile!

Blue stackable desk organizers

Since we moved this little table in here at the last minute, this is the hardware that was already on it. I decided to give them a few coats of paint with a gold metallic acrylic paint I had close by. I also decided to use the same paint on the little labels on the aqua blue little organization boxes sitting on top. All of our pens and pencils are organized here into some cans that I wrapped with jute twine several years ago.

You may have noticed that we replaced the area rug in here. I was so sad to have to do this, but the previous rug, which I loved, got a giant stain on it when our Pug got ahold of an ink pen and busted it all over the rug. Good news though, I think I am going to be able to use the old rug in our master bedroom, and the stain will be hidden! I went with a rug that was completely different than the one we had. What do you think of the zebra print? I really do like it! I think it coordinates really well with the area rug in our living room, which is just to the right of this photo below. And I view animal print as a neutral, so I think it goes with virtually any color. And I got the deal of the century on this rug. I ended up paying only $24.75 for it! You can read about how I got it for this price in last weeks post. My chandelier was a yard sale find that I painted, and you can read all about it.

Area Rug | Art print | Cotton stems | Similar aqua glass vase |Similar wood beads with tassels | Macrame table runner |Faux fur sheepskin rug
The photo below is a similar shot as the one above, a before photo from last years reveal. I can’t tell you how happy it makes me to see this before and after! You might notice that last year, that wall behind the table had a faux brick wallpaper, which I loved so much. But sadly, it didn’t last, and I ended up removing it last summer. I just went ahead and painted that wall in the same color as the other walls, which is Gray Owl by Benjamin Moore. I still would love to do a faux brick on that wall, but that is for a future project.

Area Rug | Art print | Macrame table runner

Area Rug | Art print | Macrame table runner | Cotton stems | Similar aqua glass vase |Cotton stems | |Similar wood beads with tassels
I opted to use my paint sprayer to paint the chairs that go with this table. Unfortunately, it is the middle of winter, and I was relegated to the garage to do this job. I had one semi warm day where I was able to put the garage door up, but the rest of the days I worked on these it wasn’t possible to have the door up. I was working in poor lighting conditions, so I didn’t get these chairs covered well enough with the paint. I was not able to see this until I brought them upstairs into the light. So there are spots on all four of the chairs that need to be touched up. However, I wasn’t able to do that in time for the reveal. I used Rustoleum Chalked paint in linen white to paint the table base and all of the chairs. And I used up every last drop. It wasn’t in my budget to purchase another can, so I will need to touch up the chairs, and then seal them.

Art print | Area Rug | Macrame table runner | Similar wood beads with tassels |Cotton stems | Similar aqua glass vase
We also did an Ikea desk hack for this challenge, and transformed our Ikea desk and the wall shelves hanging above. And wow, it so changed the look of this room! It used to be all black (and it was a little worse for the wear), and now it’s all white, and such a more pleasant place to sit down and work at the computer. I painted the base of the desk and the wall shelves in the same linen white chalk paint I used for the table and chairs. I also sealed them with the same Minwax polycrylic in clear matte. I plan to also write a post for the desk makeover, so if you are interested be on the lookout for that, coming soon.


The photo above is the table and desk area now, and the one below is the table and desk area from last years reveal. I am amazed at this transformation! I also changed out the bulletin board.
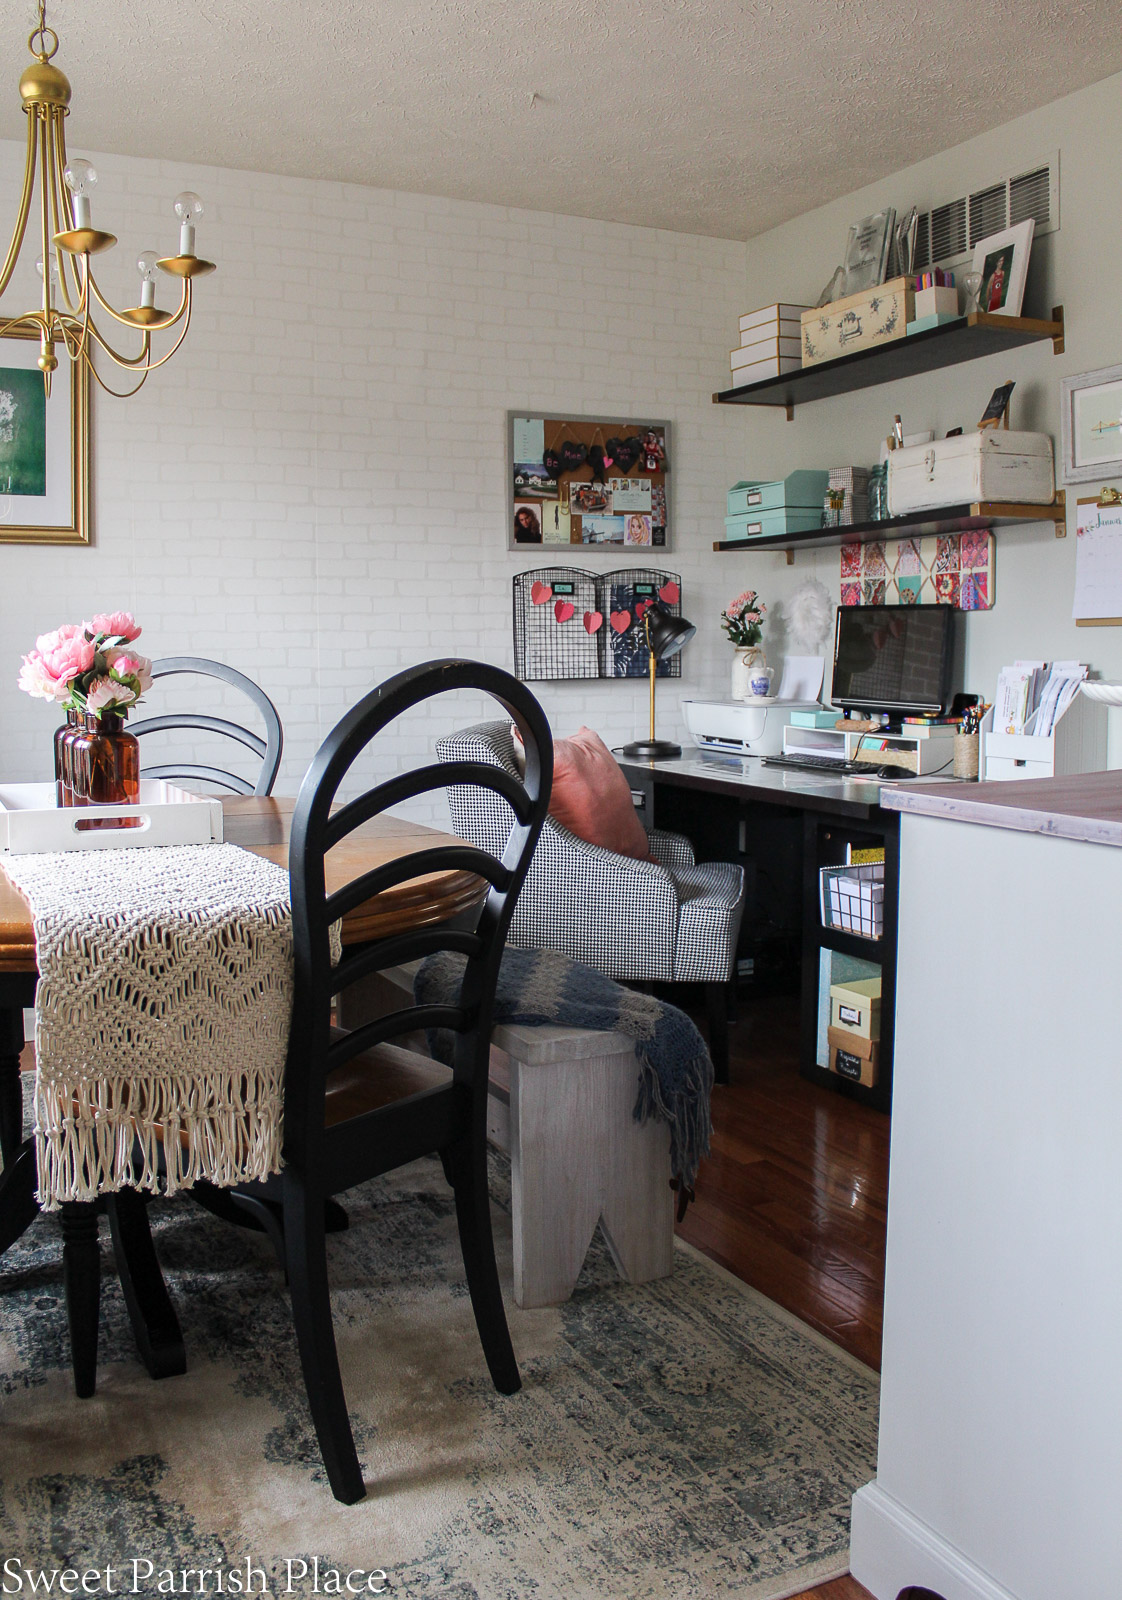
The board that is hanging there now is burlap with a cute little nail head detail, which was my daughter’s and she left it here when she moved to Miami. I just switched them out, so it was a free improvement. We applied self adhesive marble contact paper to the top of this desk, and I am in love with this desk top now! If you are interested in seeing how we did this contact paper application, you can find it in my Instagram story highlights under Ikea Desk Hack. I show how we wrapped the corners in those stories. But I will be writing a post that explains the step by step process. I’ll share several photos of the desk area below so you can see some more shots of it.


I have a mixture of real plants and faux one on this windowsill and it has always been one of my favorite little spots.


I made over this buffet for last years $100 Room Challenge, and it is my favorite piece of furniture in my house now. I mixed the paint color myself, and it has held up beautifully for the past year. You can find the buffet makeover in this post. It is one of my favorite places to decorate for all seasons. And I just love the mirror that we also painted, that hangs above.


Such a better view in the photo below, of the little white table instead of the file cabinets that used to be here. And you can see a tiny peek of the open shelving we recently put in the kitchen. It just makes me so happy! Every makeover project I do is such a labor of love, and it give me such a sense of satisfaction to see the finished photos of a space. It’s just my passion in life.


I am so happy that I decided to do a phase two of this makeover this year for the $100 Room Challenge. My husband was not really on board for me taking this on during the month of January. He wasn’t too happy that I needed to stay home to work on these things, and it caused a few arguments. But now that the room is all finished, he loves the transformation. And he said he enjoys sitting in this room much more now. So I promised to get out more and have some family fun during the month of February. No projects are planned, but I sure do need to catch up on laundry and housework, because anytime I am doing a project like this, everything else falls to the wayside. So it’s time to whip this house into shape very soon.


Thank you so so much for stopping by today to check out my modern farmhouse dining room / office makeover, and if you followed along on this entire 5 weeks of this challenge, extra thanks to you! Can you believe that I completed this room makeover for less than $86?!? I would love for you to tell me what you think in the comments below. And if you have any questions, please ask away, I will answer any questions I get in the comments. And stay tuned, because I will be doing separate posts detailing our dining table makeover and the Ikea desk hack. Both of those posts will be coming to the blog in February. Below is a good old fashion side by side so you can see a comparison. I never ceases to amaze me at the difference paint can make.

If You Like It, Then You Wanna Put A Pin On It

Source List For My Modern Farmhouse Dining Room/Office
Wall Color- Gray Owl (Benjamin Moore color)
Color on desk and table base and chairs- Rustoleum Chalked paint in linen white
Leaf art (in gallery wall over file cabinets)
Floral Wall art with amber bottle (on wallpaper wall)
DecoArt Metallic Lustre (used on buffet drawer pulls)
Faux fur sheepskin rug (on bench)
Heart framed art (on buffet)
Blue stackable desk organizers
Ikea desk top ( I covered ours in marble contact paper)
Wall shelves above desk (I painted mine white)
My To Do List For Phase 2 of Modern Farmhouse Dining Room/Office Refresh
Strip and sand table top
stain table top
paint table base
Seal and protect the finish on all furniture pieces (still need to touch up the chairs and seal them)
paint chairs
apply marble adhesive film to desk top
paint desk base and wall shelves (may do marble film on wall shelves too)
replace area rug (if budget allows)
purge office area and reorganize
Use what I have to add decor in a fresh way
My Budget For The Modern Farmhouse Dining Room/Office Refresh
Marble self adhesive film– $17.48
Varathane Weathered Oak Wood Stain– $12.58
Citristrip– $0 ( I already had this product on hand)
Area Rug– I paid $41.75 ( I had a gift card worth $50) minus $17 for a mix up with my order, so I ended up spending $24.75
Minwax Policrylic- $17.99
Rustoleum Chalked Paint in linen white- $0 ( I already had this product on hand)
vintage inspired wooden skis- $3.18
pink and blue succulents- $9.54
Grand total for this room makeover- $85.52 YAY!!!!
Now, don’t forget to click the link below to see all of the amazing room reveals from all of the other 29 bloggers who participated in this $100 Room Challenge!
Love fashion, DIY, crafting, all things vintage and thrifty? Stick with me, I’ve got you covered!
Sign up to get my posts delivered to your inbox here
Follow me here:
Facebook / Twitter / Instagram / Pinterest / Bloglovin / Google + Stumbleupon
![]()
You may also like these posts:
Modern Farmhouse Kitchen Reveal
Nikki, your dining room makeover came together so well. I love the way you glammed it up with that fun rug and the bit of fur with the pretty gray
Patti recently posted…Budget Bathroom Makeover Reveal – $100 Room Challenge
Thank you so much Patti! It is much appreciated!
What a great reveal!! I know you’re loving it all already. Hope you join us next time too!
Elizabeth Jones | Jonesville recently posted…$100 Room Challenge | Week 5: Tool Closet Reveal
My husband was just mentioning to me how much more he likes being in this room now, so yes we are! Thanks so much!
Nicki, your table transformation is so good!! Love the grey top and I’m glad you’re happy with it after all – it’s really pretty with the white base!
Thanks Lisa! I’m so happy that I did this room for a second time and was able to make over this furniture!
You inspire and never cease to amaze me! Great job as always!
Thanks so much! xoxo
Everything looks nice together. Love how it all compliments each other. Can’t decide what I like most–the table, buffet, throw rug on the bench, plants in the windowsill, or the desk. Chuckled when I read about the trouble this challenge caused. Same here. He still hasn’t congratulated me on changing the light fixture by myself. Sigh. Glad you decided to finish this room.
Kelli recently posted…Creating an inviting breakfast nook for less than $100
I love what you did with your table and desk! It really brightens up the room!
Oh it looks so pretty! You did an amazing job on that table – I am so jealous of it haha!
Thanks! It was a lot more time consuming than I thought it would be, but totally worth it in the end!
It looks so pretty! I love the lighter look. And that macrame table runner is gorgeous!
Angie @ Postcards from the Ridge recently posted…Botanical themed entry on a budget plus free fern printables
Thanks so much Angie!
Thanks Angie, this was such a fun challenge!
looks so great! I so badly wish we had a formal dining room, but until we do, I will keep loving yours! 🙂
I wish we could move our office out of our dining room, but we haven’t been able to do that yet. One day though!
What a pretty space! I was amazed last year at how you were able to combine the dining room and office space functions with such style, and you totally did it again! Love it.
Thank you Beth, that is so sweet of you!
Love the paint color you’ve chosen for the table base and chairs. Such a perfect neutral.
Thanks so much! It’s my go to for white chalk paint.
This turned out so nice! I really liked your room the last time and was a little surprised that you were going to do it again. But now I can see how the little changes you made have added up! And that zebra print rug is awesome!!! Congrats on a great job
Jackie recently posted…$100 Challenge Reveal Week!
Hey Jackie! Thank you so much! All of the black in the room was just sucking the life out of it for me, and I really wanted to paint those things the first time, but there is only so much you can do in one month and with $100. I’m really glad I decided to do it again because I’m totally happy now!
I cannot believe how much that table and desk makeover made in this space! It just looks so much brighter! P.S. Your kitchen looks absolutely gorgeous peeking through 🙂 I love the open shelving. I’ll have to go check out that transformation next. Thanks so much for participating in another round of this challenge. You did an awesome job. Enjoy the month of February with your family!
Erin- Lemons, Lavender, & Laundry recently posted…$100 Room Challenge: Boy’s Bedroom Reveal
Ahhh Thanks so much Erin! I’m so glad you like it! I love particpating, thank you so much for hosting this awesome challenge!
So pretty! I want that zebra print rug, it is beautiful. I love your style and ideas!
Thanks girl! I think that rug is currently on sale for less than $100! You can find the link on my post!
That table along with the newly painted chairs looks so nice now. It was great before too, but now there is an airiness to the room.
Mary recently posted…How to Repaint Cubby Storage Units the Easy Way
Thank you Mary! I hope you have been doing well!
This is such a lovely space! Absolutely gorgeous!
Thank you Kristi! I’m so glad you like it!
Thanks Kristi! I’m glad you like it!
Nicki, I love your table transformation! The grey top is really pretty with the white base. You should be proud of this pretty makeover!
Thanks Linda! I am very happy with the way it turned out!
I love all the attention to detail, my friend. The table is, I think, my favorite part. I can’t believe the difference! Beautifully done as always.
Thank you so much Joy! Miss you!