Sweet Parrish Place

I'm the girl with champagne taste and a tight budget

  • Home
  • About
    • About Nicki
    • Shop My Amazon
    • Contact Us
    • Blog Love
    • Link Parties
    • Advertise | Disclosure | Privacy Policy
  • Home Tour
    • Yellow Prairie House Tour
    • West Virginia Home Tour
    • Seasonal
  • Projects
    • Trashtastic Treasures
    • Holiday
    • Decorating
    • DIY
    • Crafting
    • Paint Projects
    • Cleaning/Organization
  • Style
    • Fall/Winter
    • Spring/Summer
    • Sweet Parrish Place Style
    • Tips/Tricks
    • Shop My Looks
    • Shop My Amazon
  • Travel
  • Lifestyle
    • Family
    • Decor
    • My Favorites
    • I’m Loving It
    • Personal
    • Shop My Amazon
  • Yellow Prairie House Tour

Painted Hallway and Gallery Walls- Reveal

January 29, 2014 By Nicki Leave a Comment


As I write this, we have been to school 7 days in the month of January.  I think.  Honestly, I have lost count.  But I do know that we have had more days off for weather than we have been at school.  And I have spent most of that time at home.  I am a bit of a homebody, I admit.  I love to nest.  I love to do projects around the house, and clean and organize.  But even I am going stir crazy and feel the need to get back to school!  So many of the students I work with need to be in school, and are far better off at school.  So needless to say, I have gotten so much done during all of these snow days!

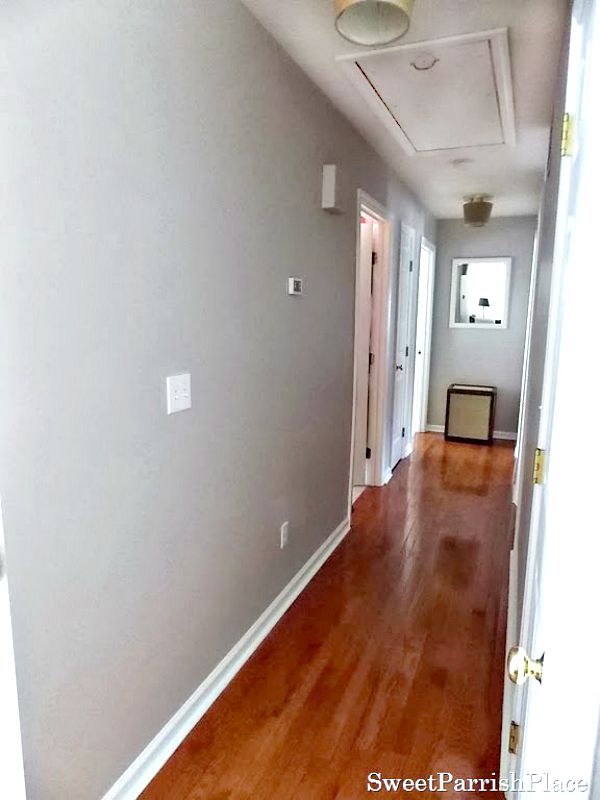
I was able to tackle a project that I had no intentions of even starting on.  As a matter of fact, if you read my post containing my goals for 2014, this wasn’t even one of them.  I painted my hallway!  Phase one is completed, yay me!

The fact that it wasn’t a goal by no means meant that it didn’t need to be done, trust me.  Pictures cannot convey the bad shape this hallway was in.  For starters, it was painted a flat cream when we moved in.  Flat paint is the worst for showing every finger print and scratch.  The wall was filthy.  The trim was so damaged and knicked up.  This is a hallway that leads to the boys bathroom, and all three of the bedrooms that are upstairs.  I am sure one reason why the trim is so beat up is from people who have moved in and out, and knocked the furniture against the door ways.
Last summer, I painted the downstairs hallway, which was even  more dirty than the upstairs hallway.  I liked the color I used so much that I decided to use it in my stairway and in the upstairs hallway.  I painted the stairwell over Thanksgiving Break.  I had cabin fever and was looking for a big project I could do without having to buy anything, and I realized I had enough paint left to go ahead and paint the upstairs hallway.  Woo hoo!  Something to do!

I spent the first day trimming everything out twice, which was no small task, with six doorways to contend with.  Then on the second day I took down the gallery walls and started painting.  Two coats did the trick.  I had a few complications with my paint roller, which slowed me down considerably, but I was able to finish both coats that day.  The third day, I caulked and painted all of the trim.  Most of it only took one coat, but I went around and touched up certain areas with two coats.

These are the supplies I used when I caulked the trim.  Some of it was separating from the wall, etc.  I had this little bucket of hot water, some white paintable caulk (I just used a tube instead of a caulk gun), a box cutter (to trim away old paint) and paper towels.  To caulk the crevices, I just squeezed out a line of caulk where I wanted it, dipped my finger in the hot water and went over where I had just caulked until it was smooth, wiping my finger with paper towels as I went.


This is an example of what some of the base boards were looking like.
And this is an example of what some of the door trim looked like.  Really beat up, huh?


This is the hallway after all of the paint and trim was complete.  It may not look like a drastic difference in the pictures, but it looks so much better in person!  So much more clean and fresh.


And here is the same view with the outlet covers replaced and the lights off.  This hallway is so difficult to photograph because of the lack of natural light.  I can never decide whether to turn the lights on or off.


Speaking of lights, in case you are wondering about my ceiling lights in this hallway, they are simple burlap lamp shades from Target.  I hated the lights in this hallway when we moved in, so I removed the glass lights covers, and kept the brass bases that were attached to the ceiling and the hardware that you screwed the fixtures on and off with, and I just slid the lamp shades up over the center, and used the hardware to screw it on.  I quite like the way it looks, and I think I will probably paint the brass bases eventually.


Don’t mind the rug with shoes sitting at the end of the hallway.  I had to put it there for everyone to dry their shoes out because there is so much snow out there. At the end of that hallway is the living room.  One of only two rooms left with the flat cream colored paint on the walls.  Hopefully they will all be gone by the end of the year.


I opted to paint the doorbell cover the same color as the walls.  And I am so glad I did.


I also painted the cold air return the same color as the walls.


In another life, I might have replaced the trim around the doors, but that is probably never going to happen while we are living in this home.  But just a fresh coat of paint did a world of good.  These two pictures below are a good look at the freshly painted trim.


When I painted, I did not fill in the nail holes because I knew the gallery walls would be rehung in mostly the same arrangements.  I spent the next afternoon rehanging it all.  I cleaned the frames and all of the glass beforehand.  And one thing I did differently this time was to use little Duck brand poster putty on the two bottom corners of each picture to help keep them straight and better adhered to the wall.  So far so good.
All that was left to do was rehang the gallery wall.  Here are some more pictures of the gallery hallway after it was all hung back up.  Again, so tough to photograph because it is such a tight space.  It looks so much better in person than it does in pictures.  People seem to enjoy it when they visit.  I always catch them in the hallway looking around!

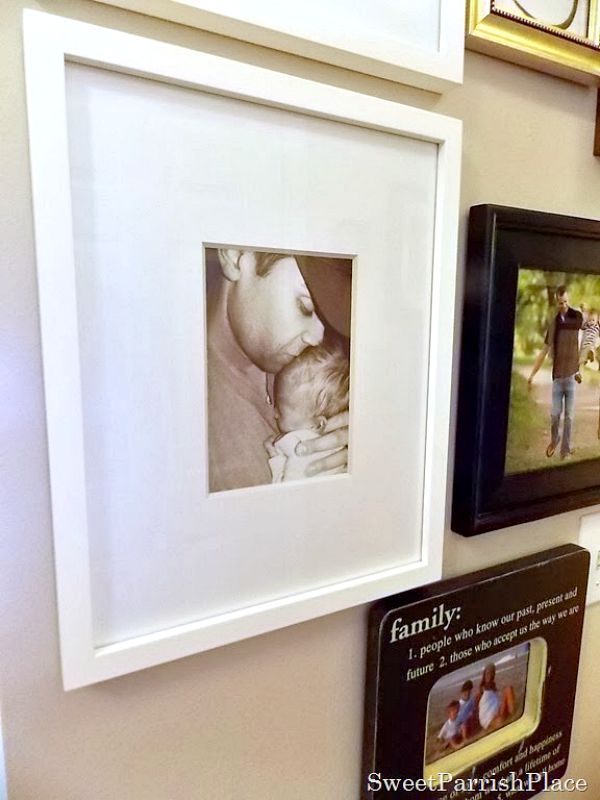
This side of the wall is where the kid’s yearly pictures hang.


Youcan read more about this meaningful date art here.
DSCN4286
Mr. 13 Year Old sketched this lion, can you believe it?  It was on display at his school’s art show last spring, and then it appeared in the Harrison County School Calendar for the school year 2013-14.  We were so proud!  I taped it up here to see how I liked it, so now I need to get it framed.


That hamper was purchased at Pier One a few years ago.


Moving on to the opposite wall.


This was a shopping bag from the Zara store in NYC.  I liked it and I think it looks cute framed.  Below that are the keys to our grandfather clock, which you can read more about here and here.  The tree photograph below was taken by a friend.  I loved it and asked him to send it to me and he did.


To the left, you can catch a glimpse of me holding Mr. 6 Year Old when he was 1 month old.  And to the right is a collage of our trip to Punta Cana a couple of years ago.  The picture of us swinging him was taken by a pro.  And of course, be classy!


This is my favorite picture of LC holding Mr. 6 Year Old when he was a new born.


And this is a picture of us on our wedding day.


This collage on canvas was purchased from Shutterfly.  It is a collage of LC and his brother, and was a gift to him last Christmas, from me.  This canvas print is very very special, because his brother has passed on, and it serves as a reminder of some great times they had together.  The picture on the right is my great grandfather, who was from Sweden.  I just added this one yesterday.


The top print is just a greeting card that I framed.


And finally, here is a side by side of the before and after.  Like I said, the difference is much more noticeable in person.  The subtle change in color makes the white trim just pop.


I can’t help but smile every time I walk down the hall, which is about 100 times per day!  This hallway felt so dull and dingy, and now it feels fresh, clean and new!
Paint colors:  Martha Stewart Living Color called Sharkey Gray MSL 240 in eggshell.  I actually bought Olympic paint from Lowes and had it color matched to this color.  The trim is crisp linen white by Behr in a high gloss.
I am considering this paint job to be phase one of the hallway update complete.  I still have a couple of things left to do for phase two.  I want to paint all of the doors, probably the same black as my front and back door, and spray paint all of the door knobs.  As far as the hinges, I am currently undecided as to whether to change them or try and paint them too.  Any advice?  Have you ever tried painting door hinges?  I also need to paint the attic door and trim in the ceiling.  And I have a project planned for that mirror at the end of the hallway.  One last thing that I might do is change up that back wall.  I have some old wood from a torn down fence, and may eventually use it somehow on that wall.  We’ll see!Update:  I just noticed that this is my 300th post!  Can you give me a woot woot!

Link Parties:

Wednesday:
Work it Wednesday
Savvy Southern Style
Friday:
The Shabby Nest
Inspire Me Please
Sunday:
DIY Showoff
DIY Sunday Showcase
Monday:
Thrifty Decor Chick
 Between Naps on the Porch
Monday Funday
The Dedicated House
The DIYers
Give Me the Goods
Project Inspired
Tuesday:
Coastal Charm
Cozy Little House
Homework
A Stroll Through Through Life

Filed Under: Decorating, Favorite Paint Colors, Gallery Hallway, Gallery wall, My Home, My Projects, Projects, Uncategorized

Leave a Reply Cancel reply

Your email address will not be published. Required fields are marked *

CommentLuv badgeShow more posts

This site uses Akismet to reduce spam. Learn how your comment data is processed.

Hi, I'm Nicki I'M THE GIRL WITH CHAMPAGNE TASTE AND A TIGHT BUDGET. I'M SO GLAD YOU'RE HERE!
  • Bloglovin
  • Facebook
  • Instagram
  • Pinterest
  • Twitter

VIP Real Estate

NO PLACE LIKE HOME

No Place Like Home

ORC Bathroom Makeover

Kids/Guest Bathroom Makeover

One Room Challenge Week 6 Kids-Guest Bathroom Reveal

It's week 6 of the One Room Challenge and this is … [Read More...]

ARCHIVE

ORC

Shop My Faves!

Spring Trends
PicMonkey Photo editing made of win
Get Sponsored by Big Brands

SheKnows

Linquia Influencer

FYI

Find Your Influence

INSTAGRAM

Recent Posts

  • Cozy and Casual Christmas Tour | Part 2
  • Casual and Cozy Christmas Tour | Part I
  • Farmhouse Bathroom Makeover Progress | $100 Room Challenge

Archives

Find It Here

Copyright © 2022 · Sweet Parrish Place