Sweet Parrish Place

I'm the girl with champagne taste and a tight budget

  • Home
  • About
    • About Nicki
    • Shop My Amazon
    • Contact Us
    • Blog Love
    • Link Parties
    • Advertise | Disclosure | Privacy Policy
  • Home Tour
    • Yellow Prairie House Tour
    • West Virginia Home Tour
    • Seasonal
  • Projects
    • Trashtastic Treasures
    • Holiday
    • Decorating
    • DIY
    • Crafting
    • Paint Projects
    • Cleaning/Organization
  • Style
    • Fall/Winter
    • Spring/Summer
    • Sweet Parrish Place Style
    • Tips/Tricks
    • Shop My Looks
    • Shop My Amazon
  • Travel
  • Lifestyle
    • Family
    • Decor
    • My Favorites
    • I’m Loving It
    • Personal
    • Shop My Amazon
  • Yellow Prairie House Tour

Removing Linoleum- And Unexpected Issues

June 27, 2013 By Nicki 4 Comments

Hi there!  In case this is your first time visiting my blog, I am smack dab in the middle of remodeling my downstairs hallway/mudroom/laundry closet.  I don’t know why I thought this would be simple.  I guess it is naivety.  On Tuesday, I showed you how I removed the carpet from half of the hallway.  That was fairly simple, except for a small area under the carpet that had warped.  I took care of that by cutting a square out of the sub floor and filling it with wood filler.  Or shall I say my dad cut it out for me.  I got that all finished and cleaned up on Tuesday.  Then yesterday this happened.

DSCN3072
First we had to unhook and remove the washer/dryer.  that is always a blast.  I got as caught up as possible on my laundry beforehand.  Because I was planning to be without it for about 4 days. 
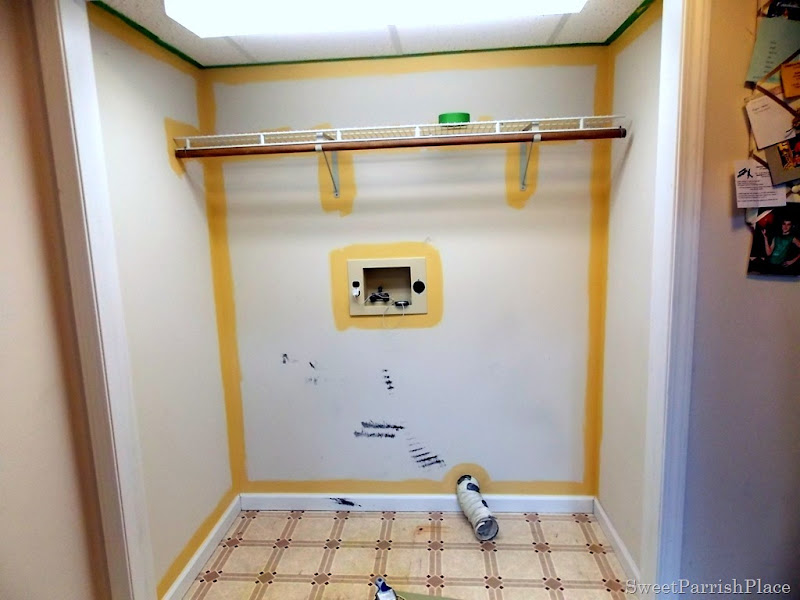
So the washer and dryer are sitting in this hallway now.  At the very bottom center of this photo, you can see where I filled in that square with wood filler. 
DSCN3073
I decided to paint this closet first so that it would be done and I would not have to stand on the new floor to do it.  I wanted a pop of yellow when you open this closet, so I used leftover paint from where I painted my kitchen cabinets.  It is called butter cup.  It is not the exact shade of yellow I would have chosen, but I had a whole quart of it, so I decided to use it up. 
DSCN3074
Next, I started trying to remove the linoleum.  That was a blast!  Let me put it this way.  I don’t plan to EVER do it again.  Oh wait, I have this same linoleum waiting to be removed in Miss 17 Year Old’s bathroom.  So I will be doing it again.  Lovely!  If you have never done it before, let me warn you it is not fun.  At all.  As a matter of fact, the only fun part of working on this was listening to Pandora while I worked.  Love the shuffle option.  A friend of mine at work had suggested last week to lay down a towel and place a hot iron on it to melt the glue a little to loosen it, so that is what I ended up doing.  And it worked, although it still was far from easy.  And this was just a small area.  I can’t imagine what an entire room would be like. 
DSCN3075
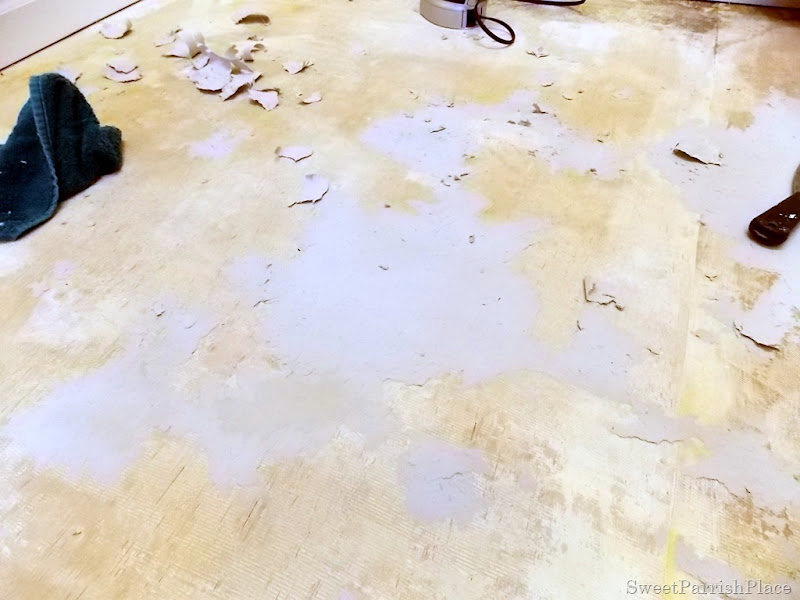
So at this juncture, the linoleum is gone.  This is where things started going from bad to worse.  Let me start by pointing out that the sub floor under this linoleum was raised a little over the sub floor in the rest of the hallway.  I did not foresee removing it so I decided to try to make it work and put a trim piece or something over the raised section.  I was not happy with this solution though because it was not going to look seamless.  Anyhoo, I started trying to peel up this leftover paper and glue that you can see in the next two pictures.  That was even more fun.  What I ended up using was a mixture of vinegar, water, and Dawn (which is what I use to clean glass).  I sprayed it on to get saturated, let it soak for a bit, and then started scraping.  It worked but it was slow going. 
DSCN3076
DSCN3077
Let me interrupt the removal of the paper and glue to bring you this very important message.  Look at the next 3 pictures.  When we were buying this house, I kept insisting that I smelled mold or mildew, but the home inspector could not find the source.  Well, I found it!  Yep!  It was underneath this linoleum, along the back wall behind the washer and dryer.  It was damp!  that is a huge concern because I cannot lay paper bag floors on a damp subfloor.  It is also important to note that the linoleum above it was not wet at all.  So what is the source of this wetness?
DSCN3078
The more I scraped glue off, the more I came to the realization that I had to get this subfloor out of here.  Remember, it was a sub floor on top of a sub floor.  So I decided to try to remove it, which should have been my decision from the get go because it was higher than the rest of the floor.  Did I mention that during this entire process, LC was at work? 
DSCN3079
So I took a screw driver, and a hammer, and started prying up that sub floor.  This was by far the hardest I have ever worked in my memory.  I worked like a man people.  Like a big, fat, stinky man whose ass crack is showing.  That’s right.  That sub floor was stapled down in a million spots with a staple gun, and those staples were a good inch long.  Might I mention at this juncture that I completely wasted my time scraping all of that paper and glue to then remove the floor?  Yeah, that’s just how I roll.  
DSCN3080
And I cannot believe it, but I got it removed all by myself!  You can see below that it is gone!  And a big pile of crap is sitting in my garage where my car should be.  The garage is behind that door.  So, this is what it looks like right now.  You can see in the back of that closet the bottom sub floor is also damp.  So now we are stuck with figuring out why this floor is wet.  We are stumped because the linoleum was not wet at all.  We can’t move forward until this problem is resolved. As I sit here there is a fan blowing on it  that has been there all night.  And we plan to hook the washer back up and run it through a couple of cycles (peed on bedding) and try to see if there is a leak somewhere.  
DSCN3081

But our guess right now is that this got wet at some time in the past and has just never dried.  Because the linoleum was not wet at all.  And behind this closet wall is our utility closet, and you can see all of the water pipes.  They are exposed and do not appear to have any leaks.  It is totally dry in the utility closet.  So we are guessing at some point there was a mishap with the washer and the owner’s thought they got it all dry, not realizing that it had soaked the sub floor.  Well, that is our prayer, anyway.  Because that means once the floor is dry we are good to go.  
Did I mention that I am having people over on Friday evening?  And that you can see this area right as you walk in my front door?  And that I have to prepare some kind of food and drinks?
Oh yeah, and to add the cherry on top, I went to bed physically and mentally exhausted, to be awakened at 6:30 this morning to the fact that Mr. 5 Year Old had peed in my bed.  the sheets, blanket and bedspread all soaked.  And if you scroll to the top, you will clearly see that we unhooked the washer/dryer yesterday- blah, blah, blah.  And therefore, I am sitting here writing this post instead of sleeping. 
And I thought I was just gonna remove the carpet and linoleum and start laying my paper bag floors.  Ha!  Hahahahahahahaha!  (Imagine me laughing hysterically right now, you know, like a crazy person, in an insane asylum)  Stay tuned for the rest of the story, the final results are still a mystery.  Even to us. 

I am linking up here:

Inspire Me Please
http://houseofroseblog.com/inspire-me-please-weekend-blog-hop-16/

Remodelaholic

The Shabby Nest
http://shabbynest.blogspot.com/2013/06/frugal-friday_27.html

DIY Show Off
http://diyshowoff.com/2013/06/30/that-dig-party-23/


http://www.vmg206.com/2013/06/diy-sunday-showcase-link-party-5.html


http://www.savvysouthernstyle.net/2013/07/wow-us-wednesdays-125.html

Filed Under: DIY, laundry room, Removing Linoleum, Uncategorized

Comments

  1. Cheryl Thornton says

    June 27, 2013 at 6:53 pm

    wow – I hate when you think you are going to breeze through a project – only to find more work!

    Hang in there…hoping things get better for you!

    Cheryl @ The Creative Me and My McG

    Reply
    • Nicki Parrish says

      June 27, 2013 at 7:50 pm

      Thanks Cheryl,

      As of now we still cna't find any leak anywhere, so that is good.

      Reply
  2. G AJ says

    June 28, 2013 at 3:48 am

    Oh my. I have been in your shoes. Bless your heart! Deep breaths and one step at a time. Your patience and ability to juggle it all is amazing.

    Reply
  3. Jennifer Schmitz says

    June 28, 2013 at 4:35 pm

    You go girl! I'm glad you did it and now look how much better it is going to look after you get new flooring. You will always walk by that spot and remember how hard you worked! Good job! ….and now I can't wait to see how its going to look when its all put back together.

    Jennifer @ Decorated Chaos

    Reply

Leave a Reply Cancel reply

Your email address will not be published. Required fields are marked *

CommentLuv badgeShow more posts

This site uses Akismet to reduce spam. Learn how your comment data is processed.

Hi, I'm Nicki I'M THE GIRL WITH CHAMPAGNE TASTE AND A TIGHT BUDGET. I'M SO GLAD YOU'RE HERE!
  • Bloglovin
  • Facebook
  • Google+
  • Instagram
  • Pinterest
  • Twitter

VIP Real Estate

NO PLACE LIKE HOME

No Place Like Home

ORC Bathroom Makeover

Kids/Guest Bathroom Makeover

One Room Challenge Week 6 Kids-Guest Bathroom Reveal

It's week 6 of the One Room Challenge and this is … [Read More...]

ARCHIVE

ORC

Shop My Faves!

Spring Trends
PicMonkey Photo editing made of win
Get Sponsored by Big Brands

SheKnows

Linquia Influencer

FYI

Find Your Influence

INSTAGRAM

Recent Posts

  • Cozy and Casual Christmas Tour | Part 2
  • Casual and Cozy Christmas Tour | Part I
  • Farmhouse Bathroom Makeover Progress | $100 Room Challenge

Archives

Find It Here

Copyright © 2022 · Sweet Parrish Place