Sweet Parrish Place

I'm the girl with champagne taste and a tight budget

  • Home
  • About
    • About Nicki
    • Shop My Amazon
    • Contact Us
    • Blog Love
    • Link Parties
    • Advertise | Disclosure | Privacy Policy
  • Home Tour
    • Yellow Prairie House Tour
    • West Virginia Home Tour
    • Seasonal
  • Projects
    • Trashtastic Treasures
    • Holiday
    • Decorating
    • DIY
    • Crafting
    • Paint Projects
    • Cleaning/Organization
  • Style
    • Fall/Winter
    • Spring/Summer
    • Sweet Parrish Place Style
    • Tips/Tricks
    • Shop My Looks
    • Shop My Amazon
  • Travel
  • Lifestyle
    • Family
    • Decor
    • My Favorites
    • I’m Loving It
    • Personal
    • Shop My Amazon
  • Yellow Prairie House Tour

Trashtastic Tuesday- How to Make a Chalkboard Tray

July 29, 2014 By Nicki Leave a Comment

Welcome to another edition of Trashtastic Tuesday! This is a little series around here where I show you something that I thrifted, sometimes I make it over, sometimes I don’t.  Or it may be something that I have owned and I am tired of, or no longer like, so I make it over.  But nevertheless, it is usually something that I paid very little money for.  I bought this silver tray from Goodwill many months ago.  It is an Oneida tray, and I paid $2 for it.  It had some type of burn damage on one side.  I went ahead and bought it knowing I could use it for something. Are you ready to find out how to make a chalkboard tray?

DSCN5588
I had this idea in my head to create a chalkboard for my kitchen using this tray.  But I wasn’t sure how it was going to turn out.  Many months later, I finally got around to transforming it into something beautiful!  This is what it looked like when I finished it.
DSCN5563
This was a fairly simple project.  Here is how I did it.  I used some white satin paint that I had left over, and some chalkboard paint.  I started with the outside rim.  On the part of the rim where the decorative edges are, I used a small paint brush and just painted it, making sure to get into all of the nooks and crannies.  Working in sections of a few inches at a time, I then quickly wiped the paint off with a paper towel.  The raised parts were wiped down to the bare metal,and the white paint in the crevices stayed.
DSCN5565
Next I started working on the inner part of the rim.  I used a dry brush technique on this.  But first, I took a small white paint brush an painted a white line all around the inner part of the rim, where the chalkboard paint meets the white.  Next, I used a one inch paint brush to dry brush white paint all around the rim.  The way I dry brushed this was to dip a little of my brush into my paint, and then dab it onto a paper towel a few times.  I then painted all around the inner rim using this technique.
DSCN5567
After I had the entire inner rim painted, I took a paper towel and wiped all around where I just painted.  The picture below is a close up of the result.  I was very happy with the way it was looking at this point!  It has a rustic look, and the silver on the tray was showing through perfectly.  Just the way I pictured it in my mind.
After that was finished and dry, I started painting the inside of the try with chalkboard paint using a two inch paint brush.  I free handed this part.  I just painted in a circular motion. I also want to mention that when I looked up how to paint with chalkboard paint on metal, I read that you should paint one coat of primer on before hand.  Being the nonconformist, I ignored this and went straight for the chalkboard paint.  This could possibly cause the paint not to stick I guess, but since this tray will never be touched by anyone but me, I decided to ignore the recommendation.  I painted on 4 coats of chalkboard paint and let it dry overnight.
DSCN5570
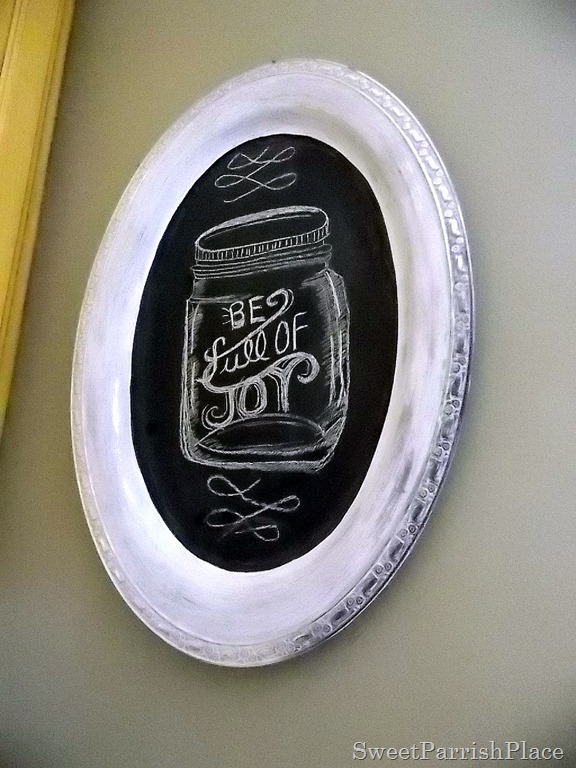
After it was all dry and ready to go I got to work making it look pretty to hang in my kitchen!  This is the end result!  I free handed this drawing of a jar that says Be full of joy.  I got the idea from this chalk art I had pinned.  I printed it out, and looked at it while I drew my own.  It is by no means perfect, but it is good enough for me!
DSCN5583

If you would like to know how I hung this, you can see a post I wrote on a DIY way to hang plates.

DSCN5590
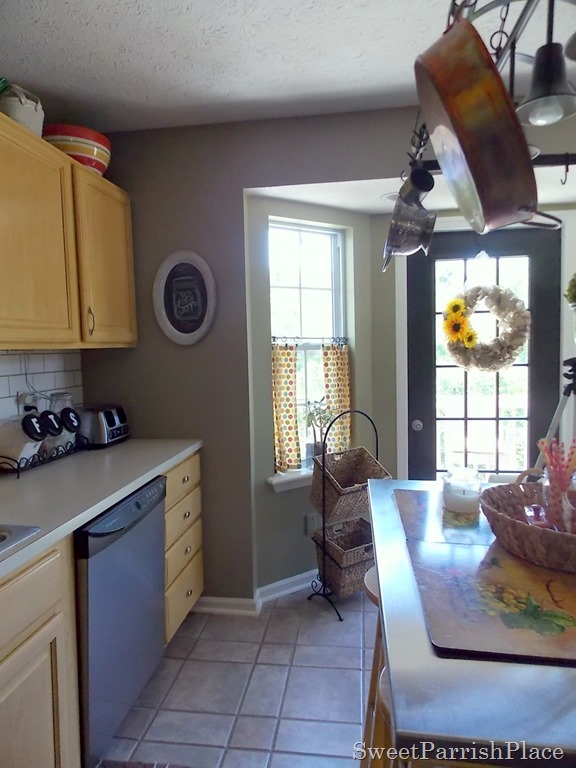
Here are a few more shots of it actually hanging in my kitchen, just in case you are new around here and don’t know what my kitchen looks like.  I painted my kitchen door black, and I spray painted the doorknob, all last spring. I made the no sew cafe curtains myself.
DSCN5592
You can see a tutorial for how I made the burlap wreath hanging on my door here.  And if you are interested in seeing how I made the canisters on the counter, click here.  They were another Trashtastic Tuesday Project.
DSCN5594

And this in my entire kitchen.  You can read all about my painted subway tile backsplash here, and my painted kitchen cabinets here.

DSCN5574

I have to say, this is one of my most favorite Trashtastic Tuesday projects to date.  I love the way it looks hanging in my kitchen!  What do you think?  Do you have any old silver trays hanging out that you could make over?  I would love to read your thoughts in my comments!

If you would like to see all of my Trashtastic Tuesday projects, please click here.  Have a great day!

Linking Up Here:

Tuesday:
The DIYer’s
A Stroll Through Life
Coastal Charm
Wednesday:
Savvy Southern Style
Work it Wednesday
Friday:
The Shabby Nest
Craft Dictator
Inspire Me Please
Remodelaholic
Funky Junk Interiors
Jennifer rizzo
Sunday:
DIY Sunday Showcase
DIY Showoff
Monday:
Monday Funday
Project Inspired
Between Naps on the Porch
Inspire Me Monday

Filed Under: trashtastic treasures Tagged With: turn a silver tray into a chalkboard, upcycle a siler tray

Leave a Reply Cancel reply

Your email address will not be published. Required fields are marked *

CommentLuv badgeShow more posts

This site uses Akismet to reduce spam. Learn how your comment data is processed.

Hi, I'm Nicki I'M THE GIRL WITH CHAMPAGNE TASTE AND A TIGHT BUDGET. I'M SO GLAD YOU'RE HERE!
  • Bloglovin
  • Facebook
  • Instagram
  • Pinterest
  • Twitter

VIP Real Estate

NO PLACE LIKE HOME

No Place Like Home

ORC Bathroom Makeover

Kids/Guest Bathroom Makeover

One Room Challenge Week 6 Kids-Guest Bathroom Reveal

It's week 6 of the One Room Challenge and this is … [Read More...]

ARCHIVE

ORC

Shop My Faves!

Spring Trends
PicMonkey Photo editing made of win
Get Sponsored by Big Brands

SheKnows

Linquia Influencer

FYI

Find Your Influence

INSTAGRAM

Recent Posts

  • Cozy and Casual Christmas Tour | Part 2
  • Casual and Cozy Christmas Tour | Part I
  • Farmhouse Bathroom Makeover Progress | $100 Room Challenge

Archives

Find It Here

Copyright © 2022 · Sweet Parrish Place