Hey friends! Today is week 4 of the One Room Challenge for guest participants, and I am very close to being finished in this room! Last weekend, I got my artsy fartsy on and made this DIY macrame pendant for our downstairs bathroom makeover, and I am actually kind of amazed at how well it turned out. I am smiling from ear to ear that I completed this and I love the way it turned out!
Since we are on week 4 of this challenge, you might want to catch up with my progress on this downstairs bathroom makeover from the beginning. You can click the links provided to take you back to each of the first three weeks: Week 1, Week 2, Week 3, and Week 4.

If you don’t know what the ORC is, The One Room Challenge™, currently in its eleventh season, is a widely anticipated biannual event every April and October. Each round, twenty design bloggers take the challenge and transform a space. It is hosted by Calling It Home and House Beautiful. Wednesdays is the day for the design bloggers to go live with their progress, and Thursdays is the day for all the guest participants to go live.


I knew I wanted to replace the ceiling light in this space. The old light was just a florescent ceiling light with the tube shaped bulbs. So ugly, and so cold and stark looking! We removed it, and we are actually going to repurpose it elsewhere, probably our garage. I found this cage light on clearance at Target for less than $9, and it wasn’t really what I had in mind for the makeover. But for some reason I was drawn to it, and decided to go ahead and buy it in case I could use it.
I had this feeling I could transform it into something special, but I didn’t know at the time how I would do that. And then I cam across a DIY macrame pendant photo in a magazine, and it hit me! I could use this light to make one for myself! I had some doubts as to whether I could pull this off, but it was much easier than I thought it would be! It took me the longest to figure out how I was going to attach the cord at the top. I would say that overall, it took me three hours from start to end to make this, and I think it was closer to two hours.

DIY Macrame Pendant- Supplies
- Macrame cord
- Cage Light
- Scissors
- Heavy Duty wire to place at top (if needed, see below)
In order to get started with your macrame light, it needs to have a horizontal bar going across the top so that you can start tying your first knots. Unfortunately, mine didn’t have this, so I had to get creative. I used a picture hanging wire that I had, and wrapped it around the very top with pliers. I wrapped it at the ends so it would stay.

DIY Macrame Pendant- How To
- Find something tall to place your cage on so that you can rotate it easily.
- Cut your cords and attach them to the cage, measure the height of your light, and then multiply that number by 9. Cut the cord this length.
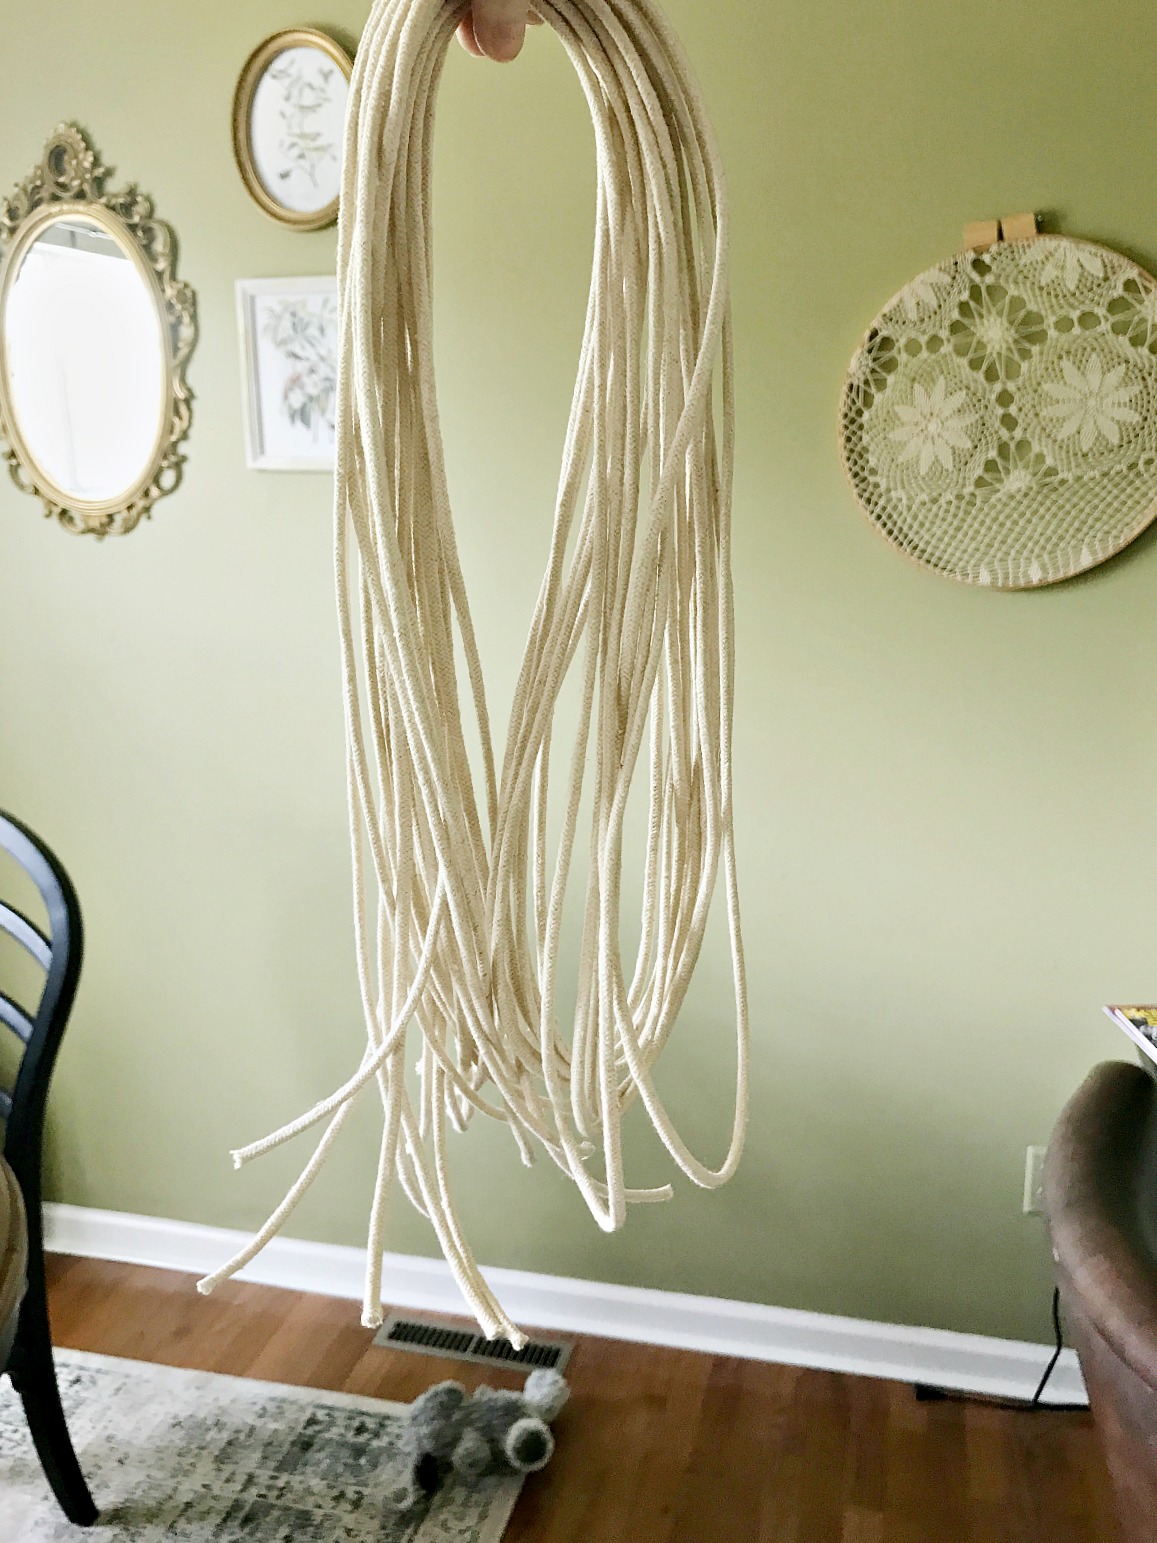
3. Attach the cord all around the top of the pendant by folding it in half, and then wrapping the looped end around the top bar, and pulling the loose ends through the loop. You can see this in the picture below. Make sure you have an even number of cords wrapped around the top, until it is full. But it needs to be an even number. These are called larks head knots.


4. The knot you will be making over and over again is called a square knot, and the pattern will be an alternating square knot. Start with a pair of larks head knots.
5. Bring far left cord over two middle cords, and under cord on the far right. Bring the far right cord under the two middle and over the cord on the far left.
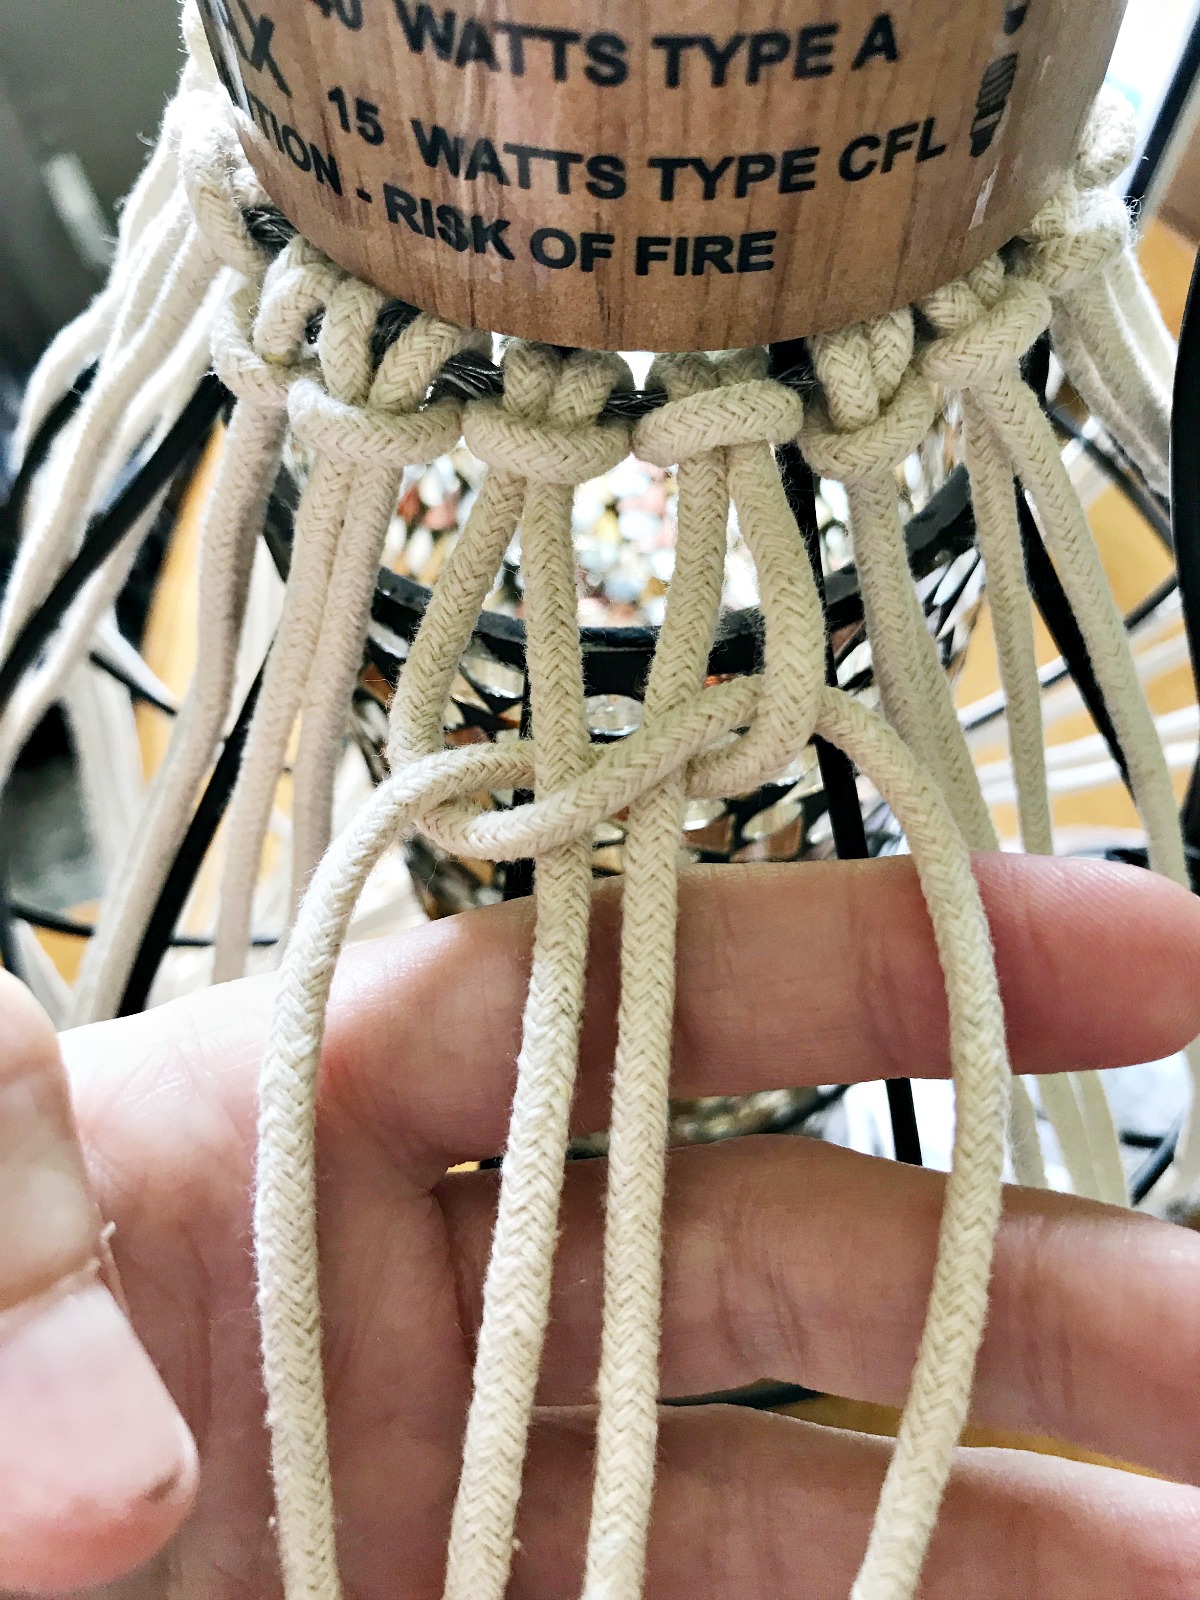
6. Pull tight, don’t let the cords twist.
7. Bring far left cord under two middle cords, and over cord on the far right. Bring the far right cord over the two middle and under the cord on the far left. Below is what your knot will look like when it is finished.

8. Keep repeating this all around the cage to form a row of square knots.
After you have the first row of square knots complete, you will work your way down the cage making alternating square knots. I made this graphic to show you how to alternate the knots. I have black arrows pointing to which cords to pick up to start the next row of square knots. This was the part that initially stumped me when I was getting started, but once you figure it out, you are golden!
9. Once you have reached the bottom of the cage, you will take the cords and intertwine them with the cage, and make the knot as tight as possible.
10. Cut off excess cord.

I made a short video of myself tying a square knot, and you can watch it by clicking the link below. For the life of me I could not get this video embedded into this post! But all you have to do is click this link!
https://www.youtube.com/edit?0=U&video_id=r4FO9ZWYNxA

I love the way this light makes the room look! I haven’t taken the stickers off it yet, but I will before the room reveal next week. I used a vintage looking Edison bulb in my light, but I may switch it out to a brighter lightbulb.


I have also painted the mirror over my sink white, but I need to go back and scrape the paint off of the mirror with a razor blade.

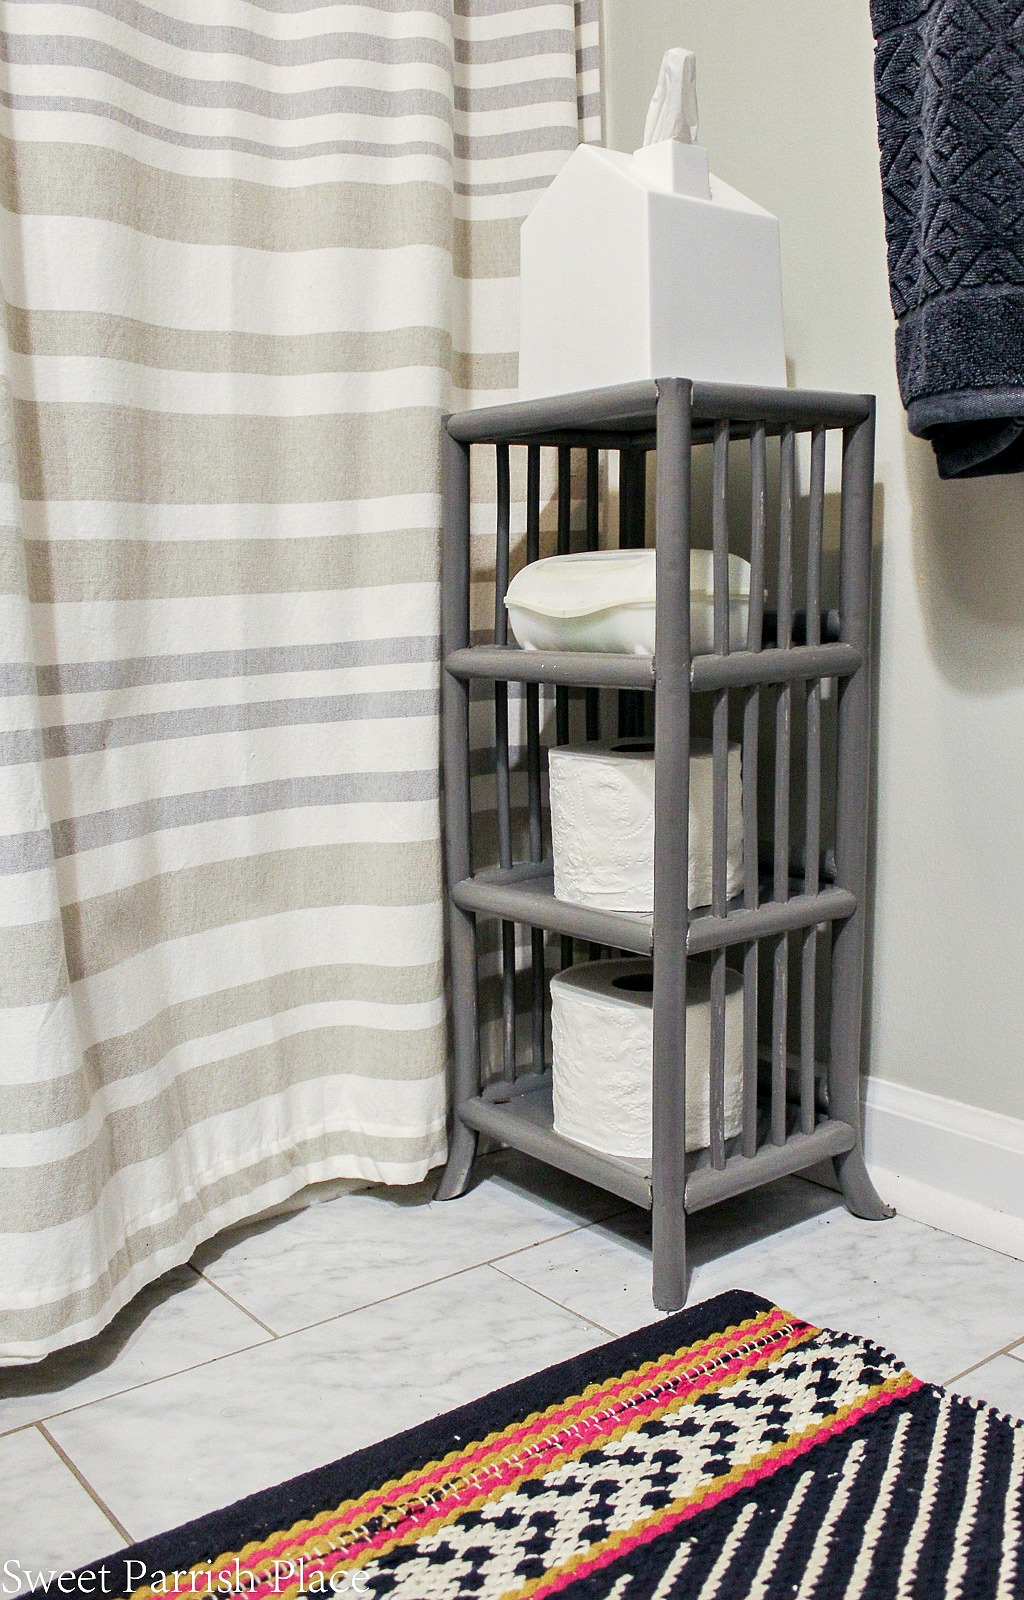
Another thing on my list of things to o in this room was to paint this small bamboo shelf. This shelf is where I put toilet paper, tissues, and wipes. It was white and starting to look worn, so I decided to paint it grey. I just put it in my small spray paint shelter and spray painted it. And isn’t the tissue box that looks like a house the cutest? I had to have it when I saw it!
If You Like It, Then You Wanna Put a Pin On It!

What do you think of my DIY macrame pendant light? I have less than $20 in it total, and I think it adds so much to the space! I still have some trim work and caulking to do around the sink, and I have to clean up the mirror and style everything, but I am right on track for the big reveal that will take place in just one week! And wow, this room has come a long way! The macrame wall weave I had made for this space is finished, and on the way to me. I will have it by this weekend so that I can finish up this room. I am dying to see it! I really am loving the way this room is coming together, and I hope you have enjoyed following along with me on this journey! Don’t forget to come back next week for the full reveal!
Before I go, let’s review my list for the downstairs bathroom makeover.
TO DO LIST
Replace sink and vanityInstall light over sinkDIY wall shelvesReplace shower curtainReplace shower headReplace accessories and hardwareHave a Wall Weave made for the spaceReplace bathroom rugReplace ceiling lightPaint bamboo shelves for spaceInstall glass subway tile backsplashPaint walls
SOURCE LIST
Quartz vanity top- Craigslist
Do you have champagne taste and a tiny budget too?
Love fashion, DIY, crafting, all things vintage and thrifty?Stick with me, I’ve got you covered!
Sign up to get my posts delivered to your inbox here
Follow me here:
Nicki!!! This looks absolutely fantastic. I haven’t done macrame in years, but you’re making me think I need to get back in to it. I am blown away what a transformation the macrame made.
Well done my crafty friend.
Hugs, Lynn
Ahhh thanks so much Lynn! I am quite smitten with it myself! And this is my first ever try at macrame! I will have a macrame wall hanging in the space too. But I had it made by a friend of my daughters.
Nicki, I love how you did macrame over the cage lamp. So great and I love how you showed how to do this. I think I tried macrame years ago and that was the extent of it. You make it look really easy!
Carol recently posted…Share Your Style Party #116
Thanks so much Carol! I hope that people can understand it, so I am glad you made this comment and gave me some feedback!
Nicki, I love this so much! I took a macrame class when I was in Middle School but I have forgotten how to do it. I will be trying to relearn soon.
sherry cole recently posted…Broccoli Salad
Sherry, this was my first ever attempt, and it turned out great, so it really is pretty easy to pick up!
this is so creative! love it!!
You are so sweet Morgan, thank you so much!
My mind is blown with this! Awesome job!
How sweet of you to say, thanks so much!
Love your new bamboo shelf and that macrame pendant project is awesome! Great job. Can’t wait to see full reveal next week. Good luck!
Thanks so much! I am just getting ready to go finish it all up!
The lamp looks Awesome Nicki! I’m pinning it!
Natalie @nelidesign recently posted…Wine crates Floating shelves | One Room Challenge Week 4
Thanks so much!
Its beautiful!! Love what you did to the lamp with macrame, Nicki!! Super creative
Ahhh thank you so much!
what a fantastic idea! love how it turned out!
Thanks so much Cassie!
Your macrame shade on the pendant like is just perfect! I think those cage lights look a bit harsh, so I really appreciate your solution. The macrame shade looks very nice, and it softens the harshness of the cage. Your ORC is looking great!
Carol (“Mimi”) recently posted…3 Reasons to Make DIY Memory Wire Bracelets
Hi Mimi! Thanks so much, and I completely agree with you about the caged lights! It was a fun project!
It has been so long since I have macramed that I have forgotten how to do the knots. You did a great tutorial so my memory can be refreshed. The light looks fantastic.
I love this!!! So cool! Looks amazing! Sharing! Thank you for sharing on Merry Monday! Hope to see ya next week!
Kim
Thanks so much!
Hi Nicki, love the pattern on this lamp. Is it possible to do the same thing on a bell shaped lampshade? If so, any tips on how to do it?
This lampshade is the only one I have tried to do, and once I got the hang of it it was easy. I am sure you can do it on any shaped shade if you try! It may take some trial and error though.
what a fabulous thought! love the amazing way it ended up!