Hey friends! It is time for week 2 of the $100 room makeover, and I am excited to report that we have made some significant progress on our mudroom makeover. In case you are catching this for the first time, let me catch you up to speed. I have committed to makeover a room in my house aaannndd stay within a $100 budget. That is a tall order, and a tight budget, but I am confident that I can get it done. After all, I am the girl with champagne taste and a tight budget! This challenge was created by Erin at Lemons, Lavender, and Laundry, and I am thrilled to be a part of it all. The room I have chosen to make over is my mudroom. I have until the last Wednesday of March to reveal this room, so that gives me about 3 more weeks to get it done.
Mudroom Makeover – $100 Room Challenge Week 2 Progress
This week I worked on making over an antique trunk that will be going into the space, and we also got started on building a coat hook wall behind the door that leads out to our garage. If you would like to follow this entire mudroom makeover from the beginning, you can click here to see week one of the makeover. Are you ready to see the progress? Let’s go!
Antique Trunk Makeover
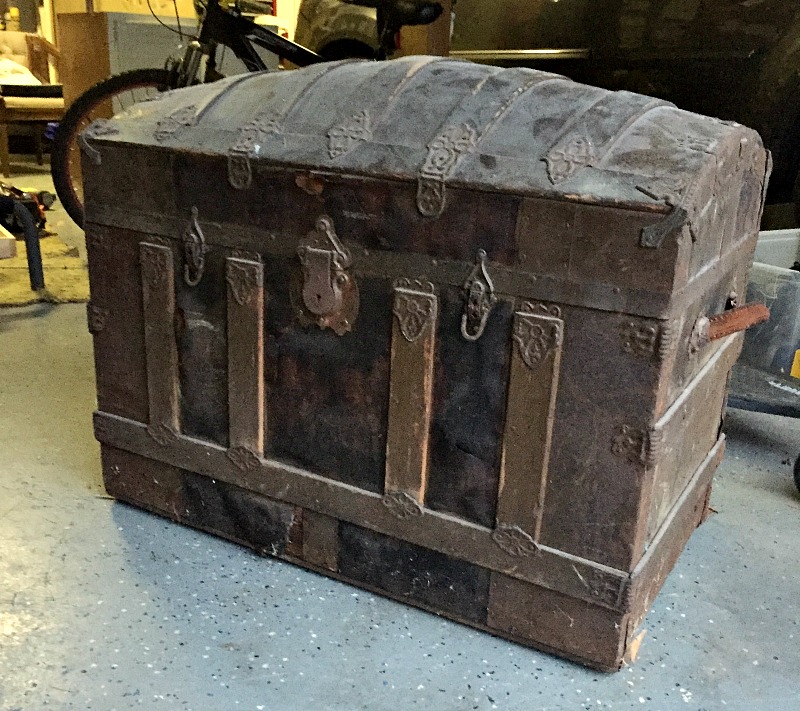
You guys, I am so pleased with how this trunk is turning out! And to think, I sort of cringed when my husband brought it home to me! Not that I didn’t like it, but it is huge, and I had no idea where I would be able to fit it into this home. So I sat it in the garage to wait for a place in our future home. And there it stayed for a year. Until I started scheming up this mudroom makeover, and I had a lightbulb moment and realized it would fit in this space. I just have to move a chair out, but it is totally worth it to have the beauty move in, and it will provide some much needed storage to boot! This is what it looked like in the beginning.
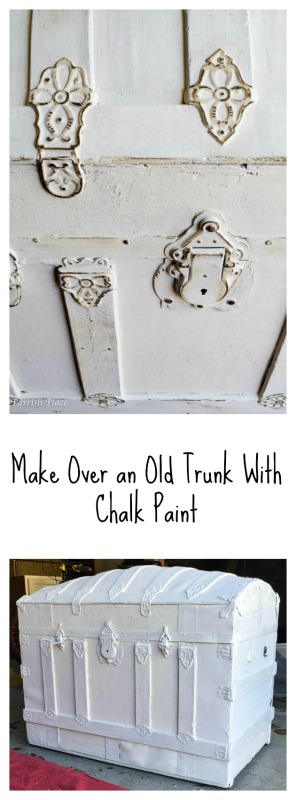
And here she is after two coats of Deco Art Chalky finish paint in the color Everlasting. Before I started painting, I cleaned it really well, and that was a job because it had years of dirt and grime on it. While cleaning it, I noticed that some areas of it were covered with some sort of paper, and some spots were damaged, so I had to remove that paper with a box cutter. I decided to paint the entire thing white, including the hardware, because I wanted to go back and distress the hardware and make it pop.

And I am so glad I made that choice, because this is the hardware after I finished sanding it. LOOOOVVVEEE it!!! To achieve this look, I used a fine grit sanding pad and sanded down all of the hardware until I liked the look I was achieving. I then also sanded the edges of the detailed wooden trim and on the corners, and just in places that it made sense that the trunk would be showing natural wear. The only thing I have left to do is give the trunk a couple of coats of wax, but that won’t change the look of it. I am going to use Decor Art Creme Wax in clear. This will protect it for years to come. This entire project cost me zero dollars, because we had owned the trunk for a long time before this mudroom makeover started evolving, and the chalky paint and the wax I already had left over from a previous project. So I didn’t spend any of my $100 budget on this makeover.

DIY Coat Hook Wall
The next project we have underway as part of this mudroom makeover is this DIY coat hook wall we are creating. In case you missed it last week, here is my inspiration photo.

I knew our wall we would be installing this on was not quite a big enough space to do this exact same thing, but the above photo was my inspiration for this idea. Our garage door opens right into this wall, so we could not use a shelf at the top, so we used a much thinner ledge, which is actually a piece of window casing that we had left over from our bathroom makeover we did in the Fall for the One Room Challenge. So that is the piece of trim you see right at the very top in the below picture. We had enough of this left over to use on this wall, so that was also free.

The remainder of the wood we are using is poplar trim we purchased from Home Depot. We bought one wider piece that measure 1/4 in. x 6 in. x 4 ft., which you see up top right below the white trim, and then we bought 5 pieces that were not quite as wide, they measure 1/4 in. x 4 in. x 4 ft. Those are being installed down both sides, and there will be another piece right across the middle. Both of the horizontal pieces will have hooks installed. There will be 5 hooks total, and we ordered them for $15.99 from Amazon.

The beadboard you see is actually paintable wallpaper, and it will also be hung behind the bench and shelf that are not pictured today, but they are to the left of the stairway. I hope to start work on that part this coming weekend. Right after I finish up this coat hook wall. I have a few more boards to measure, cut and install. And after that, I will need to caulk and paint the entire coat hook wall white. So once it is painted, it will all look like one unit. And the most fun will be installing the hooks and putting this little spot to work! Just wanted to make mention that Tom Cruise is peeking at you from the left in the picture below. That is an autographed photo you see in the back ground from his Risky Business Days. Hehe!

I can’t wait to have this little project finished! It is going to work hard for our family, I just know it! You can see the gate to the left of this wall. That keeps the puppy from getting down the stairs. I don’t know what we would do without it! I am happy with our progress towards our mudroom makeover thus far, I think I am right on track. Stay tuned next Wednesday to see more of the progress we will be making over this coming weekend.

Materials Needed for this Coat Hook Wall:
Beadboard wallpaper– $30.00
Wallpaper paste- $6.78
Wallpaper smoothing tool- $1.98
5 hooks – these were $15.99 and I used a gift card that I already had
Window casing– $10.38- I already had this left over
1/4 in. x 4 in. x 4 ft poplar board (5 needed)- $4.26 each
1/4 in. x 6 in. x 4 ft.– $6.12
Paintable Caulk– I already had this
Wood Filler– I already had this
White paint of your choice (I will be using Simply White by Benjamin Moore in a pearl finish)- I’m using leftover paint from another project
Nail Gun (I have this one)- I already had this
Brad nails ( I used these)- I already had these
For your convenience, this post has affiliate links. If you click on them and buy an item, I will receive a small percentage of commission. By clicking the link, you are NOT paying any more than you ordinarily would, and you are helping support me in keeping this blog up and running, so thank you for that!
The total I have spent so far in this room is $77.27. I did use a gift card I had from Amazon to purchase the hooks and the foam cushion that will go on the bench, so I am not counting the cost of those, because the gift card was a gift. Most of my expense will go toward this wall that is in progress right now. I will show you more of where my budget is being allotted next week.
As a reminder, here is the to do list for this space. I even got to mark something off!
MY TO DO LIST FOR THE MUDROOM MAKEOVER
- Paint and distress antique trunk
- Paint bench and shelf white
- Paint laundry closet doors ( undecided as to what color)
- hang antique mirror
- upcycle some thrift store art for the space
- Add some bling to the drum shade
- Hang beadboard wallpaper and paint it white
- Install trim and hooks to small wall area behind door leading to garage
- Add a cushion to the bench
If you like it, then you wanna put a pin on it!

Do you have champagne taste and a tiny budget too?
Love fashion, DIY, crafting, all things vintage and thrifty?Stick with me, I’ve got you covered!
Sign up to get my posts delivered to your inbox here
Follow me here:
Wow! That trunk is STUNNING! Can’t wait to watch this space transform.
Morgan recently posted…$100 Half Bathroom Update: Paint and an Updated Light Fixture
Yay Morgan! I’m so glad you like it! Thanks so much!
Nikki, you are doing amazingly well on the budget! I do love that white trunk and I think painting and distressing the hardware was a great decision. Your space is going to look great!
sherry cole recently posted…Bathroom Vanity Makeover
Thanks Sherry! I’m so glad my husband surprised me with it!
Wow! You got so much accomplished this week! The trunk looks amazing painted.
Tracy recently posted…Boys Farmhouse Bedroom Makeover: $100 Room Challenge Week 2
Thanks so much, I feel like I’m on track to be able to finish. I hope so anyway!
I love how you distressed the hardware on the antique trunk…it turned our amazing! Can’t wait to see your continue progress in the makeover! Blessings….
Thanks so much Lanita! I can’t wait to be able to move it into the space!
Love it, Nicki. DecoArt paints are the best!!
Brittany Goldwyn recently posted…Tiny Laundry Nook Update #2 // Open Shelving Using Stair Treads
Thanks Brittany! I love them for the small sizes too, because they are easy for small projects.
That truck makeover is truly amazing. It looks so fresh and pretty with the new hardware. I can’t wait to see the built in coat racks you are building.
Hi Sue! Thanks so much, I still need to wax it, and can’t wait to put it to use!
The truck turned out SO well. Love how you distressed the hardware. Such a great idea. You coat rack area is looking great as well. Can’t wait to see how that turns out.
Erin @ Lemons, Lavender, & Laundry recently posted…DIY Peppermint Lip Balm
Thanks so much Erin! I finished up the coat rack wall today and am so excited to get it photographed!
Oh that coat rack is going to be fabulous! I can’t wait to see how the truck fits into the space.
Thanks so much! The wall is finished now and I love it! And so is the trunk, and it fits so nicely. I am excited about it!
It looks great so far! I cannot believe that is beadboard wall paper!
Mary recently posted…Easter Decor and a Wooden Tool Box Centerpiece
Thanks Mary! This is my first time using this wallpaper, and I am loving it!
I love how your trunk turned out and I’m so excited to see this room when it’s all finished. I think it’ll look spectacular!
Carol recently posted…In Memoriam Of Our Dear Miss Molly
Thanks so much Carol! At this point, I’m hoping to be able to get it finished, but either way I do like where the room is headed!
Nicki…how fun is that trunk!? Can’t wait to see how you use it and the finished coat hanging wall! This is my kind of project, I know you are having fun with it.
Hugs, LYnn
Thanks Lynn! This trunk has become a treasure, and something that I will keep in our family forever. The coat hook wall is finished, so you will have to come by tomorrow to see the finished product!
I love the way you distressed the hardware on the trunk! Looking forward to seeing the coat hanging wall.
Linda recently posted…Engineering Prints DIY Wall Decor | $100 Room Challenge Week 3
Thank you Linda!
The trunk is so bright and pretty now! And I love how the coat hook wall is coming along!
Thanks Jenny! I’m really happy with my progress, just hope I can finish strong!
love the trunk when I was a kid may mother had a giant white trunk very much like the one you have. I can imagine how your room will be turned around because of the renew project
come see us at http://shopannies.blogspot.com
That is so awesome! I love the story you shared,, thanks so much!