Today I’m sharing phase one of our kitchen makeover, our new Quartz Countertops. 
Hey friends! Some of you who follow me on Instagram may know by now that we have begun a kitchen makeover! We still have a long way to go to call this project done, but the most expensive part of the project is complete, and I’m excited to share our new quartz countertops with you today. As we go along down through the photos I will be sharing, I’m going to outline the plans we have for this space along the way. We started this project with the new counters because I wanted to build everything else in the room around them. They are by far the most expensive aspect of the room, and the most permanent, so I wanted to choose the counters, and then all other decisions we make in the space will be chosen with them in mind.
The image below is a photo from a quartz website, Premium Natural Quartz from MSI, of the exact counters we had installed. The color is Fairy White, and this is a very accurate representation of what the counters look like. My main goal in this kitchen is to lighten and brighten the room, and these new quartz counters were the perfect start. I am in love with them!

We ran into a little trouble as I was preparing for the people to show up to install our counters. I discovered a water leak under our kitchen sink. I shared some of the disgusting photos and videos on Instagram of the rotted out cabinet bottom. I cannot believe it had not been discovered sooner. And the reason why is because I had everything neatly organized in Rubbermaid and other plastic organizers, so when I would reach under the sink to get something it appeared dry. You can read about how I organized under our kitchen sink and our pantry here.
When we moved in, we noticed there was plywood underneath of our sink, which was evidence of a past leak. We didn’t do much, other than cover the wood with a shelf liner. So, on the day I discovered water under the sink, I lifted the plywood up because it was completely soaked, and I discovered that the entire underneath of the sink (which was particle board) was completely soaked and had rotted out. It was a Friday and we were unable to get plumbers over to the house to fix everything and hook the sink back up until Monday. So it was a not so pleasant weekend with no running water in the sink. But we got through it. We are thankful that the subfloor was protected by linoleum that must have been laid when the house was built. And it was not wet. The water was just sitting on the linoleum. So it could have been much worse.

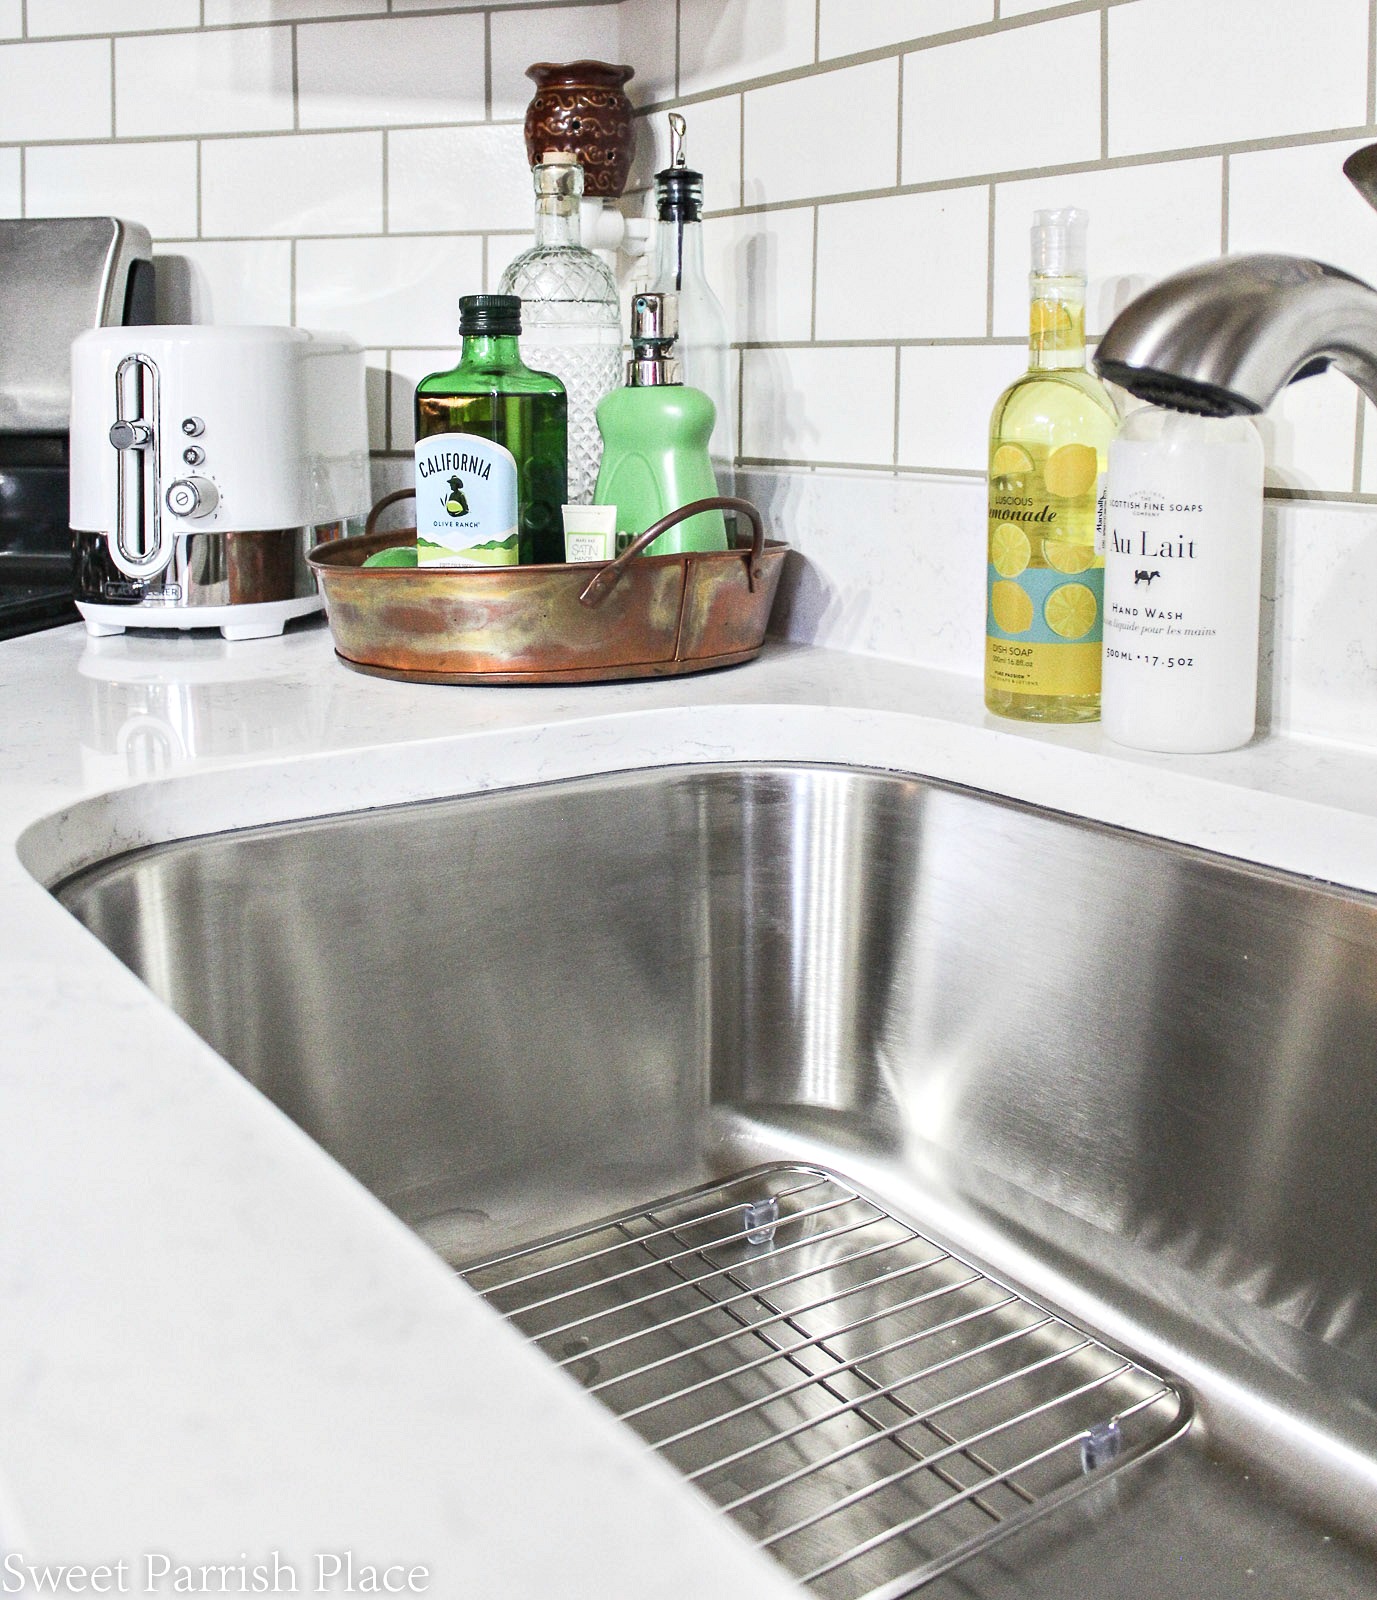
And of course when you get new quartz countertops, you want to replace all of the things, #amiright? I’m trying to hold myself back, and have patience, but it’s difficult, Ha! Slowly but surely, things are going to begin being replaced in here and this entire room will be transformed, on a budget, mind you. One thing that isn’t going to change though, is my DIY faux painted subway tile back splash. I spent many hours painting this and I still like it. I think it still looks good with the new countertops, so I plan to keep it for a while longer. It has held up amazingly well, and I am able to wipe it down easily.

Some of the links in this post are affiliate links, which allows me to make a small commission from your purchase, but your purchase price stays the same.
We also replaced the sink and the faucet. I have never had an undermount sink before, and let me just say that I love it! We went with this Kohler sink. It is a huge single bowl sink, and I am very happy with it. Of course, my dream sink would be a farmhouse sink, but that would have entailed replacing cabinets, which we will not be doing for this makeover. This is not our forever home, so we won’t be making that kind of an investment into this kitchen. I did purchase this flat stainless steel dish drying rack that fits perfectly into one side of the sink. this is where we prop our large baking pans and cookie sheets to dry. And we still have plenty of room to use the sink because it is huge.

I decided to use this copper skillet as a tray to corral some bottles of things we use often. this copper skillet was handmade by a local artist and I bought it at a craft fair years ago. It had previously hung on our pot rack ceiling light, but we are replacing that, so I had already taken everything down from it. This turned out to be a perfect way to use this skillet, and I love the patina against the new countertops.
One thing I did purchase was a new toaster, because our old one was a 4 slice toaster and it was several years old. I decided to go with a smaller white toaster that holds two slices. I went with this Black and Decker toaster I ordered on Amazon. And I am very happy with it. I love the retro vibe I feel like it has. And I love the way it looks on the counter. We do leave our toaster out all of the time and it is used daily.

I am the kind of girl who leaves a dish drainer next to my sink. Call me old fashion, it’s OK. But not everything can go into the dishwasher, and we wash some dishes on a daily basis. I did have a much larger one that was bamboo like this one, but I wanted to scale down so it wouldn’t take up so much of my counter space. So I settled on this matte nickel dish drainer I found at Target. I will probably remove it when I’m photographing the room reveal, but on a daily basis, this will remain. It just works for our family. I also have our Keurig and our Soda Stream out on the counter. It’s real life around here folks! My husband loves his Soda Stream and he uses it almost daily. His favorite flavor is grapefruit, in case you are wondering. I like it the best too.
What I like even more, is these new quartz countertops though! The old countertops were formica and probably 22 years old. So we really feel like we are living in luxury right now. I love the grey veining throughout, and I love the way they shine. It’s not exactly a mirror like sheen, but they do reflect light, unlike our old ones.

Dish drainer | Keurig | Soda Stream
Ahhh this kitchen island, it has been through two little makeovers since we have lived here, and it is about to undergo another one! The first time, we painted the whole island white, removed two cabinet doors, painted the insides grey, and made open shelves. You can read about the first transformation here. Next, we made over the barstools that came with the island. And then, we added legs to the island.
We also decided to forego the two barstools and replace them with this bar height chair you see pictured in these photos today. I actually have 5 of these stored up in our attic from our old home. I had my husband bring one of them down because I wanted to try it here, and it works so much better for us than the stools did! We can only fit one, but when we talked about it, we realized two people absolutely never sit here. And the tall chair is so much more comfortable, we decided to go with it. I may end up painting it a fun color, or just black and white? I haven’t decided yet, but I can tell you that every member of the family has commented about how glad they are that we made this simple change. I have noticed people sitting here a lot more often too, including myself.
Next up on the list for this island is to add a rustic wood top. Sort of like butcher block, but a tad more rustic. I think I have some wood picked out to use for this project. It’s just a matter of having the time to actually do it. I despise the stainless steel top on this island. It is so scratched looking, and just not the look I want in this kitchen.
The light you see above the island, the giant pot rack? We have already said goodbye to it since I took these photos. I didn’t hate the pot rack at all. I just didn’t like it in this space. It took up a lot of visual space in the room, and it didn’t put out enough light. I have always felt like it was too dim in this kitchen. But we fixed that, trust me! I shared the transformation in my Instagram stories on Sunday and even shared a photo of the new light in my feed.

We plan to paint the cabinets, can you guess what color? White of course! I’ve always wanted a white kitchen, and have never truly had one. I painted these cabinets once already, shortly after we moved in. You can see that whole transformation here. And they have held up fairly well, except around the cabinet handles the paint is worn off. I hope to do a better job this time and avoid this happening in the future with the new paint job. I do plan to use a paint sprayer on the cabinet doors, and it shouldn’t be as difficult to paint, since they have been painted once before.
I have not decided on what type of paint I want to use. I would love to know any suggestions any of you wonderful friends might have for me. Because I want it to look great and I want it to last. I am considering using Fusion Mineral Paint. Have any of you used it before? Please share any tips and tricks you have up your sleeves for painting cabinets below in the comments. The cabinet pulls will be changing too, but I haven’t made any decisions about them yet.
I got rid of the kitchen rugs I had because they were getting really gross, and I ordered a runner that will go in front of the entire cabinet area from the sink to the wall. This is the rug I ordered, I hope I like it when it arrives!

I wanted to replace my old utensil holder and when I was out shopping around for a few items for the kitchen, I didn’t really find a utensil holder I liked. But I did find this cute flower pot at Target, and it was just the right size for a utensil holder. The message here is don’t be afraid to repurpose things and use them in unexpected ways. I like thinking outside the box a little. It makes things more interesting.

Flower pot utensil holder | Copper Mugs | Bamboo Cutting Board
I like how this pot has an aged look. I always like things from Target’s Smith & Hawken Line. That is the brand of this planter.


On the opposite side of the kitchen from the sink is this little nook you see below. There are some cabinets and the refrigerator. I am considering removing the cabinet doors here and making it resemble open shelving, but haven’t made my mind up quite yet. But behind those doors its a disaster, plus one of the boards is bowed in the middle. So I will have to replace the shelves inside the cabinet first, which should be fairly easy. I will have to do some rearranging too so that my pretty things are displayed. I actually plan to do a major purge in my kitchen cabinets before I paint to get rid of things I don’t use and make room for other items that need a place.
I hate having a microwave on the counter. But in this kitchen, I have no choice. So it will stay right here. Not without some kind of a gut job, which isn’t going to happen. We want to improve the kitchen without changing anything structurally.

Let’s talk about this little pop out nook in my kitchen with the windows, and the door that leads out to our deck. We replaced this door back in the Fall, but it was too late in the year to paint it. So I plan to paint that door black, which is what color the old door was painted. I am slowly working towards all black doors in our home. I love black doors with white trim, and it hides a lot of fingerprints, trust me. I plan to paint the walls in this little nook white.
The curtains are new. I just hung those after the new quartz countertops were installed. I wanted something else in this space to change up the look a little before I could get to painting the cabinets and walls, and these white curtains did the trick. You can see the old cafe curtains that I made myself here. The old curtains were great for a few years, but I was ready for a change in this room. I decided to use full length curtains, and to just hang one on each window and then swag each one over. I used jute twine to tie these curtains back on each side. I held them back with a tiny little thumb tack that holds the jute to the wall in the back.

I love these storage baskets in the photo below. I bought them years ago at Pier One, and they are just so useful. I also bought a new pot for this plant. It was in a wicker basket, but the basket was starting to fall apart, so this one will be much more durable. I found it at Marshall’s recently, so you may be able to find one at your local store. They had a great selection of planters when I was there. The plant is a plant that I took home from my Pap Pap’s funeral about 14 years ago, and I have managed to keep it alive for all of these years. The leaves near the bottom are tattered because I can’t keep my dog from trying to chew on it. any tips to keep dogs from chewing on this plant?

This little wall you see below is going to change drastically. I have plans to put open shelves going up this entire wall. This should give me some more room for storage. And maybe a little space to display pretty things as well. The red stool was a yard sale find.

I found this vintage bar cart at a vintage store and brought it home and painted it. You can read all about that here. This was below the opposite window, but I moved it over here to make room for the upcoming shelves we will be installing in the future. Inside of the RC crate are some things that we use almost daily, and my husband’s K cups are in there, so this little small change seems to be more convenient for the family. My husband has even commented on how much he likes this set up. The Keurig is on the counter to the left of the bar cart. So it is in a good spot for now.

The next project I tackle in this kitchen will be the back door and the walls in this little nook. That is going to be an easier task than painting the cabinets, so I’m planning to save the cabinets for after my son graduates high school and track season ends. I may be able to get this nook finished before then. You might notice in the photo below that our new back door has a doggie door. We specifically chose one that did so that our dog can go out on the back deck whenever he wants to. But lately, he seems to be pooping out there, so we have to watch closely.

I would love to know what you think about our new quartz countertops. Also, if you have quartz counters, share your experience with them and how do they hold up? Stay tuned because I will be sharing all of our progress as we go. But we are planning on taking this one slow and easy because we have a lot going on in our personal lives with a son graduating high school and a daughter moving to Miami. So we aren’t putting pressure on ourselves to be up against deadlines. I love to share little bits of progress over on Instagram so please give me a follow over there and you can stay up to date on goings on around our kitchen!
Love fashion, DIY, crafting, all things vintage and thrifty? Stick with me, I’ve got you covered!
Sign up to get my posts delivered to your inbox here
Follow me here:
You may also like:
Faux Painted Subway Tile Reveal

How We Added Legs To Our Kitchen Island

Trashtastic Tuesday- Barstool Makeover

Wow it’s look amazing. These are really inspiring. Hope so your experience are helpful for all who going for kitchen makeover. Personally i am following these when i makeover my kitchen. If you had more insight i will greatly appreciate it. Thanks for the sharing your informative article with all of us.
Leo Odom recently posted…How To Make Incredible Homemade Bread
Did you make the farm fresh sign? Your KITCHEN is charming. Makes me what to com e and seat at you table for a cup of coffee or maybe you will offer me a seat in your new redone white chair.
Hi Jane! No, the sign was a Target dollar spot find! Thank you so much though! You made me smile this morning!
Hi Nicki, the quartz countertops look really nice. We actually found a leak under our sink cabinet not long ago as well… it was really bad… the garbage disposal had disconnected by us just putting way too many bottles and items under the sink cabinet. It was subtle, but we didn’t spot the leak before due to all the things in front 🙁
#amiright ? You are! Things never end at home and you’re always looking for a new look, improvement of some sort etc. I actually thought those were ceramic tiles on the backsplash… really nice work!
I love the painted tile backslash. That is a fantastic idea!! Happy to meetup on the link party. Love your blog.
Thank you so much Kippi! It has held up beautifully!
Hi, GIRL!!!!! Your kitchen looks amazing. Great job 🙂
Amazing….you shared very informative blog. Thank you sharing with us.
The grey veining really makes the quartz stand out. I want to try something similar with my own kitchen countertops. Also, the mug tree idea is super cute and I love that it saves space. Thanks for this!
Jennifer Sarah recently posted…5 Ways to Spice Up Your Kitchen
Thank you so much! I am still loving my countertops!
Quartz countertops in kitchen make it look dashing and stunning. The biggest advantage of quartz countertop is easy installing and placing of kitchen items without any worrying about surface textures and polish shining.