Sweet Parrish Place

I'm the girl with champagne taste and a tight budget

  • Home
  • About
    • About Nicki
    • Contact Us
    • Blog Love
    • Link Parties
    • Advertise
  • Home Tour
    • Seasonal
    • Every Day
  • Projects
    • Trashtastic Treasures
    • Holiday
    • Decorating
    • DIY
    • Crafting
    • Paint Projects
    • Cleaning/Organization
  • Style
    • Fall/Winter
    • Spring/Summer
    • Sweet Parrish Place Style
    • Tips/Tricks
    • Shop My Favorites
  • Travel
  • Lifestyle
    • Family
    • Decor
    • My Favorites
    • I’m Loving It
    • Personal

Brown Paper Floor Reveal

July 15, 2013 By Nicki 34 Comments

I have been waiting for this day for a long time!  I researched and planned for a long time.  I even did a post all about  brown paper floor.  And I am so excited to say that my brown paper floor is finally ready to be revealed!  Are you super psyched to see them?  You can read about how these floors are holding up by clicking here.

DIY brown paper floor

I started these floors on June 24.  I finished them on July 11.  It took me way longer than I had planned.  I feel like I spent most of my summer break on these darn floors!  But it ended up being worth it because I love them!  I decided before hand to divide this task up into two sections.  I started with the section where the laundry closet is.  I did this for two reasons.  The first reason was because I needed to remove the washer and dryer from the closet, and put them in the other half of the hallway.  I would have rather done that before I had the paper floors completed.  The second reason was that I figured I could use the laundry closet as my learning curve, because most all of it would be hidden underneath the washer and dryer.

First, I had to remove the carpet from the half of the hallway where I would be placing the washer/dryer.  That was fairly easy.  Next, LC pulled out the washer/dryer.  Then I had to remove both the linoleum and the top layer of sub floor from the half of the hallway and closet I was planning to start with.  That was the hardest part of the whole project, and the most difficult thing I have EVER done.  Hands down.  And I am still in awe of myself that I did it.  I wish someone had video taped the event.  And trust me, it was an event!
Once that sub floor was removed, we found a problem.  The sub floor was wet, and it was coming from the utility closet right behind the laundry closet.  The sub floor was moldy and mildewed, and it stunk!  All of the flooring I removed stunk to high heaven.  Thank God it is out of my house.  That is all I have to say.  We had to have someone come over here three different times before it was finally fixed, and I am not even going to bore you with the details.  Just know that it is fixed, finally.  So all of that delayed me.  I needed a dry floor before I was willing to risk laying paper on it!  Ok, now for some pictures of the process and the finished product.  I will go into details about the process in between pictures.

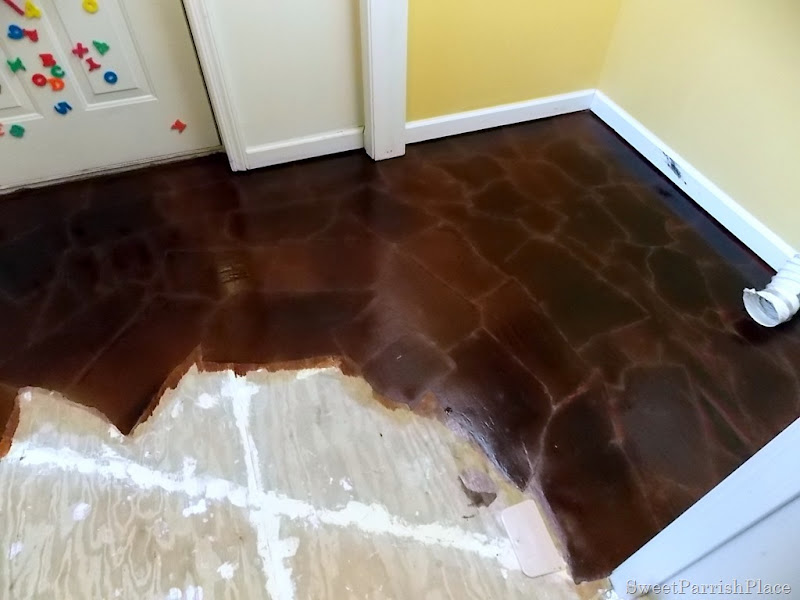
This is the laundry closet.  After the paper was glued down, and before stain.  Before I started it, I painted the walls in this closet.  I used a buttercup yellow that was left over from when I painted my kitchen cabinets.  The walls in the hallway are going to be a light grey, so I thought a little pop of yellow when the laundry doors are open would be cute.

DIY brown paper floor
These are some close up shots of what it looked like before stain.  I did paint the baseboards in here too, after the floor was finished.  In this shot, you can see the small bucket and paint brush.  this is what I used to glue the paper down.  I mixed the glue and water up in the bucket, and used that brush to glue it all on.  First, I painted the glue onto the back side of the paper, then I placed it where I wanted it on the floor, smoothed it out and got out all of the air bubbles with a straight edged rubber scraper tool, then painted more glue on top of each piece.  I overlapped each piece by an inch or so.  I used straight edges to go around the walls.
DIY brown paper floor

How I laid my Brown Paper Floor:

After I had it all glued down, I let it dry for about 24 hours.  I used two different tutorials when I did this floor.  The first one I referred to was this one from Lovely Crafty Home.  But once I started reading her tutorial, she gave a link to a video tutorial  from An Oregon Cottage that I also watched and referred to.  I kind of took advice from each tutorial, and suited it to fit my own taste.  If you are interested in laying a floor like this, I highly recommend that you read the tutorial and watch the video.  Both offer excellent advice and I could not have done it as well as I did without the advice of both.  I am not giving you a full tutorial here, because both of the tutorials I used were excellent, and I do not feel the need to rewrite the book.
DIY brown paper floor
After the glue had dried over night, I applied the stain.  I used a big pad that was specifically for oil based stain.  It did not have a long handle, because I was doing a fairly small area so I did not feel that I needed a long handle.  This is what the floor looked like after I stained it.  I chose the color of the stain based on a picture I took of my wooden stairs.  I wanted the floor to match.  I used Minwax oil based stain in red oak 215.  It turned out darker than I thought it was going to be, but it is nothing I can’t live with.  I let the stain dry over night.  It was still tacky the next day, but after the first coat of polyurethane dried, the tackiness went away.  The type of polyurethane I used was Varathane water based polyurethane for floors.  I applied 6 coats, and let each coat dry for at least 2 hours.  I applied it with a 3 inch flat brush.  I applied it with light coats.  In the tutorial I used, she sanded it after the first coat, and before the last coat.  I did not sand mine at all, and I think it is fine.  It is smooth under foot.
DIY brown paper floor
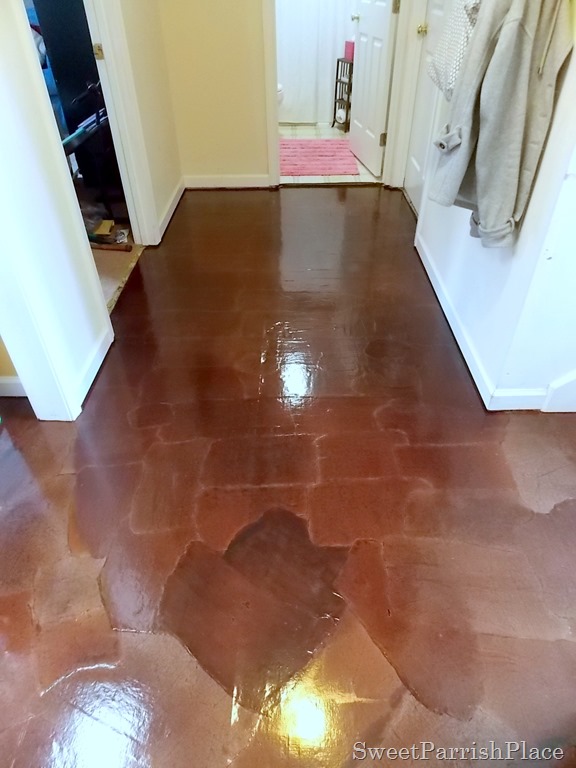
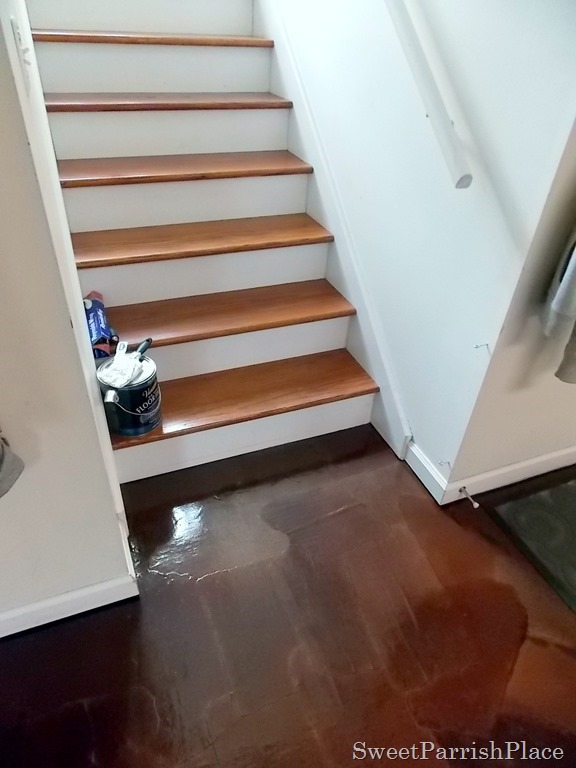
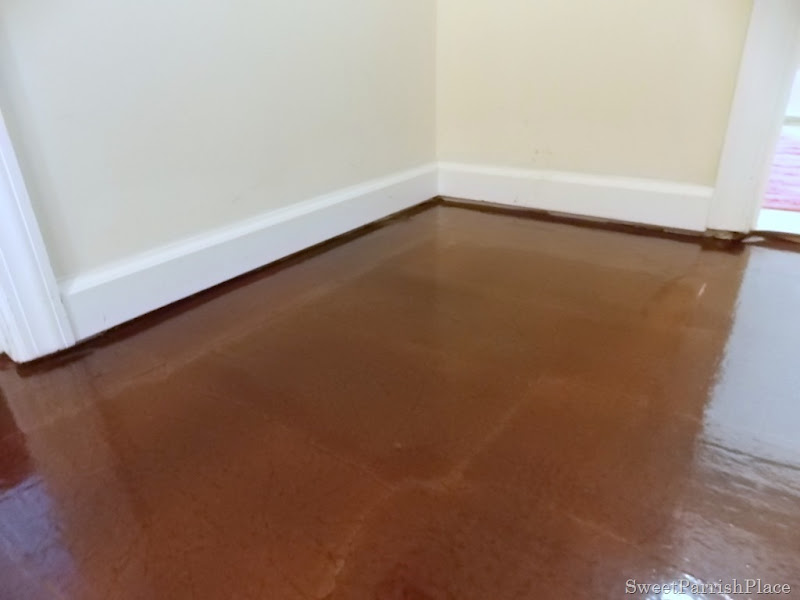
And now here are several pictures of the floor completely finished.  Excuse the mess, this area was a work area for quite some time.  This is what you see as you are walking down the stairs.  The closet doors will be re installed soon.
DIY brown paper floor
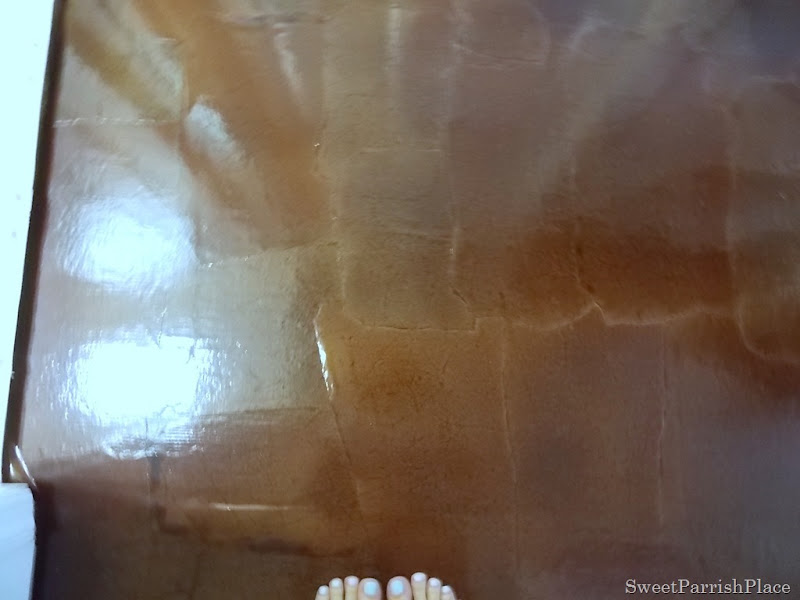
Do you see my toes?  Do you see the darker area my toes are pointing at?  This is a mistake.  I made the mistake of light placing my hand down on the floor to test if the stain was dry.  Much to my dismay, I left a handprint!  I had no choice but to go back over it with more stain.  I tried to do it very lightly, but it made the area darker.  I am not sweating it too much though, because it will eventually be covered with a rug.
DIY brown paper floor
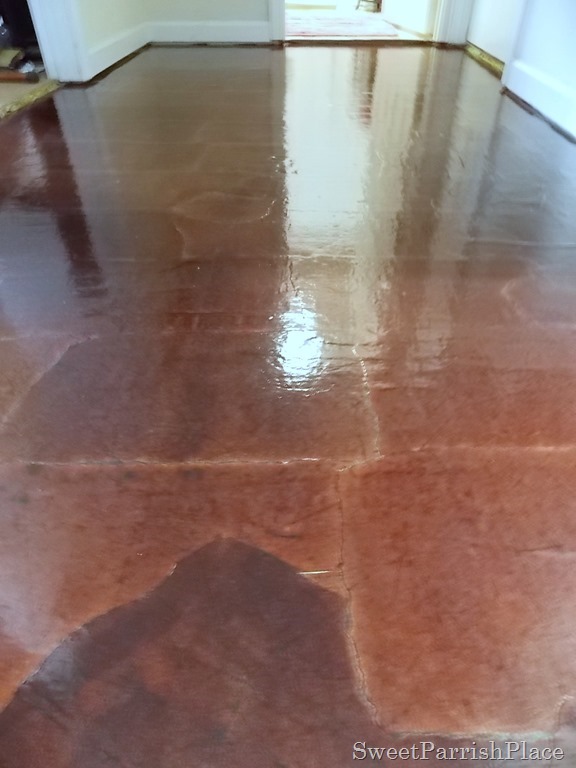
Do you see these small roundish pieces?  There are 4 of them.  There was places that the paper just would not stick to the floor, so I covered them and glued down these pieces over that.  It stuck the second time around.  these are not that noticeable, and the bench that goes in the hallway will cover them.
DIY brown paper floor
Obviously, we need to install quarter round around the baseboards.  My dad is going to install it for me next week.
DIY brown paper floor
We also need three thresholds.  I am going to stain them to match the floors.  Dad will be doing those for me as well.
DIY brown paper floor
These baseboards need painted desperately.  this is just to show you the shape they are in.
DIY brown paper floor
Since the floor has been finished, I have also painted the walls and the trim around the doors.  I will paint the baseboards after the quarter round is all finished.  What do you think of my new floors?  We all love them!  We are so glad that we no longer have the ugly linoleum and gross carpet down there.  Here is a reminder for you of what the hallway looked like before.
DIY brown paper floor
And here is a side by side view of the before and after for you.
DIY brown paper floor

I will show you this hallway step by step as I get it finished.  Next thing I will be showing you is the new paint.  It looks and feels so much cleaner and “ours” down here.  I would be happy to answer any questions you may have about these floors if you just ask me in the comment section!  Have a great week!

Do you have champagne taste and a tiny budget like me?  Love fashion, DIY, crafting, all things vintage and thrifty?  Stick with me, I’ve got you covered!
Sign up to get my posts delivered to your inbox here
Follow me here:

Facebook / Twitter / Instagram / Pinterest / Bloglovin / Google + / Stumbleupon


You may also like:

One Year Later: How My Brown Paper Floors Are Holding Up

how my brown paper floors are holding up- one year later

Faux Painted Subway Tile Reveal

faux painted subway tile

Faux Painted Subway Tile- The Tutorial

Faux painted subway tile tutorial

Filed Under: Before and After, Brown Paper Floors, DIY, laundry room, mud room, My Projects, Paper Bag Floors, Uncategorized

Comments

  1. Christine Graves says

    July 15, 2013 at 4:45 pm

    I am gasping thru this whole post….your floor looks like a hand made tile…Sweet!

    All that hard work paid off…You did a great job.

    XO,
    Christine

    Reply
    • Nicki Parrish says

      July 15, 2013 at 10:44 pm

      Thank you Christine! So glad that you like it!

      Reply
  2. Marie Blackburn says

    July 15, 2013 at 4:58 pm

    Those floors look so cool! My gosh it looks like a lot of work but in the end you have flooring that is uniquely yours and tells a story. Love it!
    Marie@InteriorFrugalista

    Reply
    • Nicki Parrish says

      July 15, 2013 at 10:45 pm

      Thank you!

      Reply
  3. Traci Creel says

    July 15, 2013 at 6:03 pm

    Wow! I have been waiting to see your new floors. I love the dark color, the floor has such a rich look now. So much better than the lino and carpet. I have always wanted to try this but I don't have any place where it would work in my current house. I have to find something that I can cover with brown bags, maybe a table top.
    Great job and keep up the great work.
    Traci

    Reply
    • Nicki Parrish says

      July 15, 2013 at 10:45 pm

      A table top would be a great idea! it kind of looks like leather!

      Reply
  4. Jillie says

    July 16, 2013 at 11:45 am

    It is gorgeous! I am so proud of you and all of your hard work! Absolutely beautiful, just like you! 🙂

    Reply
    • Nicki Parrish says

      July 16, 2013 at 3:46 pm

      Wow! That was really sweet! Thank you!

      Reply
  5. andrea@townandprairie says

    July 16, 2013 at 12:01 pm

    That was A LOT of work! WoW! It looks so natural and like it was meant to be there…great job!

    Reply
    • Nicki Parrish says

      July 16, 2013 at 3:47 pm

      Thanks you so much!

      Reply
  6. marty (A Stroll Thru Life) says

    July 17, 2013 at 12:49 pm

    Oh my word, I've seen this done on a wall, but never the floor. Your floors look amazing. Wow, tons of work, but it really looks fabulous. Thanks so much for joining Inspire Me. Hugs, Marty

    Reply
  7. Pat@Life At Lydias House says

    July 17, 2013 at 9:53 pm

    I know this was a lot of work but it was certainly worth it! It looks fantastic!

    Reply
  8. Amber Koogler says

    July 18, 2013 at 7:38 pm

    Holy cow! I am totally amazed by these floors! Thank you for sharing at Give Me The Goods!

    Dimples & Pig Tales

    Reply
  9. Artsy Chicks Rule says

    July 19, 2013 at 2:26 pm

    Very cool! And much better than before!!Thanks for sharing on Project Inspire{d}.. Pinned!
    Nancy

    Reply
  10. Meredith S says

    July 19, 2013 at 8:01 pm

    I have never seen anything like this before! So cool! Thanks you for sharing these gorgeous floors at Pin it Monday Hop! 🙂

    Reply
  11. Kathryn Ferguson Griffin says

    July 21, 2013 at 5:42 pm

    Absolutely fantastic! You are one of the fan favorites today at the Sunday Showcase from the Make it Pretty Monday party at The Dedicated House. Pop on in and grab a feature button for your blog. Here is the link to today's Sunday Showcase. http://thededicatedhouse.blogspot.com/2013/07/sunday-showcase-from-make-it-pretty_21.html Hope to see your prettiness again tomorrow at the bash! Toodles, Kathryn @TheDedicatedHouse

    Reply
  12. Rachel Paxton says

    July 22, 2013 at 4:04 pm

    I can't believe how hard you worked on this, Nicki… It's awesome!!

    Rachel @ Maison de Pax

    Reply
  13. Suzan Sweatman says

    July 26, 2013 at 2:16 am

    It's AMAZING – just beautiful!!!!!!!!!!
    Thanks so much for sharing this –
    XOXO

    Reply
  14. Christine Vandormolen says

    July 26, 2013 at 3:27 pm

    omg somehow I missed that post Nicki, you have been a busy bee…..what a task to take on. I love the color of the floor. Great job

    Reply
  15. Roeshel says

    July 28, 2013 at 7:28 pm

    Wow, Nicki! Awesome reveal! They look gorgeous! I'm sharing a link back in this week's DIY highlights. 🙂 Thanks so much for sharing!

    Reply
  16. Jennifer says

    July 28, 2013 at 10:37 pm

    These are beautiful…I know that yours have only been finished for a few days now, but do you think this would work in a dining room? Or do you think the poly would look scratched with kids dragging chairs regularly?

    Reply
    • Nicki Parrish says

      July 31, 2013 at 2:16 pm

      Jennifer,

      I think they would be fine in a dining room as long as you have an area rug under the place where the table and chairs are. I would not risk pulling chairs in and out frequently on these floors.

      Reply
  17. Lauren Davison says

    July 30, 2013 at 12:11 am

    Just found your blog from DIY highlights and I'm still in shock, paper bags!??! wow! It looks very nice and definitely an upgrade!
    Lauren
    http://realhousewifeofnova.blogspot.com

    Reply
    • Nicki Parrish says

      August 17, 2013 at 3:45 am

      Thank you so much!

      Reply
  18. ourwolfden says

    August 2, 2013 at 1:02 pm

    Very cool. That turned out really nice. I would have never guessed what it was if you hadn’t told me!

    Reply
    • Nicki Parrish says

      August 17, 2013 at 3:45 am

      Sweet! Thanks!

      Reply
  19. Krista thehappyhousie says

    August 3, 2013 at 4:05 am

    They look so cool Nicki! I love them… great texture and warmth. Amazing job!!

    Reply
    • Nicki Parrish says

      August 17, 2013 at 3:40 am

      Thanks very much!

      Reply
    • Nicki Parrish says

      August 17, 2013 at 3:44 am

      And BTW, I love your blog and I am so thrilled that you stopped by mine and left a comment!

      Reply
  20. Sheryll And Critters. says

    August 4, 2013 at 2:18 pm

    I love it….. and great job. I am gearing (psyching myself) up to do my floors as well. Will start on a closet in my bedroom (to see how it goes and get my nerve up) and then do the entire bedroom starting in the furthest corner from the door……. and then eventually I want to do my entire living room and another bedroom I use for my home office.

    Wish me luck?

    Oh yes, I found you via Roeshel's "DIY Showoff Party".

    Reply
    • Nicki Parrish says

      August 17, 2013 at 3:39 am

      Thanks so much for the sweet comment! Good luck, show me when you are finished!

      Reply
  21. The Domestic Fringe says

    August 15, 2013 at 10:44 pm

    I'm shocked by how fabulous this is. I LOVE your floors! We have terrible floors in our house. I painted most of them, but it's only a temporary fix. You've got me thinking now…

    ~FringeGirl (thedomesticfringe.com)

    Reply
    • Nicki Parrish says

      August 17, 2013 at 3:39 am

      Awesome! Thanks so much!

      Reply
  22. Barbara Sawyer says

    August 28, 2013 at 11:50 am

    Beautiful! A lot of work paid off! You have created a unique piece of art as well!

    Reply

Leave a Reply Cancel reply

Your email address will not be published. Required fields are marked *

CommentLuv badgeShow more posts

Hi, I'm Nicki I'M THE GIRL WITH CHAMPAGNE TASTE AND A TIGHT BUDGET. I'M SO GLAD YOU'RE HERE!
  • Bloglovin
  • Facebook
  • Google+
  • Instagram
  • Pinterest
  • Twitter

NO PLACE LIKE HOME

No Place Like Home

ORC Bathroom Makeover

One Room Challenge Week 6 Kids-Guest Bathroom Reveal

One Room Challenge Week 6 Kids-Guest Bathroom Reveal

  Hey friends!  I am so excited because today is … [Read More...]

ARCHIVE

ORC

Shop My Faves!

Spring Trends
PicMonkey Photo editing made of win
Get Sponsored by Big Brands

SheKnows

INSTAGRAM

Recent Posts

  • Totally Terrific Tuesday #142
  • What To Take To A Blog Conference
  • Totally Terrific Tuesday #141

Archives

Find It Here

Copyright © 2017 · Sweet Parrish Place